Contents
- 1My Photography Journey
- 2Best Camera for Travel Blogging
- 2.1Olympus EM10
- 2.2Olympus EM5
- 2.2.1Pros of the Micro Four Thirds range
- 2.2.2Cons of the Micro Four Thirds
- 3Micro Four Thirds Lenses
- 3.1Zuiko 14-42mm
- 3.2Zuiko 40-150mm
- 3.3Zuiko 30mm Macro
- 3.4Zuiko 12-40mm Pro
- 3.5Zuiko 75-300mm
- 3.6Zuiko 12mm prime
- 4Best Camera Accessories
- 4.1Tripod
- 4.2ND Filters
- 4.3UV filters
- 4.4Camera bag
- 4.5Memory card
- 4.6Lens cleaning wipes
- 5Editing Tools
- 6Improving your Photography
- 6.1Tips for shooting Long Exposures with Micro Four Thirds
My Photography Journey
I have always had the ‘eye’ for a good photo, completely innately, but for years primarily shot on my phone with the occasional compact digital camera. Many of the photos you have seen on this site were taken on a phone, and these days the phone cameras are so good a camera isn’t even a must have travel item anymore.
As a photographer friend said to me, the best camera is the one you have.
I never had any real desire to transition to a DSLR, put off by the size and weight that made it impractical for the active style of travel I enjoy.
I am not, and will never claim to be, an expert in photography, in fact I am an eternal student. I wont know much of the terminology or some of the techniques, but I am willing to try different things and tools to get the results I want. I can show you the results I’ve achieved with a good eye, a little practice and some equipment.
This post contains affiliate links. Making a purchase thorough these links earns a small commission at no additional cost to you and is a great way to show your support for this site.
Best Camera for Travel Blogging
Whether you’re a travel blogger like me, or just after the best backpacking camera, size and weight are going to play a major part in your decision.
I had finally reached the point of considering a DSLR and mentioned it in passing to my sister, who declared she had one sitting in a box , unopened for years that had been an unwanted gift. Enter my first interchangeable lens camera, though it wasn’t quite a DSLR.
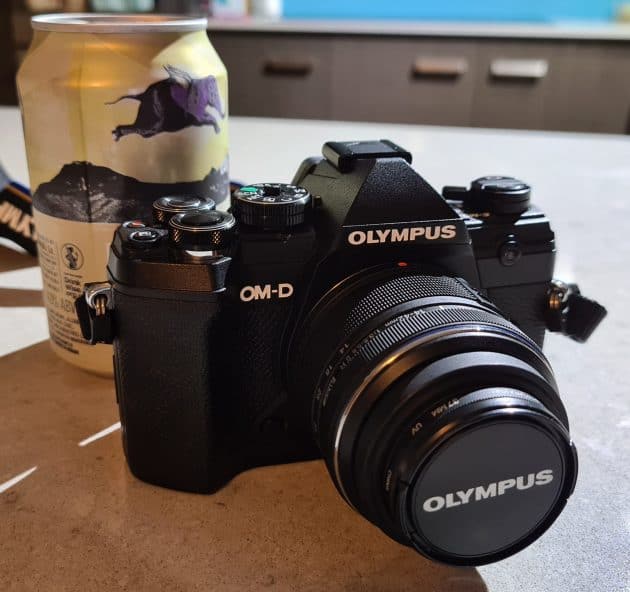
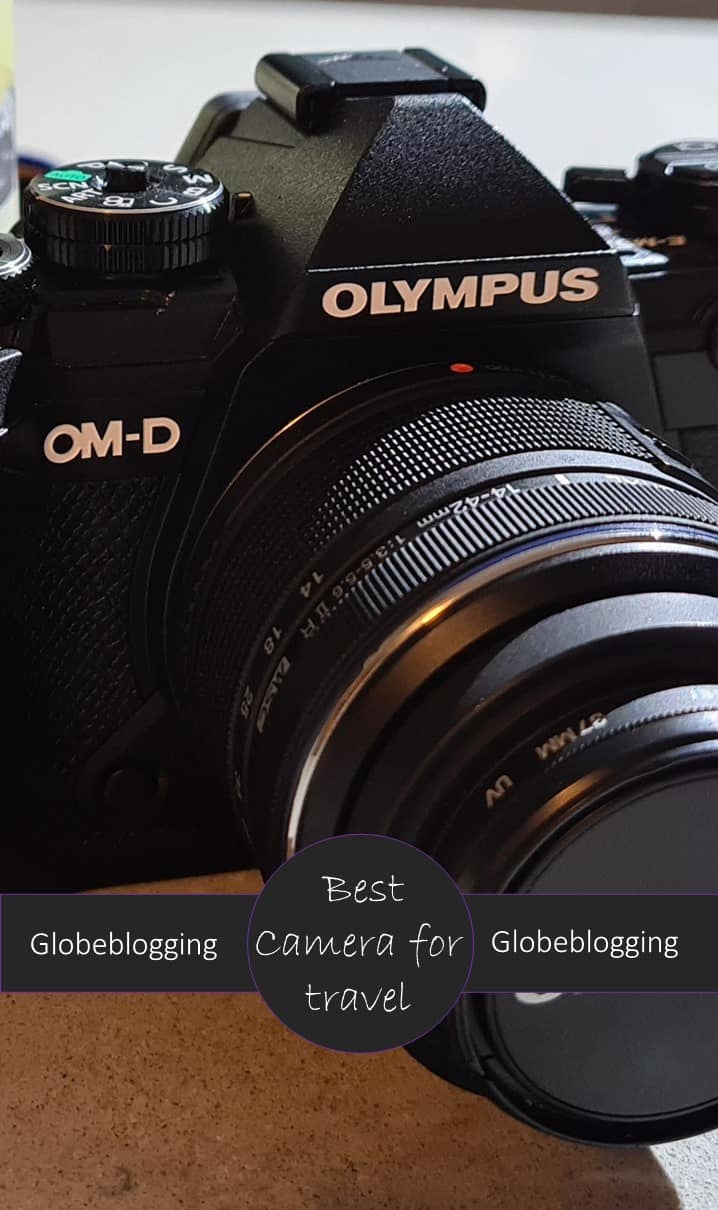
Olympus EM10
Prior to my sister handing me that box, I had never heard of a Micro four thirds camera.
So named for the aspect ratio of 4:3 of the sensor, which is roughly a quarter the size of a DSLR, the smaller sensor enables a smaller package and smaller lenses. This gives you a much smaller and lighter camera while still having the ability to shoot on full manual mode. The mirrorless technology also captures brighter colours due to the angle of the light hitting the sensor. The Micro Four Thirds cameras are exclusive to Olympus and Panasonic.
I could literally throw the Olympus EM10 in my handbag, making it perfect for both travel and more local adventures. The crop effect of the sensor doubles the aperture and focal length of the lenses, so 50mm focal length becomes 100m equivalent to a full frame DSLR.
The below shot was before I even knew what I was doing, on one of my first hikes with the EM10. It was shot on Auto at 1/200s Shutter, 42mm and F8 and cropped in.
Check out the Olympus EM10 Mark IV now
Psst…
If you aren’t in Australia check it out on the US or UK Amazon
Olympus EM5
When it came time to upgrade I had a choice, the Olympus EM10 Mark II was well within my price range. Or I could spend a little more and get the higher level of weather protection offered by the EM5 Mark III, as well as the higher Megapixel capacity.
I chose the EM5.
Soon after the EM10 Mark III was released, which leveled up on the Megapixels.
The EM5 is a fraction bigger and heavier than the EM10, but not enough to be a factor in the decision. Otherwise the functionality predominantly appears the same.
The EM5 has now been replaced with the OM5.
Or,
If you aren’t in Australia check it out on the US or UK Amazon
Pros of the Micro Four Thirds range
In a nutshell;
- Size
- Weight
- Price
The Micro Four Thirds line has the same interchangeable lens and manual shooting capabilities as a DSLR, at a fraction of the price, weight and size of one. This extends to the lenses too.
It’s perfect for the people looking for more technical photographic capability than a point and shoot compact camera, or a superzoom bridging camera but like me, find the package of a DSLR prohibitive. Being mirrorless there are also less moving parts within the camera that can malfunction.
They really do fantastic on the landscapes and capture colour beautifully!

Cons of the Micro Four Thirds
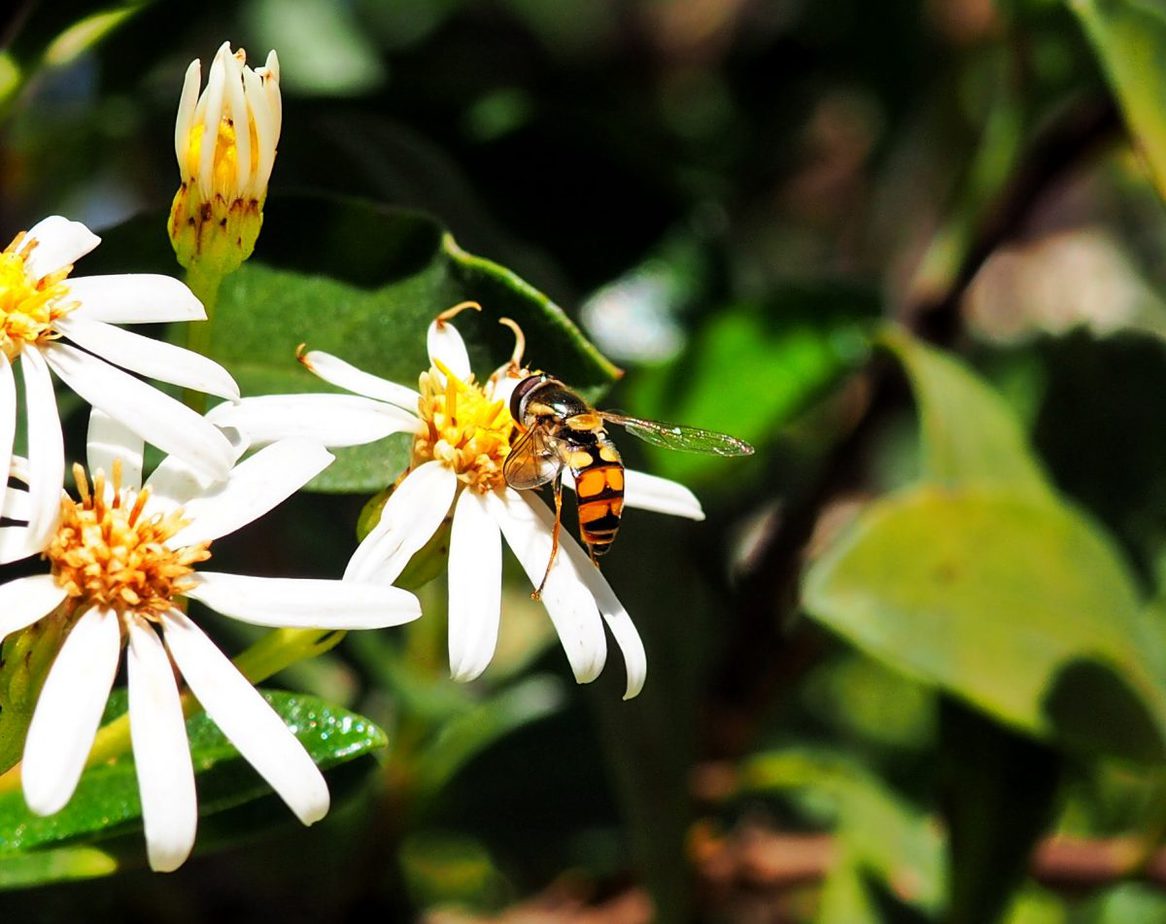
Due to the size of the sensor, these are camera’s that are less sensitive in low light conditions, though if you understand how to manipulate your settings you can improve your results somewhat. It will also mean that there are limitations with regards to enlargement and cropping of images, due to the amount of megapixels the sensor is able to capture. This will be evident in lower light conditions but can be improved with editing. The Hoverfly image above is significantly cropped.
The adjustment in the aperture also means it changes the depth of field, so it can be harder to get good bokeh effects. Again this is something you can adjust for.
The presence of an Electronic View Finder means an electronic circuit board that can malfunction, which is what went wrong with my EM10. I could still shoot using the screen and made do until I chose my replacement.
Perhaps the biggest irritant for me of the Olympus is that the battery charger still runs off a plug, rather than a USB, so it is harder to charge on the run. The batteries are interchangeable however, so I now have the EM10 battery on hand as a spare.
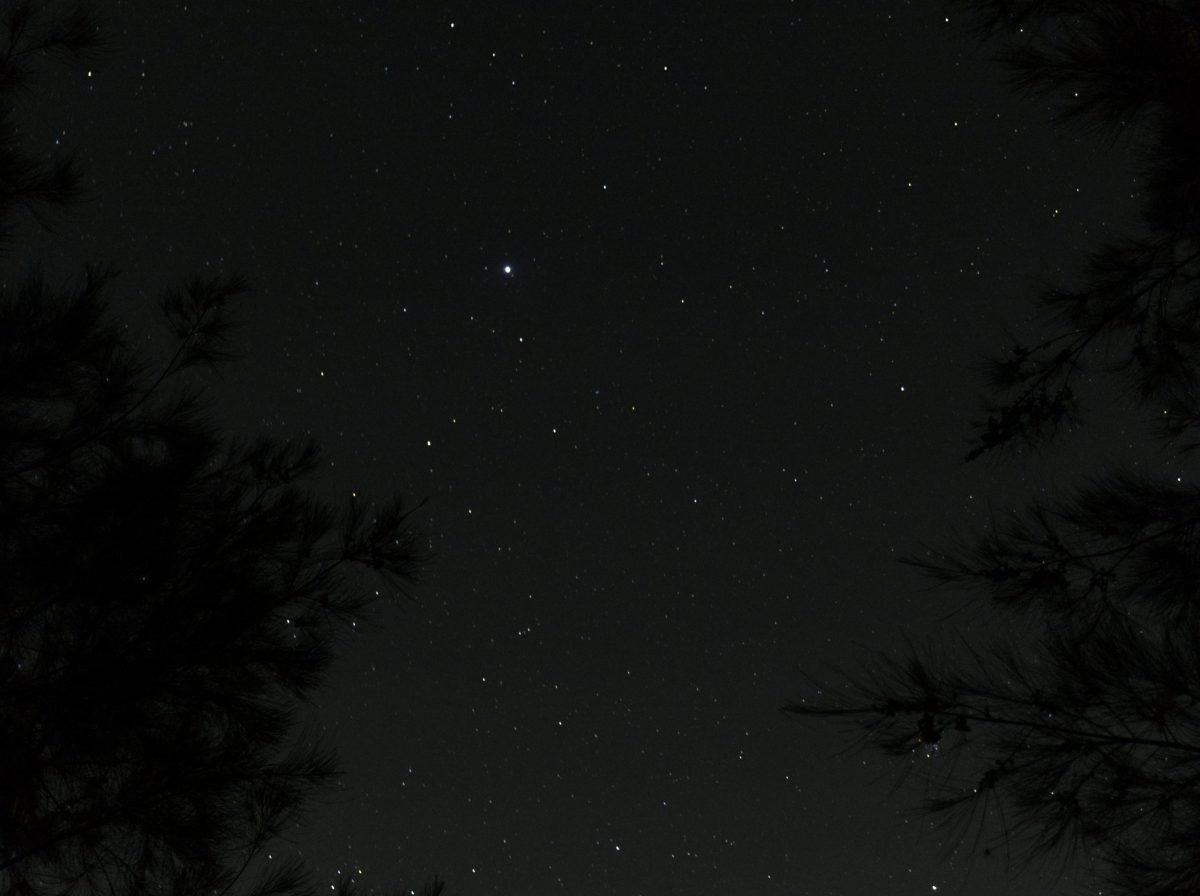
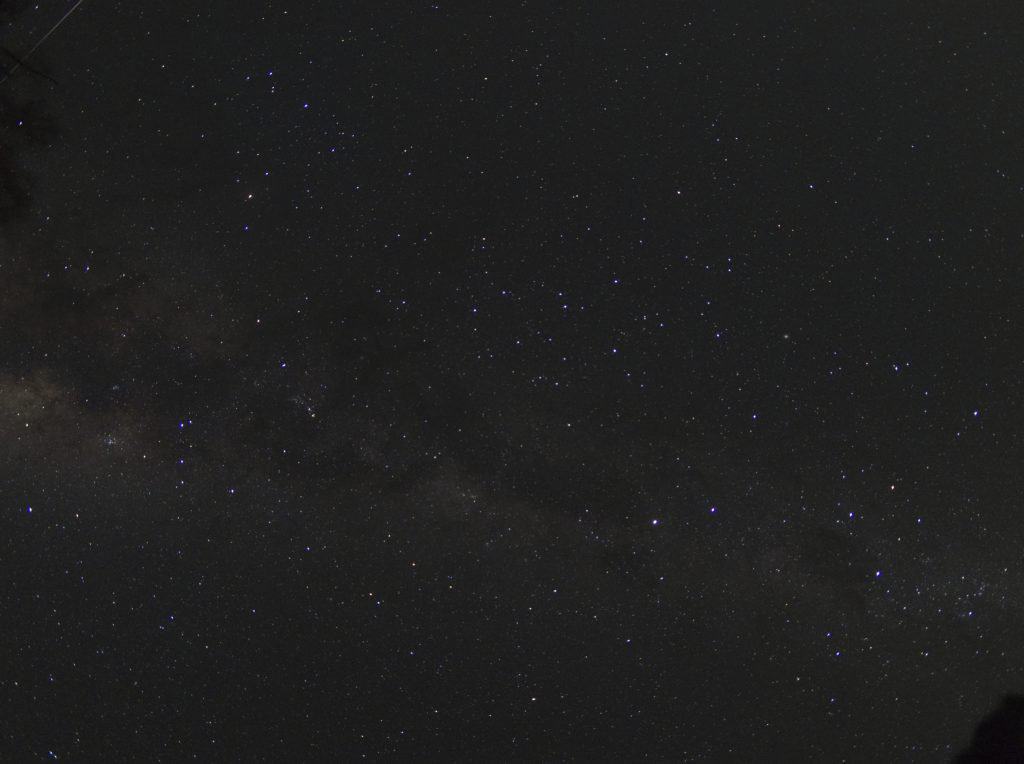
This range of cameras are not normally recommended for astrophotography due to the cropped sensors, but the EM5 still gives it a decent go. The photo below was taken on my kit lens, but I’ve since invested in an Astro lens and you can see the results on my lens reviews.
Micro Four Thirds Lenses
Any Micro Four Thirds lens is interchangeable with any other Micro Four Thirds camera.
The lenses you want will always be dependent on the type of photography you want to do, but I’ve found three lenses cover mostly everything I want, and I’d rate them as the best micro four thirds lenses for travel.
Zuiko 14-42mm
Equivalent to a 28-84mm lens on a full frame camera, this is the kit lens for the Olympus range and its the one that spent the most time on my camera before I invested in the pro. It’s a crisp, wide-angle lens which is great for a range of purposes.
Check out the Zuiko 14-42mm lens now
Or,
If you aren’t in Australia check it out on the US or UK Amazon
Zuiko 40-150mm
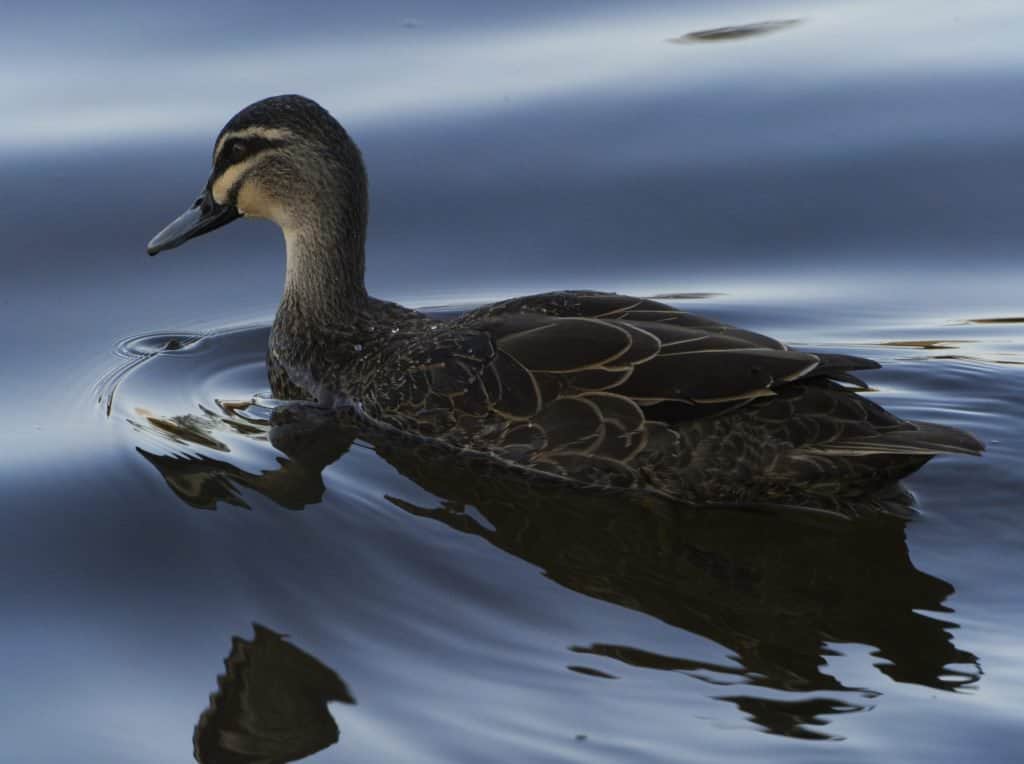
Next I found I needed a greater range of distance so the first lens I actually purchased was this Telephoto lens, which is great for those close ups of subjects that are a little further away, or just to get a clearer image of a subject in the distance. I don’t leave this lens on all the time because the focal length is too far out for closer photos, but before I invested in a bigger zoom lens it was always in my bag.
Check out the Zuiko 40-150mm lens now
Or,
If you aren’t in Australia check it out on the US or UK Amazon
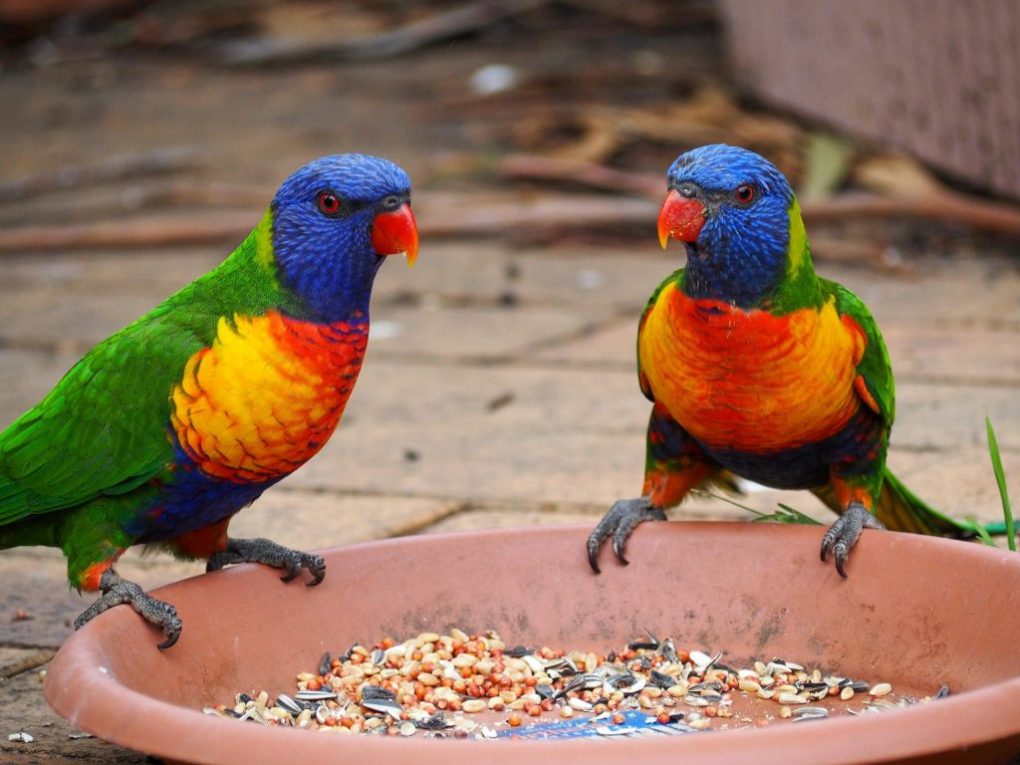
Check out more of my bird photos in my article on native Australian birds.
Zuiko 30mm Macro
I got this lens for no other reason than macro photography is so much fun! It allows for that really close up photography.
Check out the Zuiko 30mm Macro lens now
Or,
If you aren’t in Australia check it out on the US or UK Amazon
I still love each of these lenses, but I’ve expanded my kit somewhat in the past 18 months, and I tend to use a couple of the new lenses rather than my original ones.
Zuiko 12-40mm Pro
For those unfamiliar with Pro lenses, they can usually be identified by a red line circling the lens. They contain more glass than standard lenses for sharper images, but that also means they are heavier and bigger and come with the higher price tag. I particularly bought this lens due to its compatibility with the in-camera focus stacking option in the EM5, but its since replaced my kit lens as the one which is always on my camera when I’m not shooting wildlife. This is a wide angle lens but the 12mm focal range means it can also perform well with Macro shots, while the F2.8 also makes it suitable for Astro if you don’t want to take multiple lenses out with you.

Check out the Zuiko 12-40mm lens now
or
If you aren’t in Australia check it out on the US or UK Amazon
Zuiko 75-300mm
I invested in this lens for the greater telephoto capability of the 300mm focal length. A pro friend of mine that also shoots on Olympus recommended the 300mm prime as sharper than this one, but not only was the price prohibitive for me but it is a bigger lens than I would in reality want to carry around with me. I was delighted with the quality of the wildlife shots I’ve achieved with this lens.
The one drawback to this lens is that it doesn’t have a wide aperture at F4.8 so you may have to bump up the ISO in low light conditions. The Olympus EM5 can still produce some nice shots at 2000 ISO.
Check out the Zuiko 75-300mm lens now
or
If you aren’t in Australia check it out on the US or UK Amazon
Zuiko 12mm prime
One of the things you learn when you start playing around with Astro is that there is a formula that tells you how long you can set the exposure that is impacted by the focal length and the camera sensor. Due to the sensor size of the Olympus, the shorter the focal length, the longer the exposure you can take without catching movement in the stars. For best results you also need a wide aperture lens, ideally wider than F2.8.
The 12mm prime is an F2, and allows me an exposure time of 18 seconds before movement is captured. If you’re lucky you might even catch a meteor through your shot too!
Check out the Zuiko 12mm Prime lens now
or
If you aren’t in Australia check it out on the US or UK Amazon
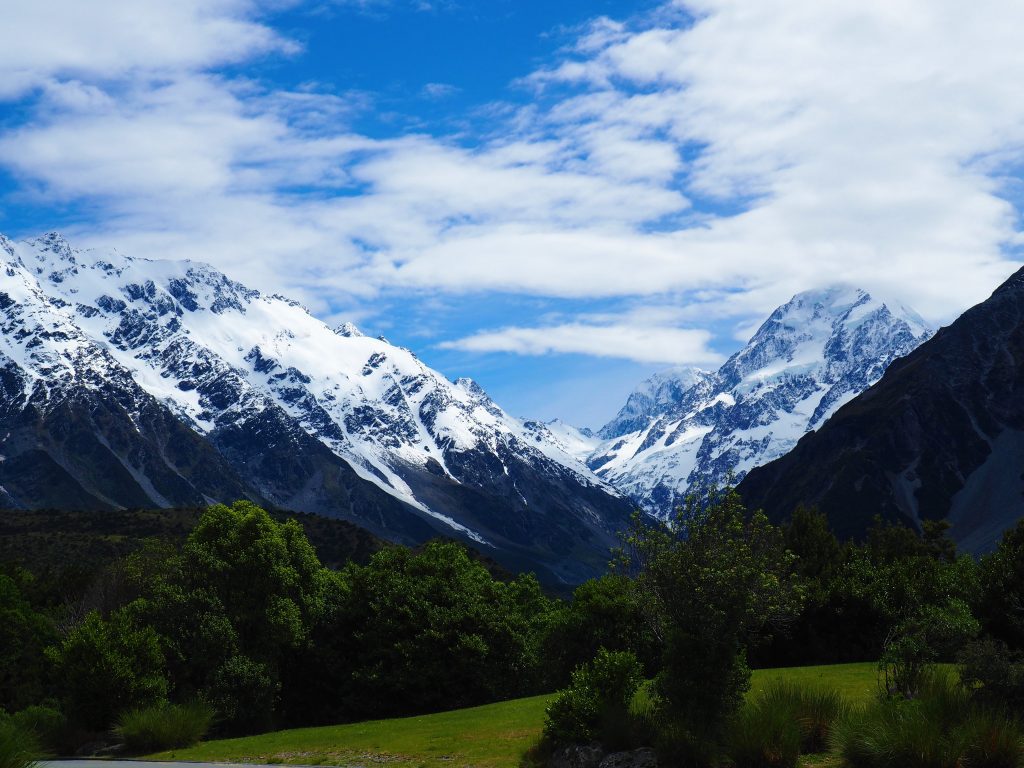
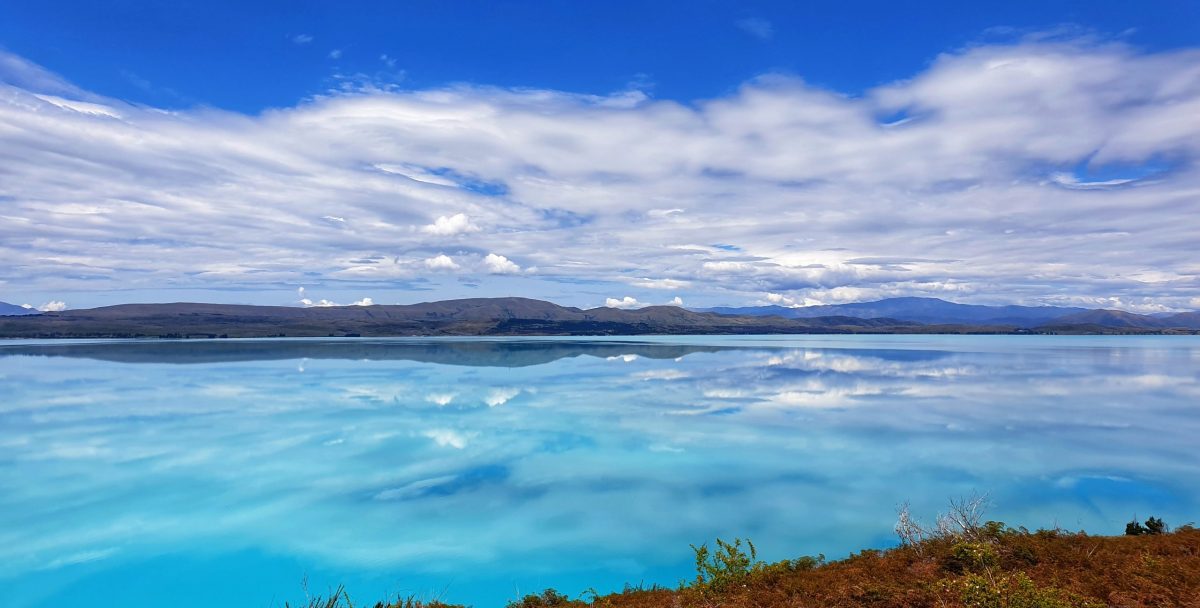
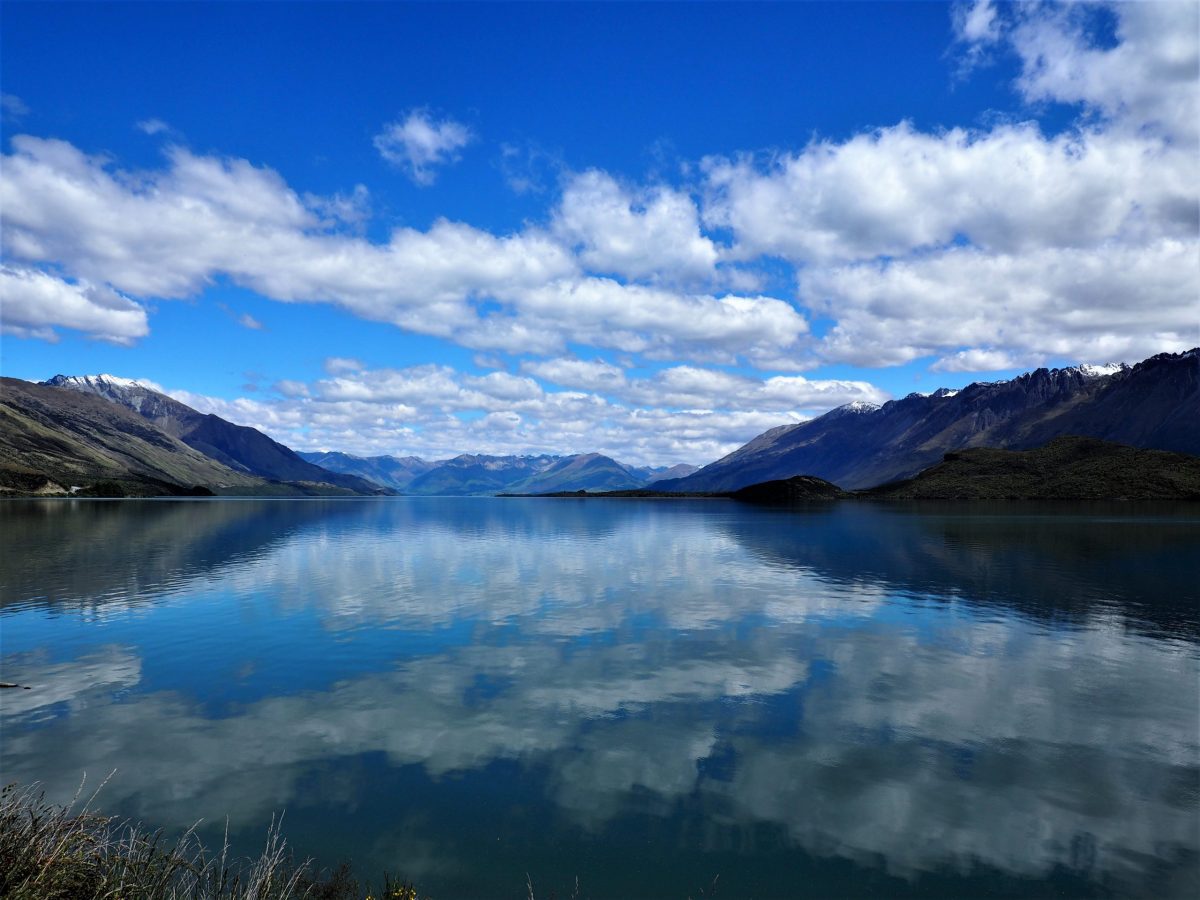
But sometimes, even when I have my camera, I’ll still prefer an image from my phone. I took this beautiful shot at Lake Pukaki in New Zealand on both my camera and my phone, and I preferred the image the phone captured. Sometimes the angle is better, and sometimes the phone just does a better job of averaging out the settings for the best image.
Best Camera Accessories
Tripod
Depending on the type of photography you want to do, a tripod is a must have. I didn’t really start pulling mine out until I started trying to perfect long exposures.
I love my Vivitar tripod. It is sturdy, lightweight and versatile with adjustable height and stabilising feet for uneven ground.
or
ND Filters
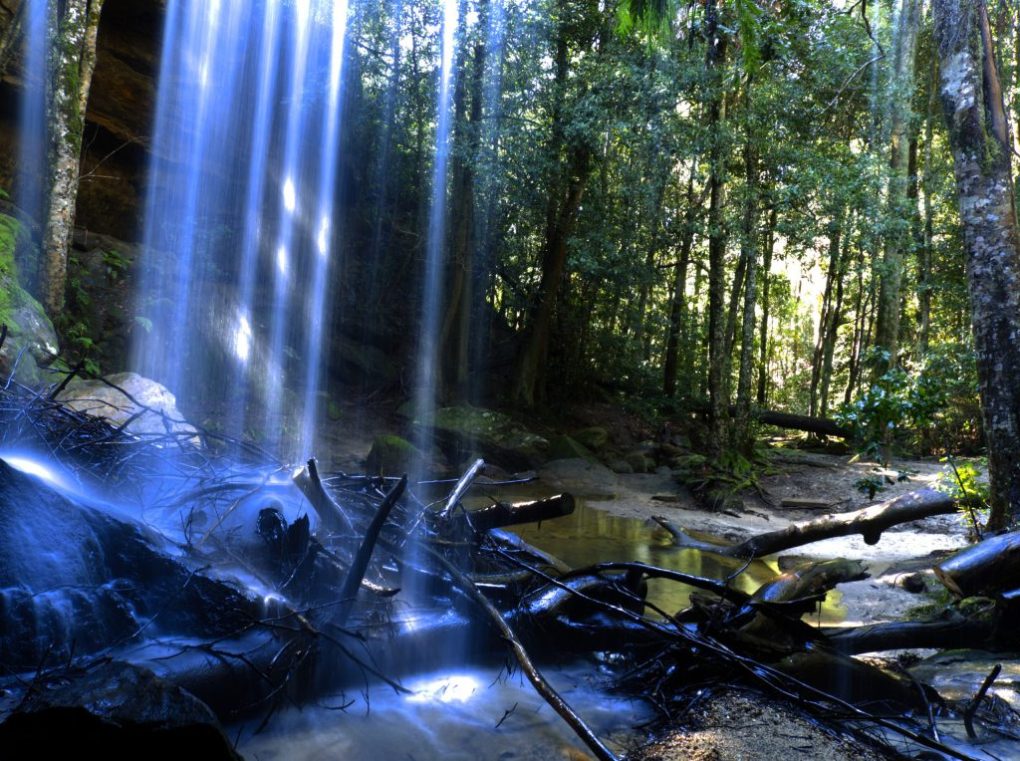
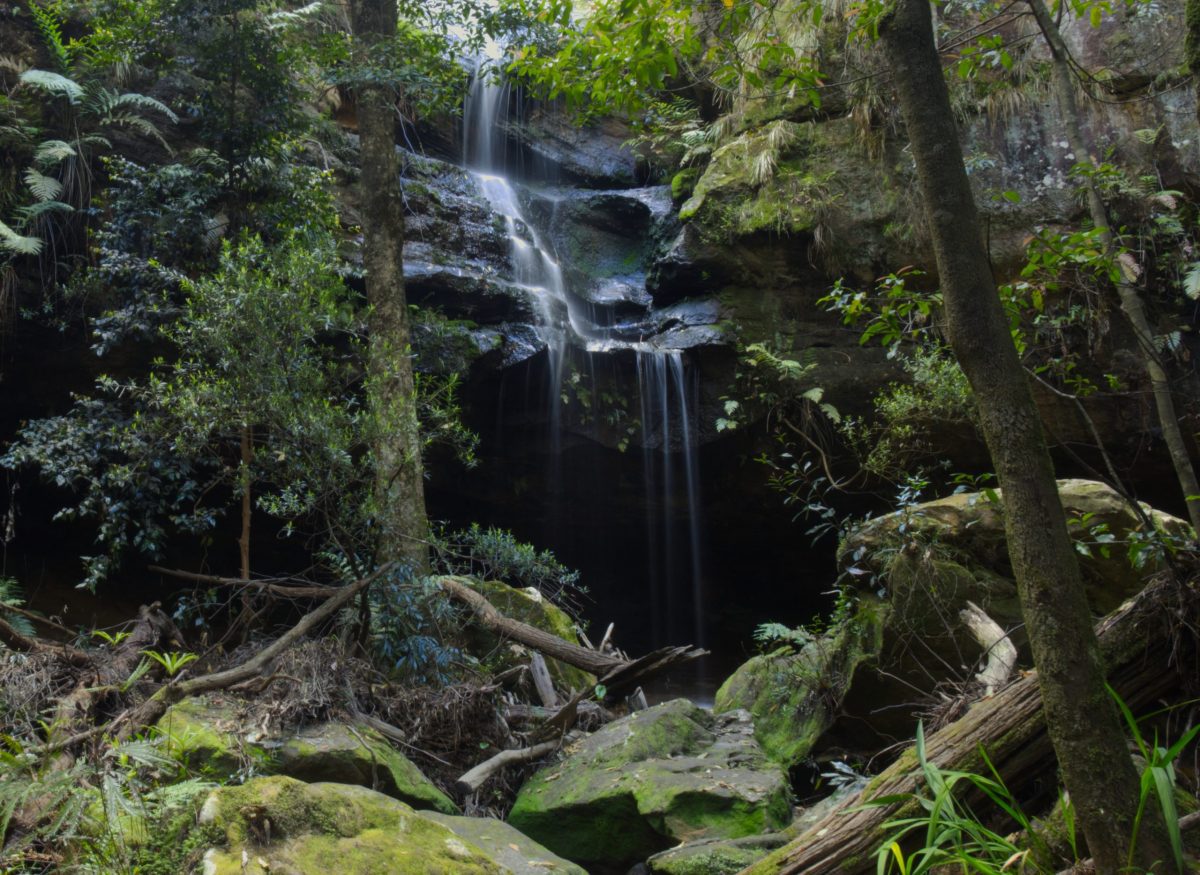
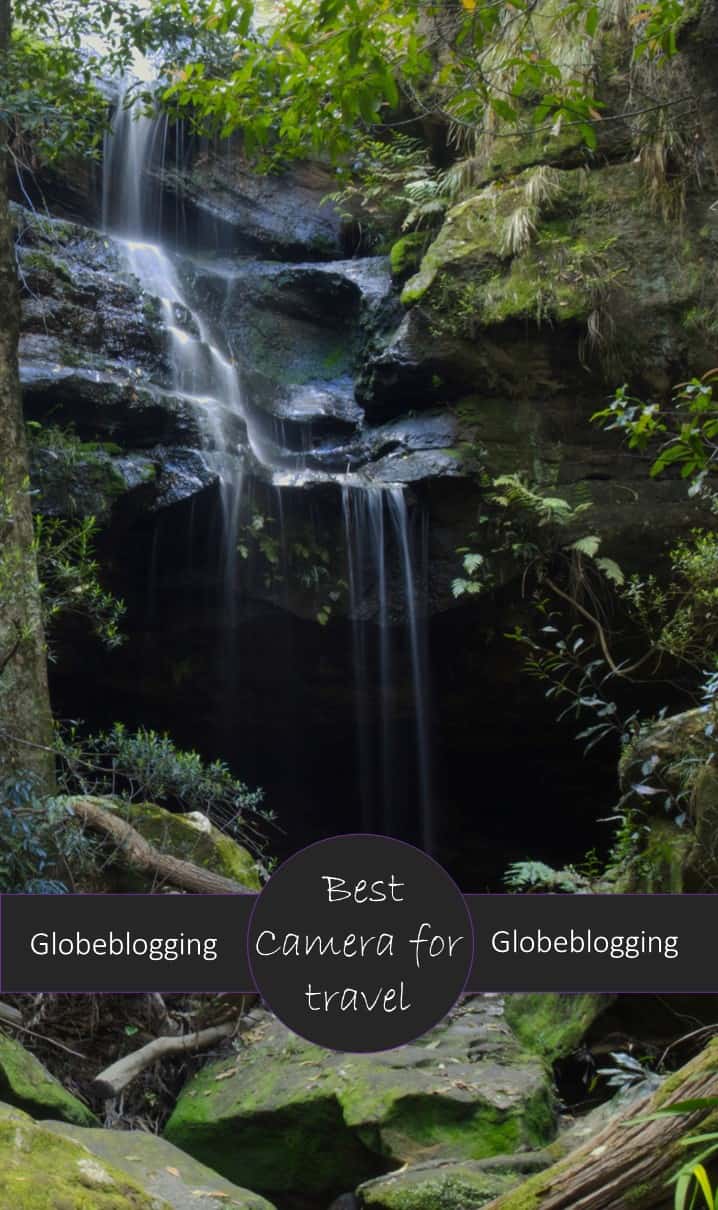
In my pursuit of perfecting my waterfall long exposures I found that even when I managed to make lower light time of day, it still wasn’t possible to escape the excess highlights in the image. I shot the long exposure above in the morning with no filter on my lens, and while I am really happy with the result you can still see the presence of excess highlights. These can be difficult to remove in post processing.
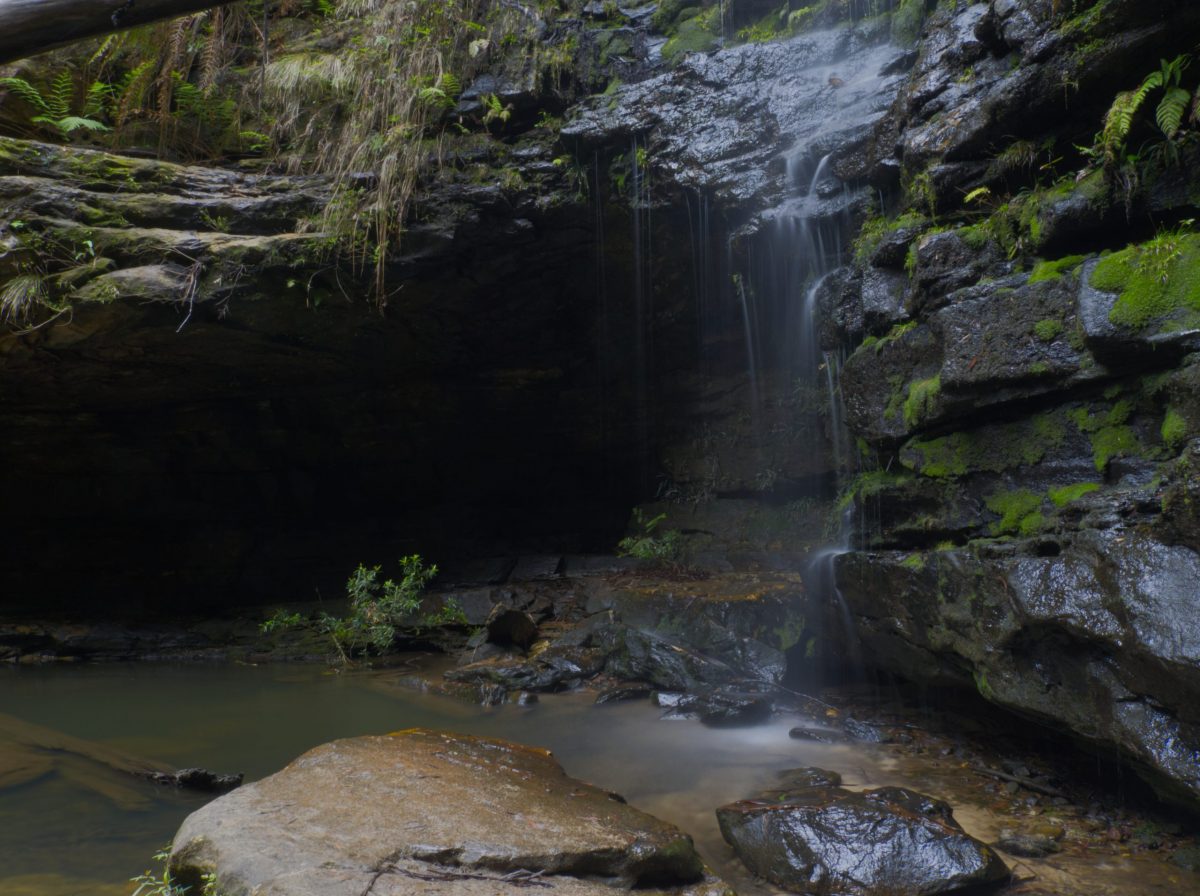
I was driven to try my luck with an ND filter, which effectively is like putting sunglasses on your lens, allowing you to shoot at sharper apertures without letting too much light into the image.
The image below is shot using an ND64 filter, which reduces the aperture by 6 stops. You can see it has tempered the highlights in the water while still capturing the colours, however the risk with long exposures is the longer the exposure the greater the chance of movement causing blur and lack of sharpness elsewhere in the image. I will be experimenting further with different ND filters and exposure lengths. Make sure you check the lens size depending which lens you are buying for!
This filter is made by Gobe, a company that directs profits to the planting of local trees in areas affected by deforestation. Their filters are also really reasonably priced.
The filter size for your lens is written around the glass of the lens.
Check out the GOBE ND64 filter on Amazon Australia
Or
Check out the GOBE ND64 filter on Amazon US and UK
I have also tested the Neewer ND filters which came in a set of three and even cheaper than the Gobe brand. The ND8 filter edge is visible in the corner of the raw images, but the same issue isn’t evident on the ND2 filter. For the price it’s worth it even if only one of them is good, and they come in a great storage pouch.
Check out the NEEWER ND filter set on Amazon Australia
Or
Check out the NEEWER ND Filter set on Amazon US and UK
Check out more of my waterfall photos in my article on the best Blue Mountains waterfalls.
UV filters
A UV filter acts to filter out UV light and sharpen images in hazy conditions, but I keep one permanently on my lens now to act as a lens protector. I’ve not actually taken the same photo with it on and off in order to assess the difference it makes, but it’s like having a cover on my lens while still being ready to pick it up and snap a photo at any moment, for a fraction of the cost of replacing a damaged lens! All the filters have the same thread and can be stacked on top of each other, so I can add an ND filter on top without needing to remove the UV filter. Make sure you check the lens size depending which lens you are buying for!
Check out the GOBE UV filter on Amazon Australia
Or
Check out the GOBE UV filter on Amazon US and UK
Camera bag
Again in the vein of not wanting to carry a lot of bulk, I was keen to find a camera bag that would fit what I needed but still be a compact size.
For the EM10 the Lowepro camera bag was perfect for me, fitting the camera with the kit lens on, and the telephoto lens in the additional compartment!
Find the Lowepro Camera bag on Amazon Australia
or
Find the Lowepro Camera bag on Amazon US and UK
The EM5 requires a slightly bigger bag for which I use an XCD.
Memory card
I think memory cards are probably much of a muchness, but I use Sandisk for all of mine. The 64gb offers me oodles of space for shooting both jpeg and raw images.
Find the Sandisk 64gb card on Amazon Australia
or
Find the Sandisk 64gb card on Amazon US or UK
Lens cleaning wipes
I discovered the Clearwipe individually wrapped and moistened lens cleaning wipes in my local chemist and I have to say, they are amazing! I always have a few stashed in the pockets of my camera bag. They are great for cleaning your glasses too!
Find Clearwipes on Amazon Australia
or
Find Clearwipes on Amazon US or UK
Editing Tools
I’ve always been a purist when it comes to editing, on principle wanting to take the best photo possible straight off the bat.
Noble yes, and certainly the case when it comes to photo composition, but I came to realise that editing often is just about bringing out what the eye can see that the camera doesn’t quite capture accurately. I’ll still edit as little as I can though.
As with DSLR’s, the Olympus has the ability to shoot in raw. This is a version of the photo which captures layers of information in the image which the camera processes and compresses to produce a jpeg image.
At a friends urging I started shooting in both jpeg and raw format, and while I am at times happy with the jpeg image the camera produces, there have been times when I am grateful to have had the raw image to bring out more, or different information from the image.
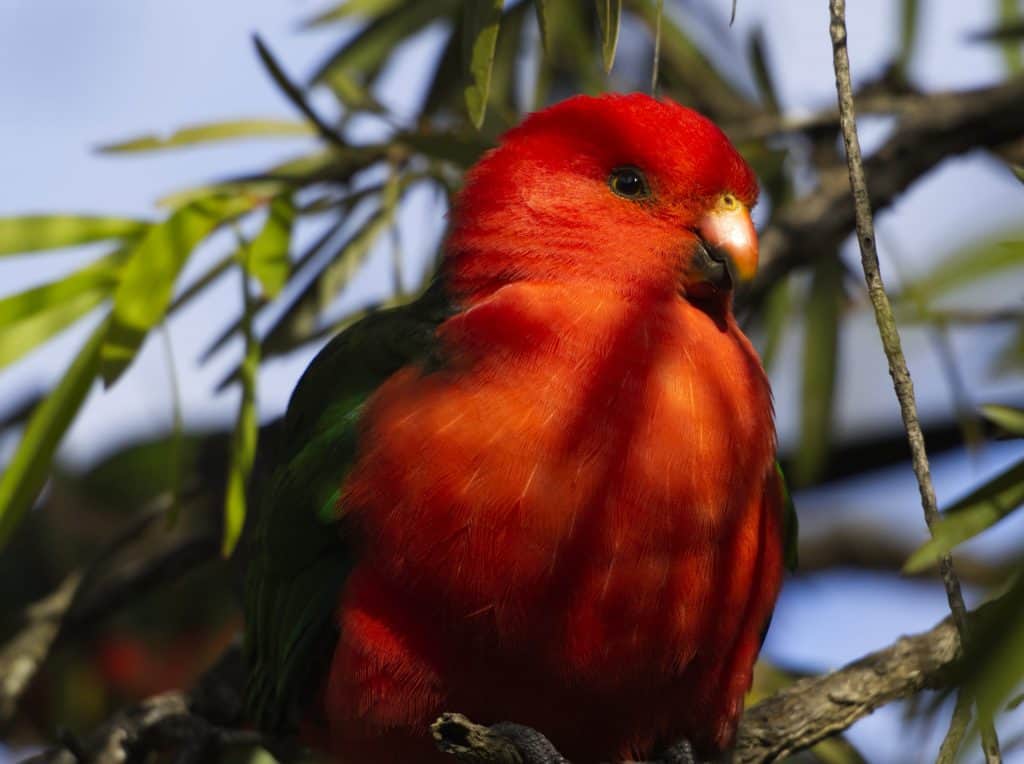
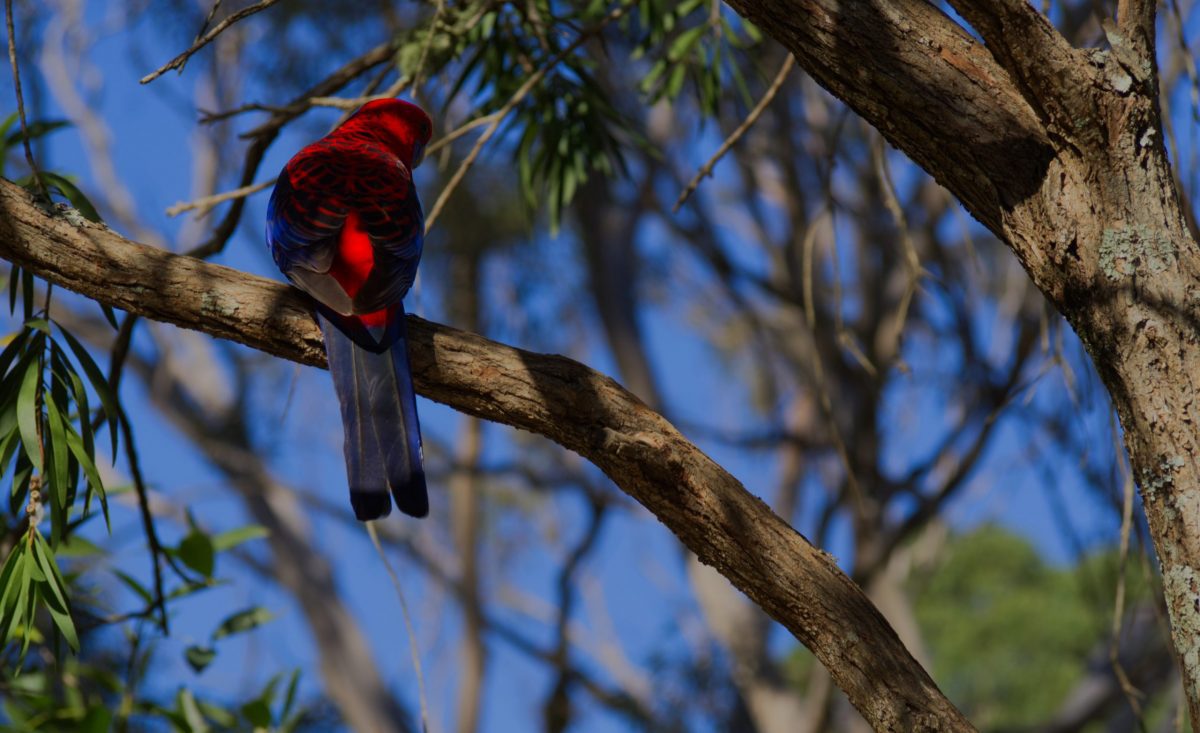
I absolutely loved this image of a Crimson Rosella, but because it is sitting in the shade of the tree in the jpeg image the birds colours were concealed by shade, and editing the whole image resulted in the sky looking unnatural behind it. With the raw file I was able to edit the Rosella only to reveal its colours.
For editing on the phone I use the app Snapseed, which was recommended to me by a professional photographer on a photography tour in Hawaii as the best free app for phone editing.
While Photoshop admittedly sets the standard on phone editing software, their monthly subscription charges add up considerably, especially if photography is just a hobby. A photographer friend recommended Affinity to me, which has a one off purchase cost. It is more challenging to use than Photoshop, but there are courses available on Udemy to assist with learning and plenty of youtube tutorials!
Topaz is a new addition to my editing suite of tools and it is a game changer in noise reduction, sharpening and upscaling the resolution of your images.
Improving your Photography
Tips for shooting Long Exposures with Micro Four Thirds
Again, I am absolutely no expert when it comes to these, but I have no problem trying over and over to play with settings and figure out what works.
- Shoot on full manual mode. Shutter Speed is the main setting you’re thinking about with a long exposure, so for a while I was shooting on Shutter Priority mode and letting the camera choose the other settings. And I was never happy with the results. I went back to my older attempts where I had tried through the fstops of my 14-42mm lens and found my results were sharpest at f16. The camera can choose what settings will work for you, but every lens has a sweet spot. The lower the fstop value the narrower your depth of field, meaning the chances are you aren’t going to be getting that sharpness to your image on the edges. Find the sweet spot for your particular lens and that gives you the setting to work with.
- Pay attention to the light. If you’re trying a long exposure in the middle of the day when the sun is at its highest then you are likely going to be frustrated with a washed out and overexposed image. Shoot when the sun is low in the sky, and be prepared to try both ends of the day, because the light is quite different.
- Use a tripod. If you have a steady hand you’ll be able to get the smoothed effect hand held, but for image sharpness you’ll want to take a longer exposure.
- If you have a camera with wifi use your mobile phone as a remote to prevent unnecessary movement to the camera.
It’s also worth checking out local photography groups on social media, they will quite often organise sessions with professional photographers to learn from. Eventbrite is also a great place to look for workshops in your area.
I hope you’ve enjoyed this insight into my photography journey and equipment. It’s something I absolutely love to do and I love to share it!
If you enjoyed this, please share!

Being a photography buff myself, I quite enjoyed reading about this 4:3 ratio sensor camera. I shoot with a Canon 70D which is a proper DSLR and has some awesome lenses to use along with it. But its a heavy duty camera and your sounds just the perfect thing to pack within the travel gear 🙂
I’ve been thinking of getting some new camera accessories so this was perfect timing! Nice list of equipment you’ve put together.
Your photos are gorgeous! I’ve been meaning to learn to use my DSLR more but like you said, it’s an ever-learning process. I end up using my phone much more often due to convenience right now. The UV filter as a lens protector is such a great idea!
I am SO bad at photography, so the idea of getting a nice camera panics me. But…I have heard great things about that Olympus. So one day when I’m brave enough, I’ll have to look in to that!
Pretty photos! This was a really wonderful post. Thanks for the recommendations on your photography equipment and tips!
Appreciate the photography equipment recommendations! I’ll try some of these out!
Thanks for the marvelous post! I genuinely enjoyed reading it.
I always find such good advice from your articles!
Thanks so much for the great recommendations on photography equipment! It’s great to see real results that can be achieved with the Micro four thirds cameras
Really enjoyed this article. Really thank you! Fantastic.
I like the helpful information you provide.
I’ll bookmark your site and take a look at it regularly.
Yes! These are some fantastic tips and insights!
Thank you for another excellent post.
Very nice article, totally what I was looking for.
Great post! These are some great tips!