No visit to Hawaii is complete without a Diamond Head crater hike. If you’re staying in Waikiki you’ll see the extinct crater from virtually the whole area. The reward for the walk is spectacular panoramas of the Hawaiian coastline from the 760 foot peak, along with what remains of the US military lookout posts from WW1 and WW2. It is one of the best known and most popular hikes on Oahu.
This post contains affiliate links. Making a purchase through one of these links earns a small commission at no additional cost to you and is a great way to show your support to this site.
What is Diamond Head?
The Hawaiian name for the crater is Le’ahi, which translates to “brow of the ‘ahi fish” which reflects the appearance of the crater from Waikiki. Western explorers in the 1700’s mistook the craters calcite crystals for diamonds, earning the site the name of Diamond Head.
According to the information boards at the Visitor Center on the crater floor, about 300,000 years ago there was an eruption on the flanks of the Ko’olau Mountains. Large amounts of ash and fine particles settled around the centre of the eruption, forming a crater, and cemented into a rock called tuff. The crater is almost a perfect circle of 3520 feet diameter and has a floor area of 175 acres. The entire area including the outer slopes of the crater is over 475 acres.
Heavy rains and runoff from intense storms have deepened the gullies of the crater slopes, eroding an estimated 100 feet from the summit. The trail to the summit was built by the US Army Corps of Engineers in 1908 and climbs the interior face of the crater to the Fire Control Station at the summit. The state requests visitors keep to the marked trail so as to not add to the speed of erosion of Oahu’s premier natural landmark.
Declared a National Natural Landmark in 1968, the crater was opened for recreational use in 1976 and receives more than a million visitors each year. Some parts of the park are still restricted due to their use by Civil Defense, FAA and the National Guard.
Diamond Head’s Military History
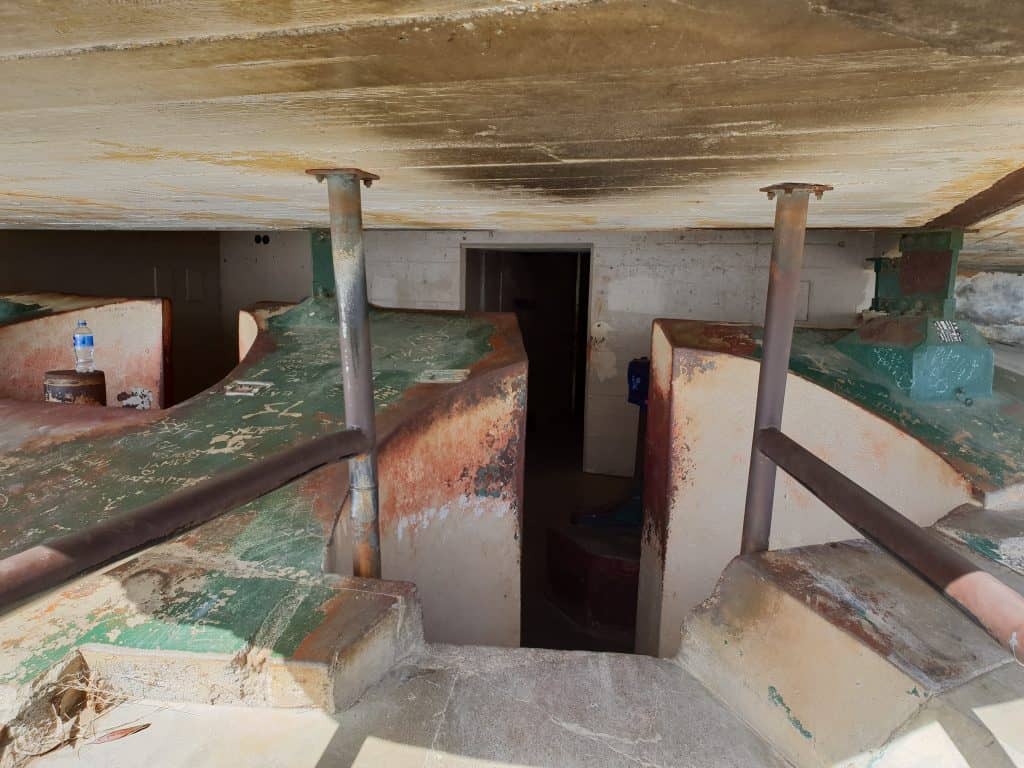
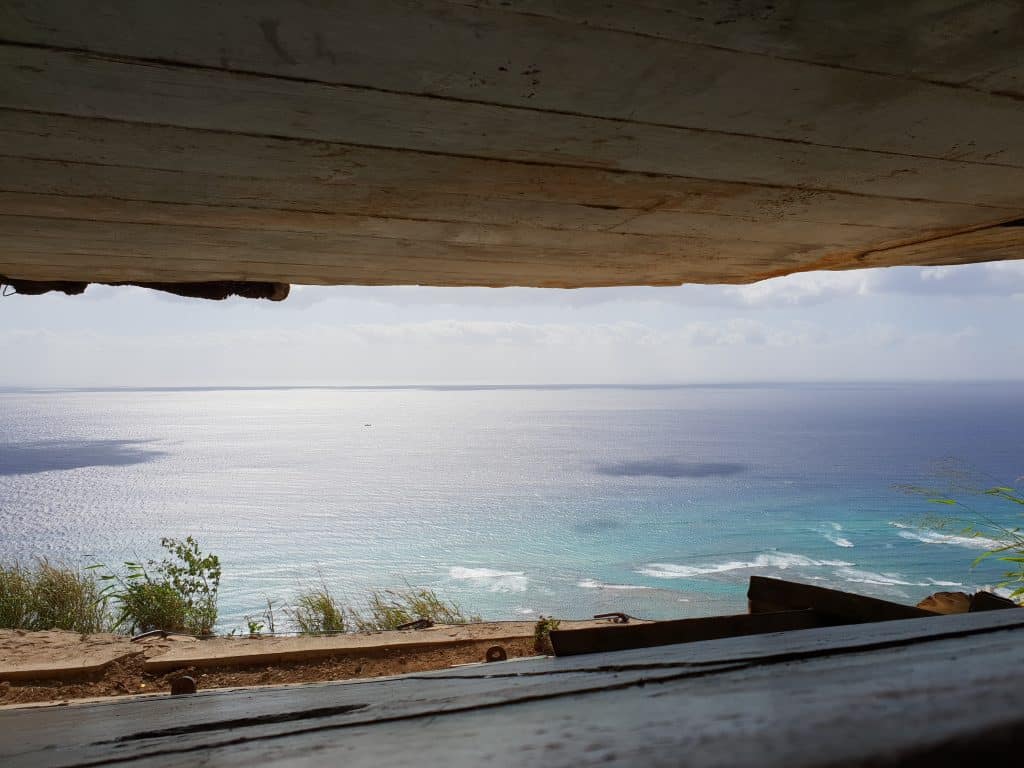
The natural defense offered by the crater walls, and the view from the summit made it a natural choice for fortifications. Construction on Fort Ruger began in 1908 with the construction of Battery Harlow on the outer slopes. The Fire Control Station located at the summit was a critical component of the coastal defense system for Oahu, and built between 1908 and 1911. The station was used as an observation post for spotting the approach of enemy ships. Hikers heading for the summit will journey through the levels of the station.
Radar was not invented until WW2, however using triangulation with Mount Tantalus artillery spotters were able to calculate the position of ships at sea, guiding the 12 inch mortars of Battery Harlow on the slopes below and the guns of Battery Randolph at Fort DeRussy. The mortars were aimed to fire over the crater and out into the channel south of Oahu with a range of 8 miles, reaching both Honolulu and Pearl Harbor.
Three more batteries, Dodge, Hulings and Birkheimer, were added in WW1, and a fourth, Battery 407, in WW2. All artillery was dismantled in 1950 and was never fired during war. During WW2 the communications rooms and mess halls were added to the Fire Control Station.
Command post in Fire Control Station
How to get to Diamond Head
If you feel like extending your walk by 40 minutes or so, it is approximately 3 miles from Waikiki to the Diamond Head State Monument.
The public bus route #23 runs regularly, however as the stop is outside the crater it does mean an additional walk uphill into the crater. An all day ticket for the bus can be purchased for US$5.50.
The Waikiki Trolley will also visit Diamond Head along with other Honolulu attractions. You can purchase a pass for single or multiple days here.
By car, parking is available in the crater for a fee of US$5 per car.
The entrance fee is US$1, payable upon entry into the crater.
Top of the hill and outside the entrance to the Diamond Head crater
Diamond Head Opening Hours
The crater is open from 6am to 6pm every day of the year.
The gates are locked at 6pm each night and all guests must be out of the park by this time. For this reason last entrance to the hike is at 4.30pm.
How long does it take to hike Diamond Head?
It is a 1.6 mile, or 2.6 kilometre, route from the parking lot to the summit and back down, but it does climb nearly 600 feet (171 metres) in elevation. Duration depends on the experience you want, I took my time and spent the afternoon, wandering around looking at all there was to see at the top. The official site suggests 2 hours as the Diamond Head hike time but it could absolutely be done in less time than that.
What you need to hike Diamond Head
Unless you have specific requirements you will need three things; good shoes, sun protection and water.
Best time to hike Diamond Head
I have read that it is a popular place for both sunrise and sunset, but naturally this depends on the time of year and those events lining up with the crater’s opening hours.
In summer it would definitely be wise to avoid the heat of the day as there is minimal shade on the majority of the trail.
How hard is the summit hike?
The official website rates it as moderate difficulty. It will definitely elevate the heart rate but I didn’t find it a difficult hike, and I did see younger and older people on the trail. There are places to stop and rest on the way if needed and while the trail is uneven, it is not tough going. It is smoothed by plenty of feet!
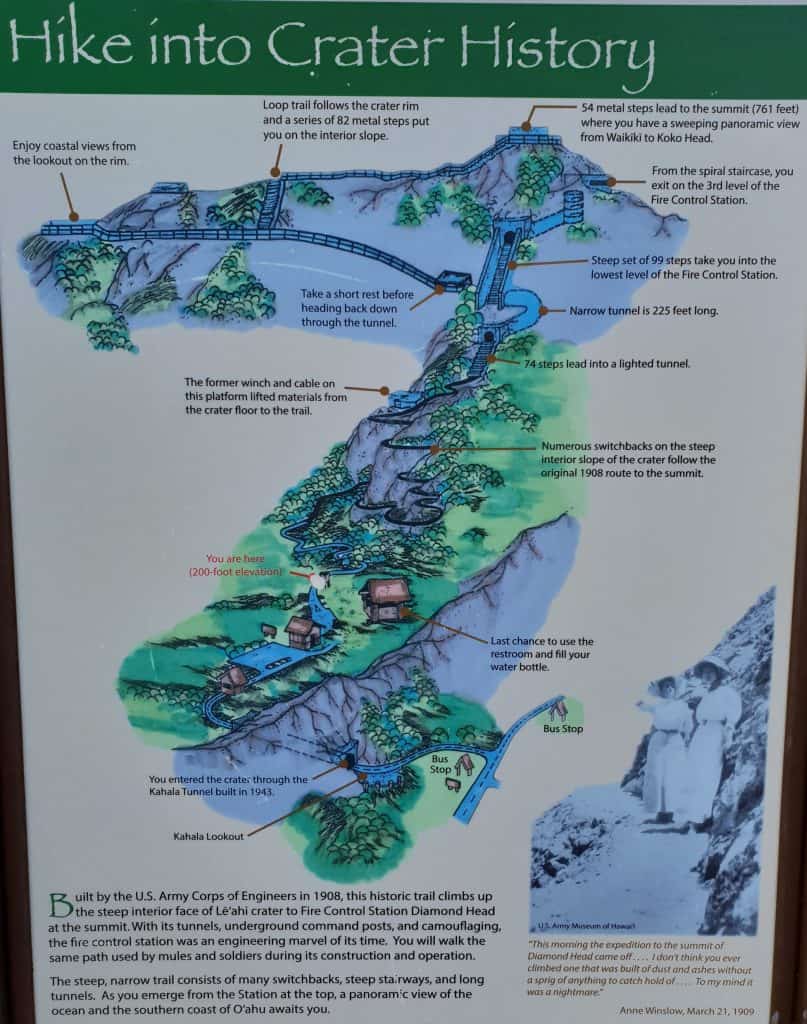
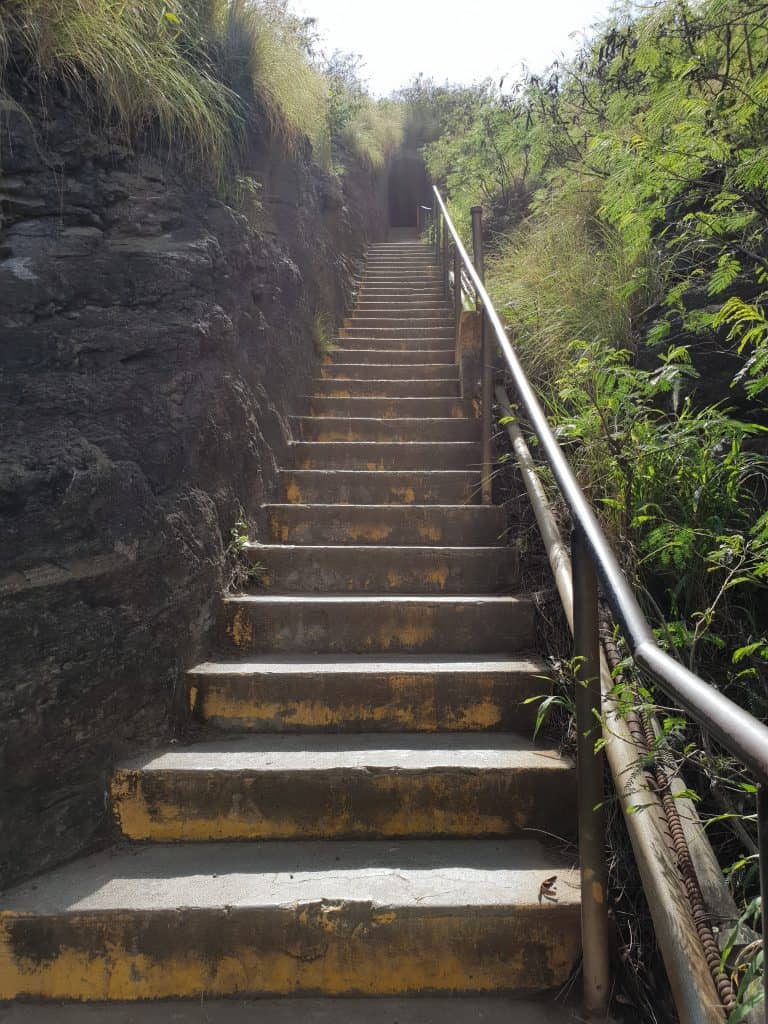
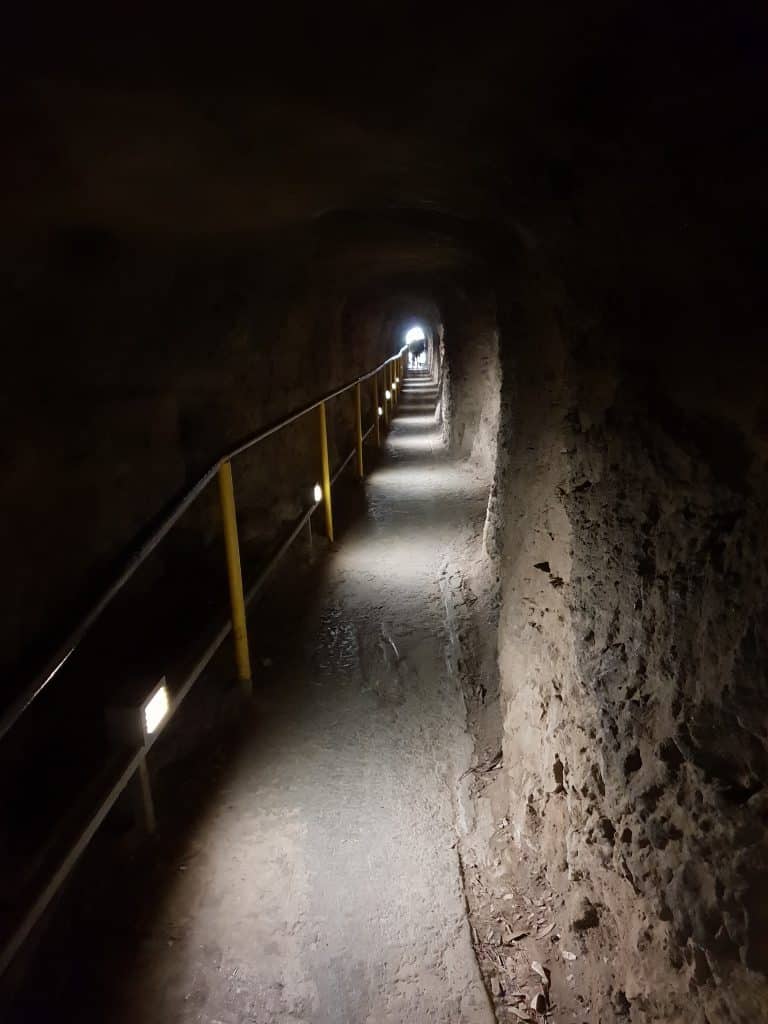
There are also tunnels and several sets of stairs, as illustrated by the information board from the floor of the crater.
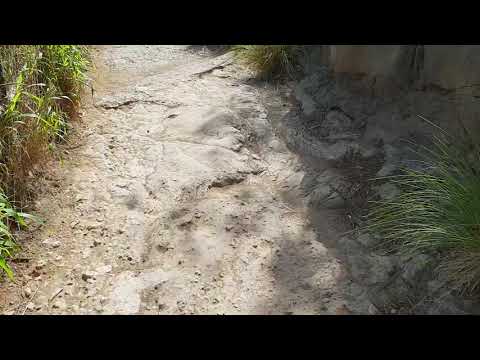
Check out the video for footage of the trail to get an idea of the terrain and the view on the way up the crater interior. It was a lot busier than it appears to be!
Staircase leading to one of the tunnels
Inside the tunnel
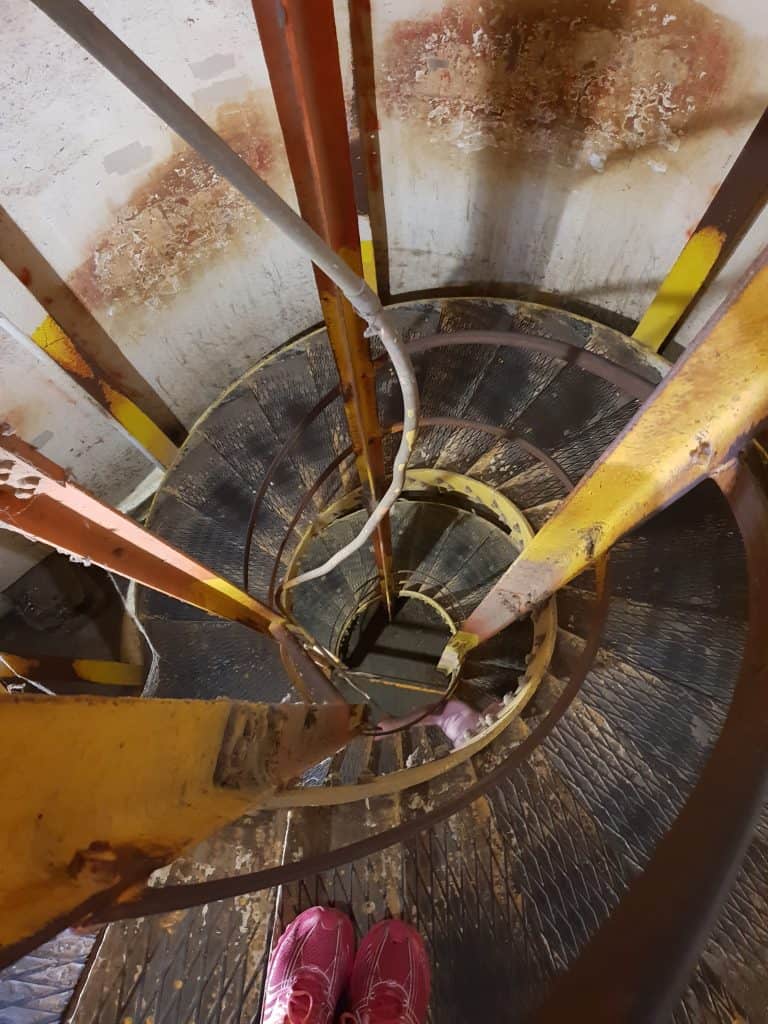
Spiral staircase between the levels of the Fire Control Station
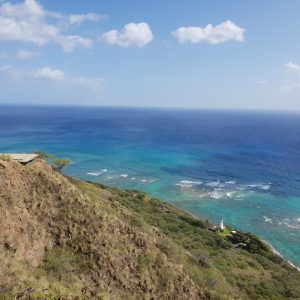
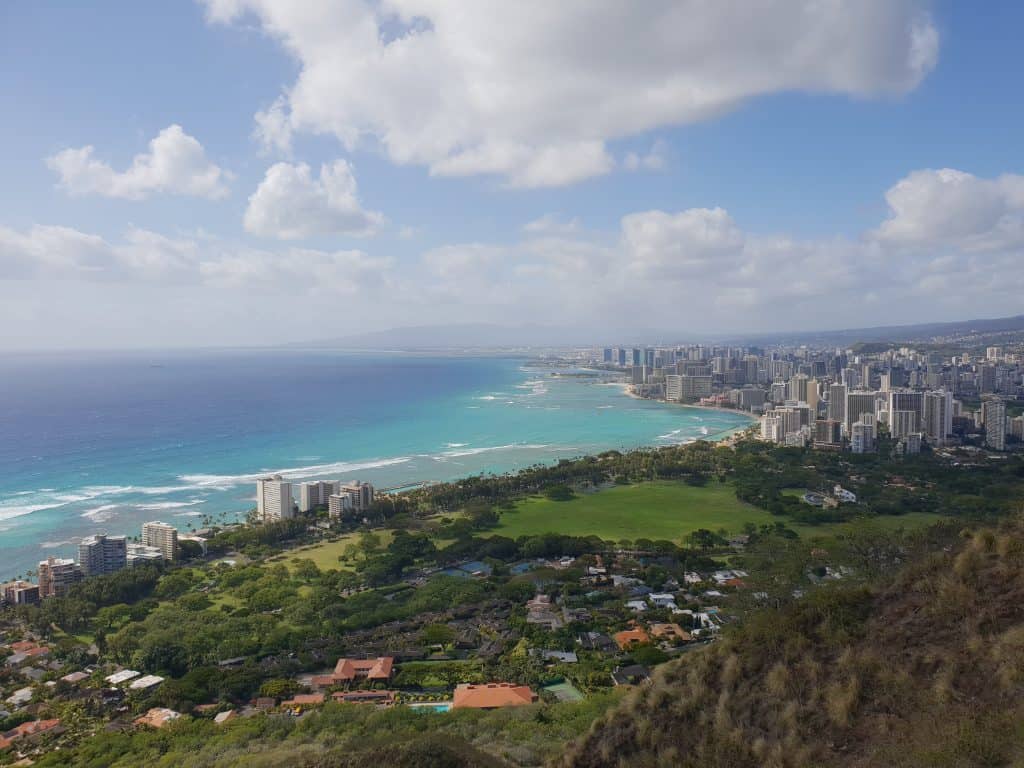
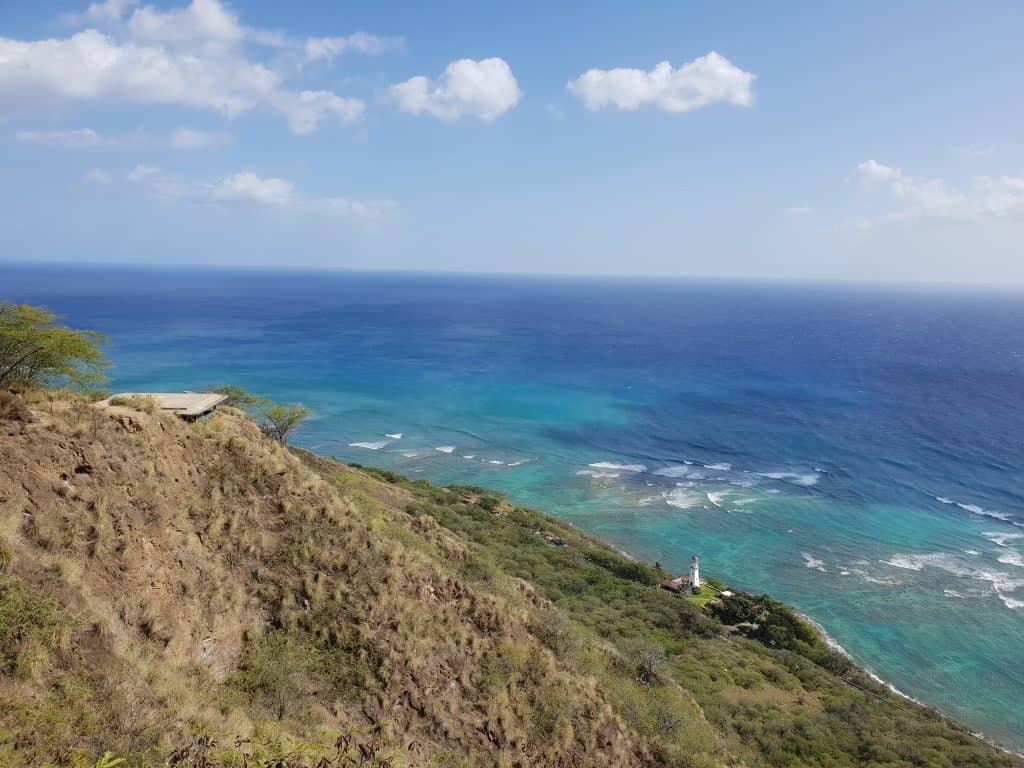
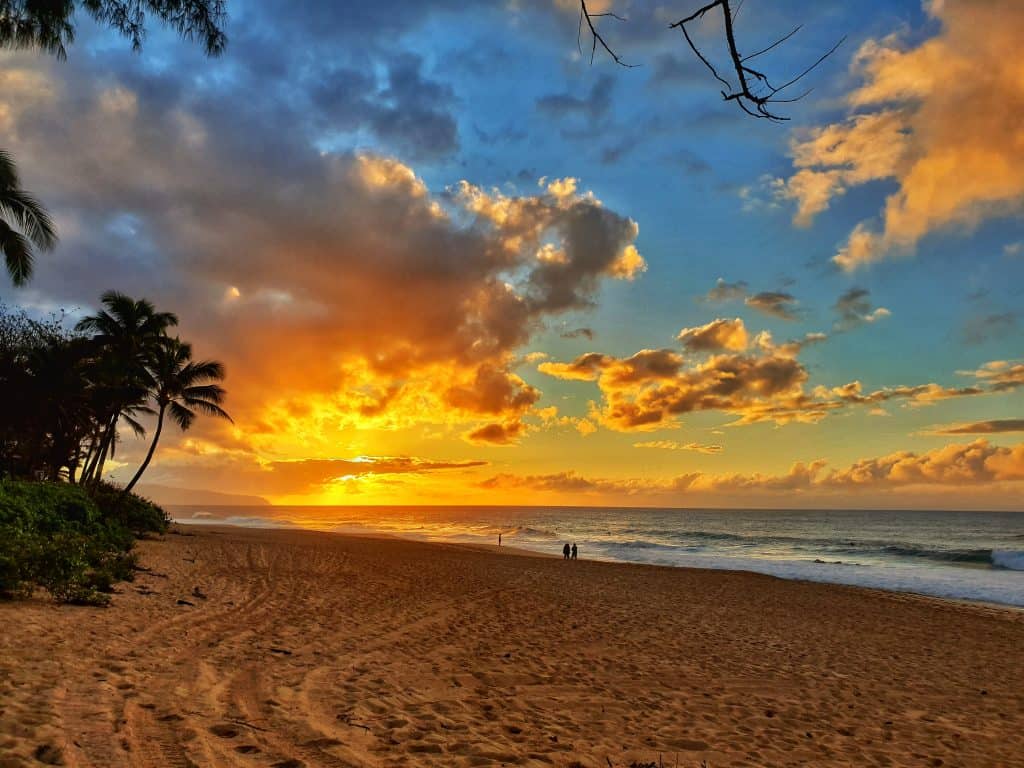
The view from Diamond Head crater lookout
There is a reason why this location was chosen to be such a critical military post. From the top hikers have a view from Waikiki to Koko Head and it is a view well worth the climb!
Waikiki and Honolulu from top of Diamond Head
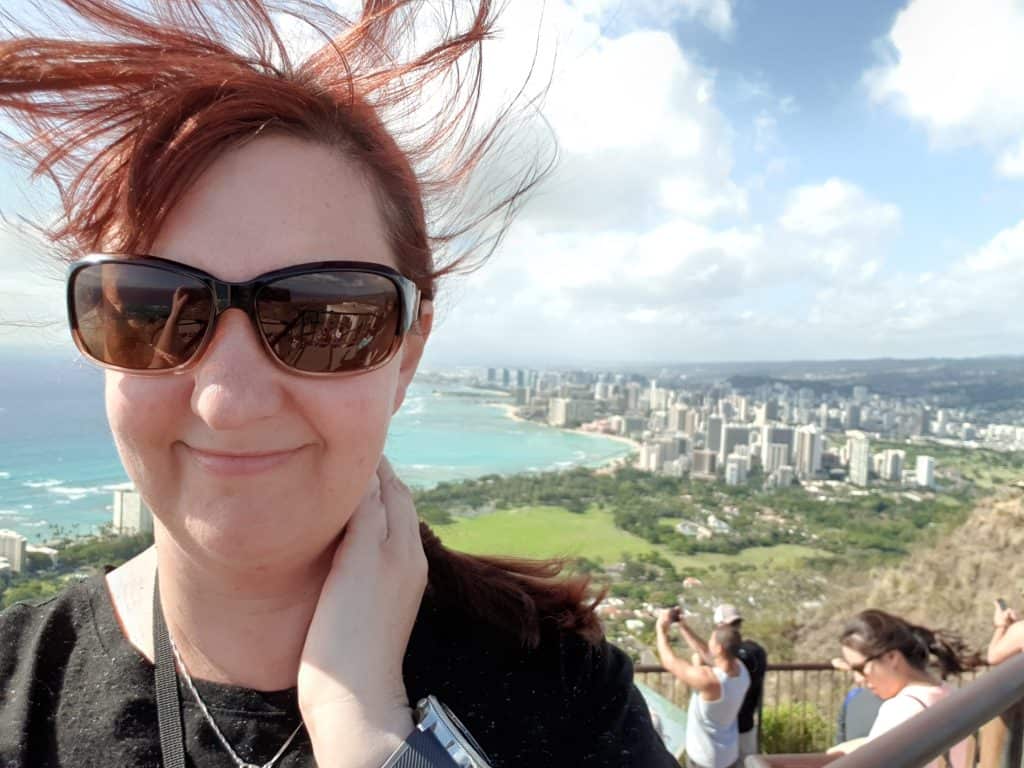
It can be a little windy at the top though, so holding onto your hats is advisable.
The views from the walk up Diamond Head
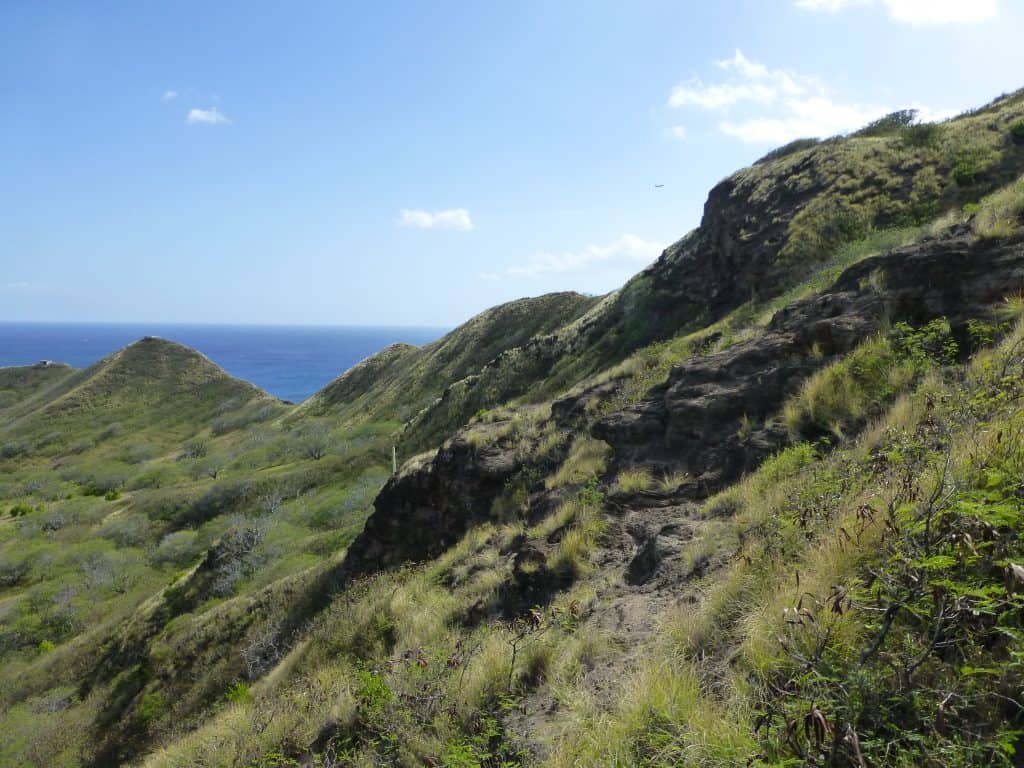
Don’t think that you have to wait for the top for spectacular scenery either! There is plenty to check out along the way if you need to take a moment to catch your breath. Most of the military locations are on the way up also.
Volcanic landscape on Diamond Head crater
Caption halfway up the crater and Diamond Head Lighthouse in the distance
View from a military post
Available facilities
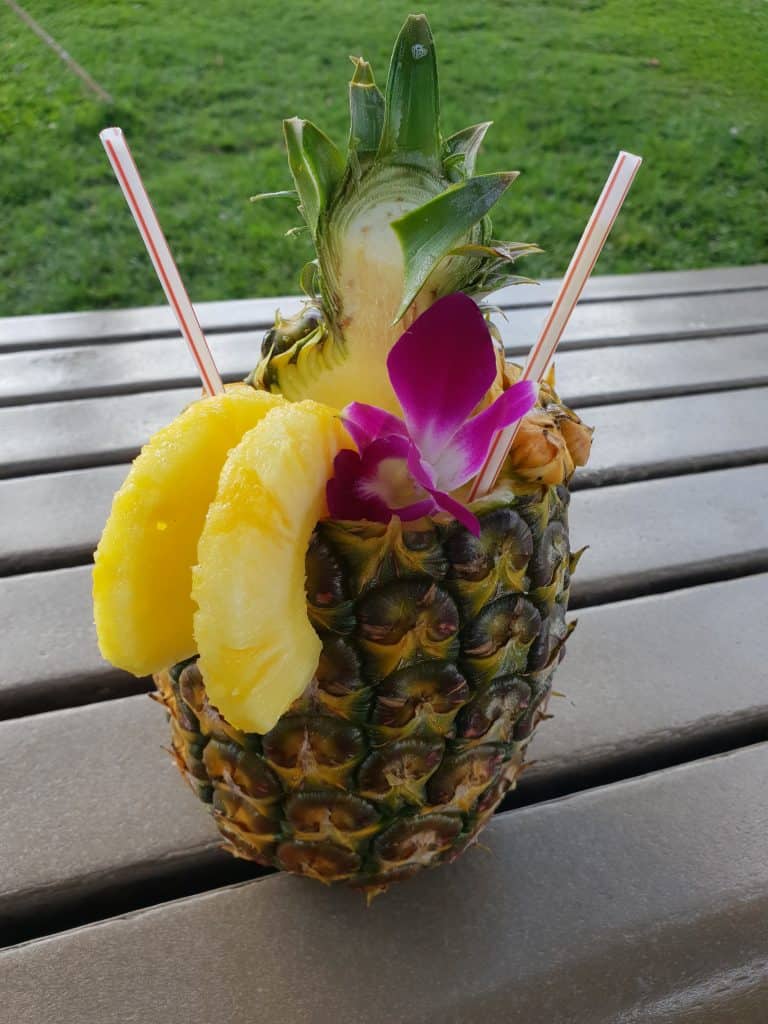
Once you leave the vicinity of the Visitors Center on the crater floor there are no bathrooms or access to refreshments. At the Visitors Center there is a small store selling souvenirs, vending machines and food trucks. If the pineapple guy is there I recommend trying one of the fresh pineapple juices served in an actual pineapple, expensive but oh so worth it! Chill out at one of the provided picnic tables and enjoy the scenery while putting some calories back after your hike!
If this has whet your hiking appetite, Oahu also has some breathtaking waterfall hikes that you might want to squeeze into your itinerary.
If you are looking for other things to do on your trip to Oahu, check out my 7 day Oahu itinerary.
You may also want to check out the Go Oahu card, which offers special prices on many of Honolulu’s tourist attractions. You can purchase one here.
Where to stay on Oahu
Being the tourist hub for the island makes Waikiki pretty much accessible to any activity on the island. I can personally recommend the Coconut Waikiki Hotel or you can check out some other options below.
My perfect holiday will usually include a mix of tourist and cultural activities, as well as time to relax and unwind. But let’s face it, if you have a week to spend somewhere chances are you aren’t going to be building in too much time to sit around not doing much. So this isn’t the itinerary for 7 days in Oahu that’s going to be building in days laying on the beach not doing much of anything. If however, you are interested in a well-rounded Oahu itinerary that gives you a good taste of the Hawaiian experience on Oahu, including the main tourist items as well as some more unique experiences, then this is the Oahu 7 day itinerary you need.
This is based on staying in Waikiki, the main tourist hub of Oahu. If you don’t want to stay put in Waikiki, check out what not to do in Hawaii.
Hawaii’s beautiful climate also makes it the perfect Winter getaway!
Where to Stay in Waikiki
If you haven’t realised already, Waikiki is tourist central and the prices are reflective of that. As such I chose to stay somewhere off the main drag, but still a short walk away, and found the prices were much more reasonable.
I stayed at the Coconut Waikiki Hotel, located alongside the canal. It was super comfortable with excellent staff and included breakfast in the morning. Less than ten minutes walk from the main hub of Waikiki it was still really easy to get to all the big restaurants, but it was somewhat quieter. It’s also close by the bus stop for easy access to the rest of the island. If you’re looking at accommodation options I wouldn’t hesitate to recommend it but you can check out some other alternatives below.
Day 1 – Scenic
Arriving in Waikiki
Day 1 is of course always going to be dependent on your flight plans, but if you are arriving from Australia then there’s a good chance that you’ll be arriving on an early morning flight. This is great if you can sleep on a plane and arrive refreshed to make the most of the day, but if you’re like me you could do with a little help staying awake to get on the right time.
Once you have passed through customs and exited the airport you can follow the signs for the Waikiki shuttle run by Roberts Hawaii. A one-way ticket starts at USD $21 per person for drop off at your hotel in Waikiki.
Pro-tip #1: You can also book your return shuttle at the time of purchasing your fare to Waikiki so this is one less thing to worry about. Alternatively you can book your return shuttle online.
If you are traveling in a small group a taxi may be more cost effective. My flight home was too early for the shuttle pickup and it cost me just under USD $40, not including a tip.
Pro-tip #2: If you are on an early morning flight it is well worth it to look at hotels that offer an early check-in option. Mine cost me USD $50 additional for a 10am check-in, however they let me straight into my room at 8.45am when I arrived and the ability to have a shower and a lie down made it the best $50 I spent!
Oahu Photography Tour
Now you may think I’m bonkas for recommending a tour on the day you arrive but there is logic to my madness.
Your stay will be a whole lot easier if you can get straight onto US time, and a little help staying awake to do that isn’t a bad thing! Some tours also pick you up from your hotel after Midday, so you have plenty of time for a nap and freshening up, or margin for error on delayed flights.
I was looking for things that were a different experience and being an avid photographer the idea of a photography tour instantly appealed to me.
Hawaii Photography Tours aim to show you the parts of Oahu that you probably wont see on other tours and excursions, at the same time showing you the best places for photographing Oahu. The guides are not only incredibly personable and knowledgeable about their island, they are also professional photographers in Waikiki and no matter what you’re using, even a little camera the size of a credit card like one lady on my tour had, they will have tips for you.
There are a range of tours on offer of various duration but the Country Sunset appealed to me for the amount of the island it covered that I wouldn’t have otherwise seen, and because I love sunsets. We finished with sunset on Pipeline beach, known for its famous waves. Surfing is naturally one of the popular things to do on North Shore Oahu. I also got to visit the famous North Shore food trucks for a late lunch/early dinner, which tided me over until breakfast the next day.
Different tours run on different days of the week. So check out the options for what might suit you. The crew at Hawaii Photography Tours regularly change the lineup of the tours available and the one I took has changed, although the Oahu Sunset Tour features some of the same locations. You can check out some of their other tours below.
This is definitely one of the best things to do in Waikiki!
Activity Level: Light. Transport is provided as part of the tour and there is some light walking between destinations.
Price: From USD $126 per person
Duration: Varies according to tour, ranges from 5 – 10 hours.
Pro-tip #3: I found these guys on Groupon, and while there were no specials on this tour on Groupon at the time it is worth a look to see whether there is a deal on the tour you want to do.
Sunset on the North Shore Oahu
Day 2 – Scenic/Adventure
A Day at Kualoa Ranch
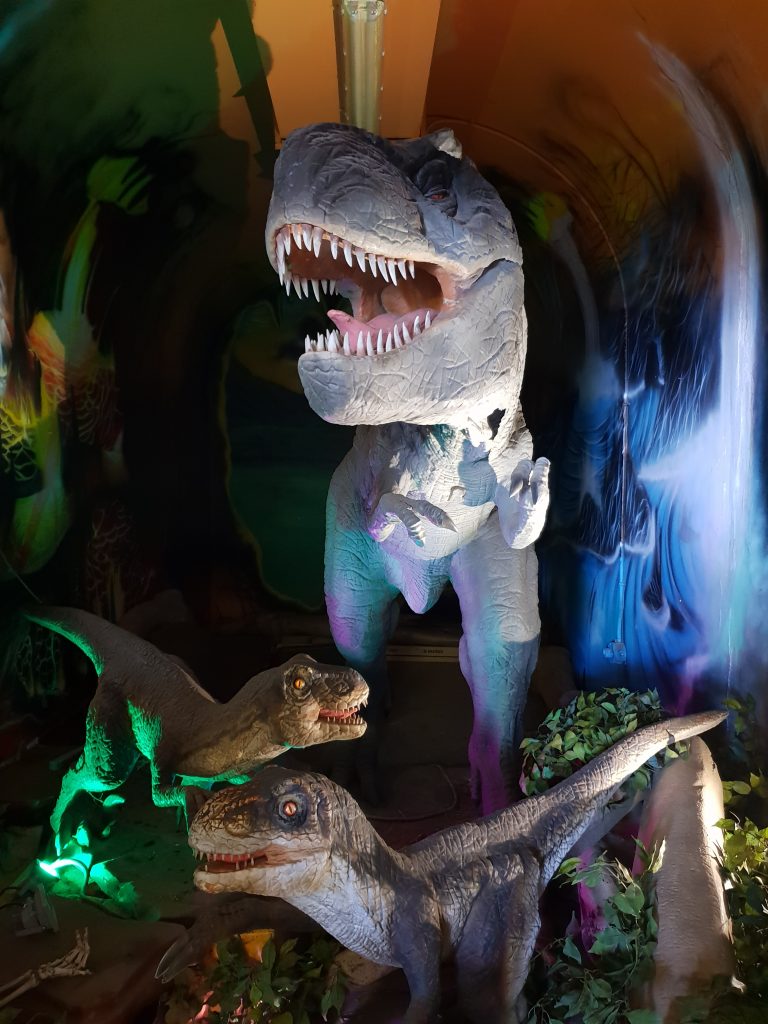
When I was planning my Hawaii trip, Kualoa Ranch was the number one recommendation from people who had been. If you’ve heard about Jurassic Park Hawaii, you’ve heard about Kualoa Ranch.
Superimpose some dinos and you have Sam Neill and the children running across the plain in Jurassic Park!
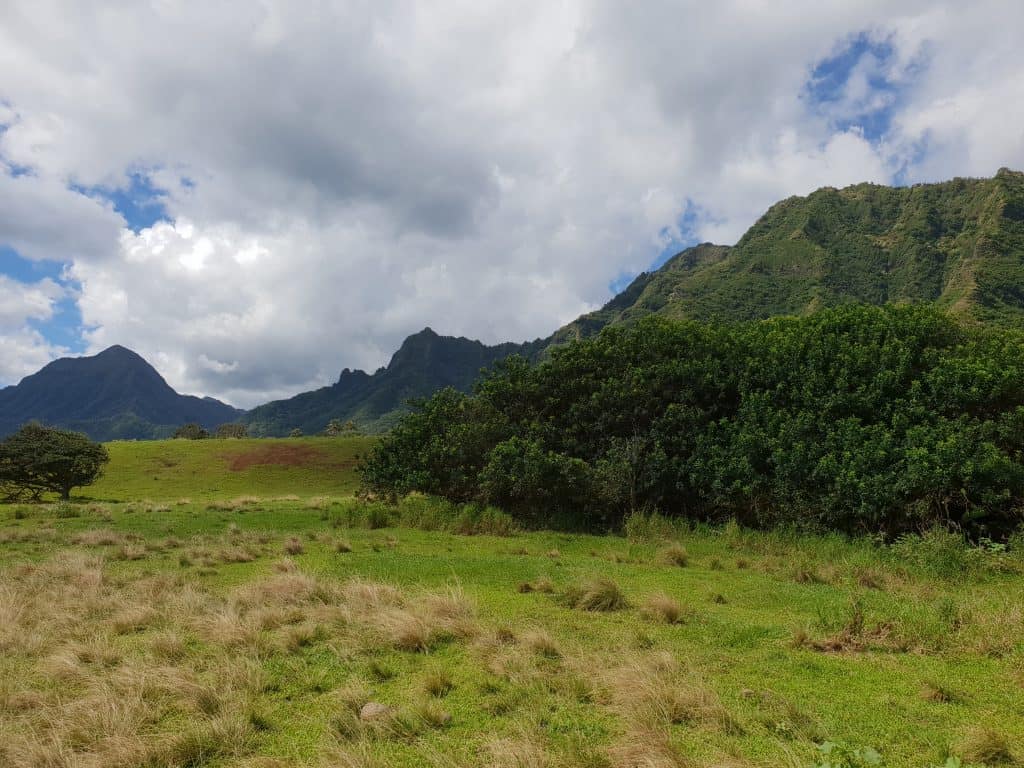
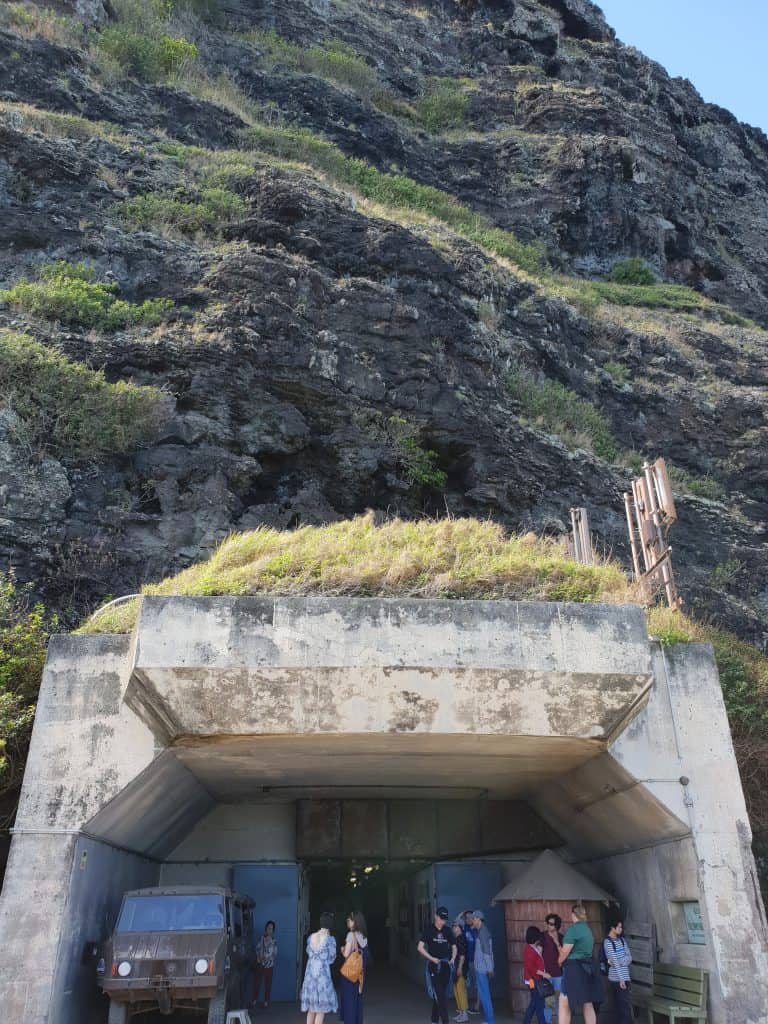
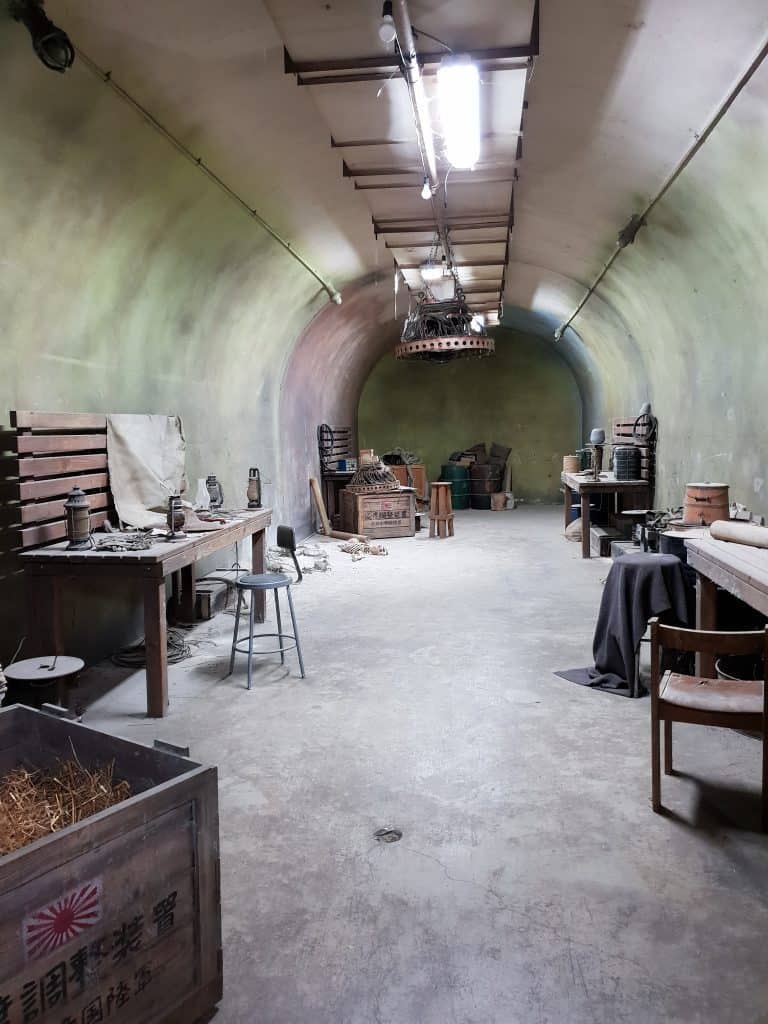
Otherwise known as Hollywood’s Hawaii set, if there was a movie filmed on Oahu then the 4000 acre Kualoa Ranch undoubtedly features. It has been the filming location for Hollywood blockbusters including Jurassic Park, Jurassic World, King Kong, Godzilla, 50 first dates and Jumanji 2. Along with the sprawling hills with imposing mountain ranges keeping watch, Kualoa Ranch was also a military outpost in WW2, and has a number of bunkers located on the property. The largest of these bunkers, Battery Cooper, winds deep under a mountain and has featured in movies and Television episodes. It is now partially a working set and partially a museum of movie memorabilia from films shot there.
Entrance to Battery Cooper
A Hawaii 5-0 set in the WW2 bunker Battery Cooper
Jurassic Park display inside Battery Cooper
Kualoa Ranch is on the other side of the island, and close to an hours drive from Waikiki. For some tours you can add a shuttle transport to your booking if you aren’t hiring a car. A round trip on the shuttle is USD$30 per person plus tax.
Given there is so many options with regards to tours and activities, and you’re going to the effort of getting there, it’s worthwhile planning to spend the day. You can select your tours individually, or select a package which bundles a number of tours together and includes lunch on the sustainable ranch. Each tour will show you a different aspect of the property.
Depending on your package the shuttle will drop you back in Waikiki early/late afternoon. If you haven’t already, take the opportunity for a stroll on the beach and scope out the tourist drag.
Activity Level: This will depend on your chosen activities. Many of the Kualoa Ranch tours you’ll be sitting in a bus with some light walking around, but there are also more physical tour options available.
Price: Entirely dependent on the activities you want to do. The tours range from USD $49.95 to $174.95 for Adults, or you can get three tours packaged together for a better price starting at $149.95. The packages also include a buffet lunch.
Duration: Tours start at 1 hour and range up to 2.5 hours for the Zipline Tour.
Pro-tip #4: Some tours book out weeks in advance so book this one early!
Day 3 – Water
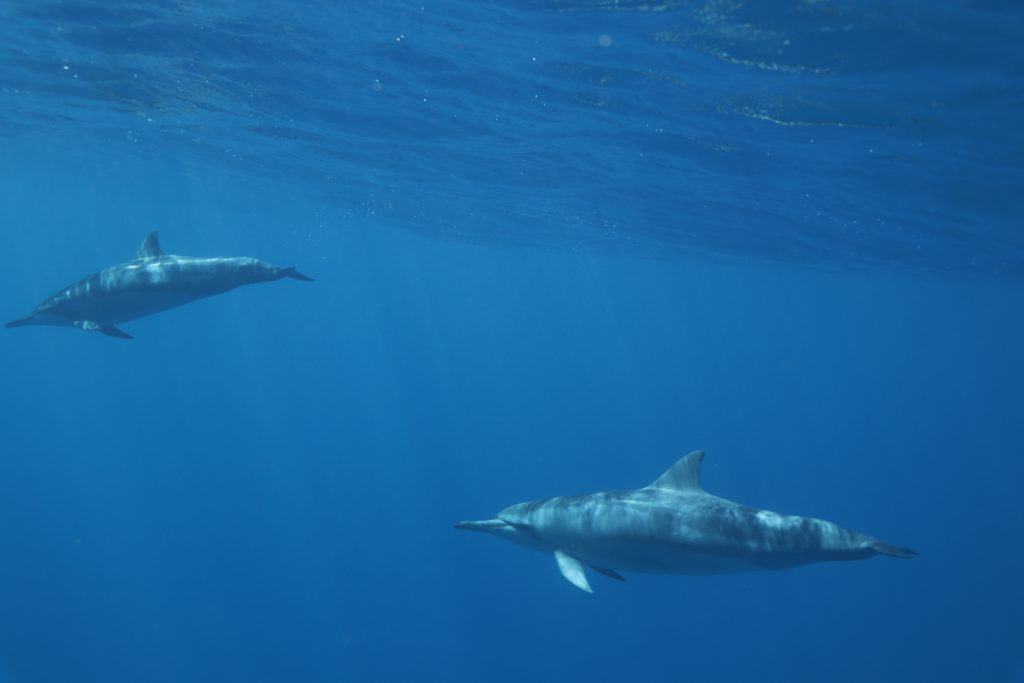
Swimming with wild Dolphins
It has been a bucket list item of mine to swim with dolphins for a very long time. I had attempted this twice before, the first time in New Zealand where the weather was too bad for the dolphins to be located, and once in Australia, which was cancelled due to lacking numbers. On both occasions I was offered an alternative date, which was a lesson I applied when planning this trip.
Pro-tip #5: Schedule this activity early in the itinerary. Dolphins are wild animals and providers can’t give any guarantees about success on a given day, but most will offer a discounted rate to schedule another day. If you’ve tried this at the end of your trip you’ll have no room for a second attempt.
There are a number of tour operators that are rated well and offer this activity. However they will all depart from a bay on the other side of the island so the availability of a car will influence your choice. It was the inclusion of transport from Waikiki that led me to choose Dolphins and You Oahu.
Pro-tip #6: I saved money on this tour by purchasing through Groupon. The price for the basic tour was no different but there was a good discount on the photo package addon. Check the fine print, the Groupon voucher can only be used for the second tour. Enjoy your sleep-in. For non-US residents you won’t be able to purchase on your credit card as they require a card registered to a US address. Paypal however will work just fine.
Pro-tip #7: Get the photo package. The dolphins aren’t going to come right up to you and even with an underwater camera I wasn’t lucky enough to snap some good photos but with the photo package you’ll receive a USB with the images from your tour taken on a professional camera. Unless its something you do regularly, its probably something you’ll want to remember! You’ll also receive a selection of some of their best images. There was no video with mine and the water isn’t great visibility beyond a certain distance so its probably not worth paying the extra for that.
Photo reproduced with permission of Dolphins and You
The shuttle will collect you from a central location in Waikiki and transport you to Waianae Harbor, on the east side of the island, where you will board the boat for your trip. You will then be given your snorkel gear and wetsuit if you have hired one. Once the captain spots dolphins the call goes out to gear up and one by one everyone jumps in the water with one of the guides serving as the marker for everyone to gather around. We were lucky enough to have a large pod of Hawaiian Spinner dolphins resting beneath us, a few of which swam around or surfed the waves on the surface.
After the dolphin snorkel the boat will move to another location and guests have the opportunity for another snorkel, and the chance to see some more of the local marine life. Turtles are a frequent sight, as are the brightly colored fish. The crew will put out a selection of water toys, including a large slide off the top deck into the water.
Lunch is served while the crew puts on a hula show, before returning to the harbor and the shuttle back to Waikiki.
Activity Level: Moderate. While you’ll be equipped with buoyancy vests for safety this is an activity in the open ocean and you’ll need some level of swimming ability.
Price: USD $156 per adult and $100 additional for a video and photo package. I got it for $189 through Groupon. Wetsuits can be hired for an additional $10 per person and snorkeling gear is included.
Duration: For the second tour my pickup in Waikiki was just before 10am and I arrived back a little before 5pm.
Snorkeling at Hanauma Bay Nature Preserve
If swimming with dolphins isn’t your thing but you are still keen to fit in a water day then a snorkel at Hanauma Bay might be for you. I didn’t make it there unfortunately, but it was highly recommended to me by other travelers. Famous for an abundance of Sea Turtles and marine life within the reef, it is one of the most popular destinations on Oahu. Expect it to be busy, they will grant entry to only 3,000 visitors per day so get there early.
You can organise transportation and gear in advance, which also includes the USD$25 entrance fee.
It’s also important to note that Hawaii has passed legislation banning the sale of sunscreens containing chemicals which can be harmful to the reef. The one below is one of the few SPF 50+ in this category. It’s also useful to have your own towel and a waterproof pouch for your phone if you would like to attempt your own photos.
Hawaii is renowned for its shopping, and the shoppers of you are probably wondering when I’m going to give you time to indulge. Today is the day for you!
But first, a recommendation a little outside of the usual tourist stuff.
Before you head off for your day, you’ll have something to do at 7am for your day tomorrow so make sure to be in wifi range!
Hawaiian Ukelele Factory Tour
This was hugely appealing to me as an avid music lover and amateur musician, but the ukelele is so integral to the Hawaiian culture that I would encourage everyone to consider adding this to their trip.
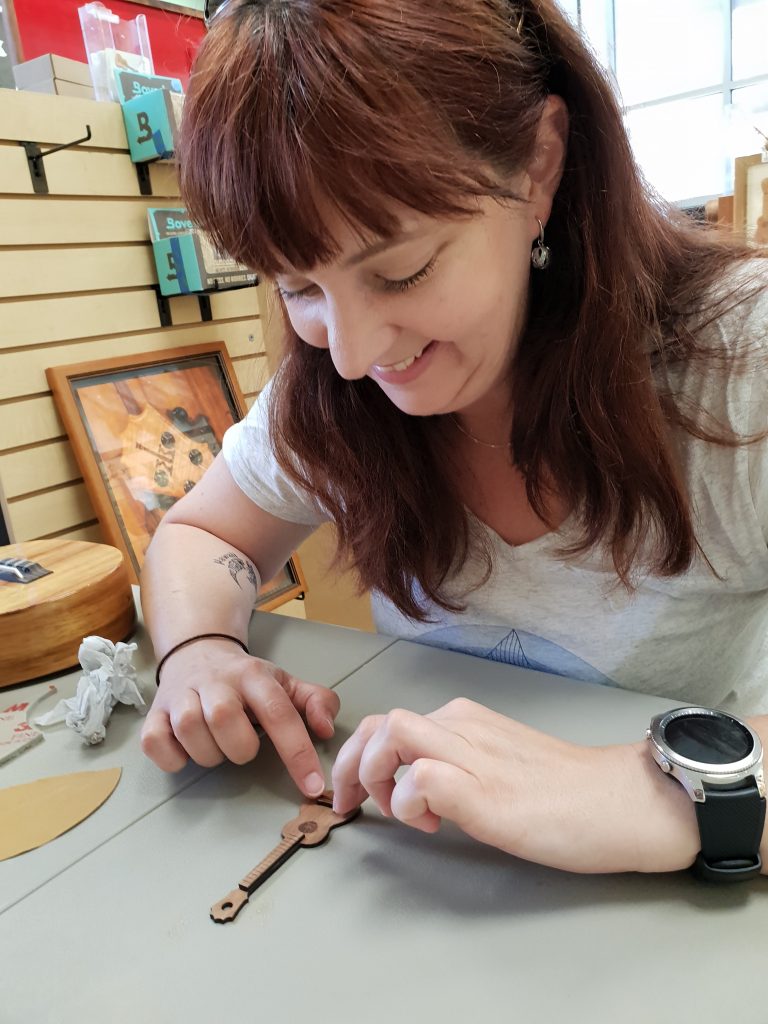
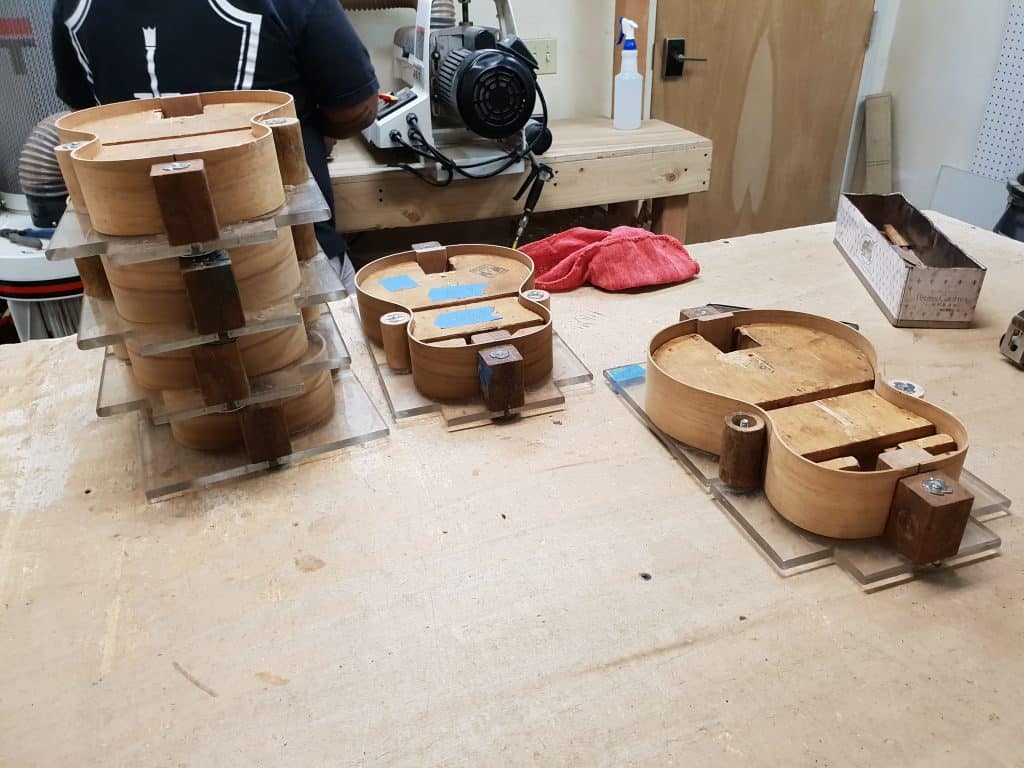
KoAloha Ukelele is a family owned and operated company that has been making premier quality instruments for over 20 years. The tour will commence in the showroom at 9am, with examination of the various ukelele’s on sale and constructing a miniature ukelele keyring to understand how the instruments are put together.
While the glue on your keyring instrument dries, your host will escort you into the factory itself and proceed to show you every step in the process of making the instruments, from the obtaining and cutting of the Koa wood, to the bending of the wood, construction and polishing. You will see what makes their instruments unique and innovative, and so highly regarded. Lloyd took me through the factory, and proudly showed me the wood that he had put aside to make the marital ukelele for his son. Due to the rare waves in the Koa wood, already an incredibly expensive material, the completed instrument will be incredibly valuable.
This is a really fun and interesting experience and I’m really glad I made time in my trip for it. Lloyd also passed on some great tips for the rest of my trip.
KoAloha Ukelele Factory is located on Kona Street in Honolulu. From Waikiki take the #13 bus and ask the driver to let you know when to get off. An all day pass for the bus will cost you USD $5.50, for as many rides as you want.
Pro-tip #8:The bus is one of the easiest ways to get around outside of Waikiki. On your phone bookmark the site moovitapp.com or download the Moovit app for up to date information on all routes and times.
Pro-tip #9: Carry the right change for your bus ticket. The drivers don’t carry change and the ticket machine will not dispense it either.
Activity Level: Light. The factory is small and there is minimal walking required.
Price: Free! Tours kick off at the KoAloha Factory at 1pm Monday to Friday.
Duration: 90 minutes
Shaping Ukeleles
Shopping at Ala Moana
I have paired a trip to the huge Ala Moana shopping centre with the Ukelele Factory as it is a 5 minute walk between them. There is a large food court and plenty of bargains to be found.
Pro-tip #10: The buses do have signs indicating that anything taking up a large amount of space that would prevent someone having a seat is not permitted. I took my small backpack and only had one additional carry bag, but if you shop up a storm you may need to look at an Uber back to your hotel.
If the Ukelele Factory is not your style and you’d prefer to spend the whole day shopping you may wish to think about a trip to the Waikele outlets instead. About 30 minutes from Waikiki, there are over 50 outlet stores at Waikele. You can book the Waikele shuttle to transport between the outlet and Waikiki hotels.
Pearl Harbor was without a doubt one of my favourite experiences in Oahu, and definitely one that is not to be missed by visitors. However there are some misconceptions about visiting that can be confusing. It is easy to think you need to go on an organised tour in order to be guaranteed entry, but this is not the case. While an organised tour might be exactly what you want to do, it’s important to understand what they do and don’t include when choosing your tour, and realise that they will often be quite time limited at the site and include other activities before or after that might not interest you.
I went solo to Pearl Harbor, and I spent the entire day and still ran out of time to see everything.
So lets start with the basics to help inform your decisions.
There are four locations as part of the Pearl Harbor historic site;
USS Arizona Memorial
USS Bowfin
Pearl Harbor Aviation Museum
USS Missouri
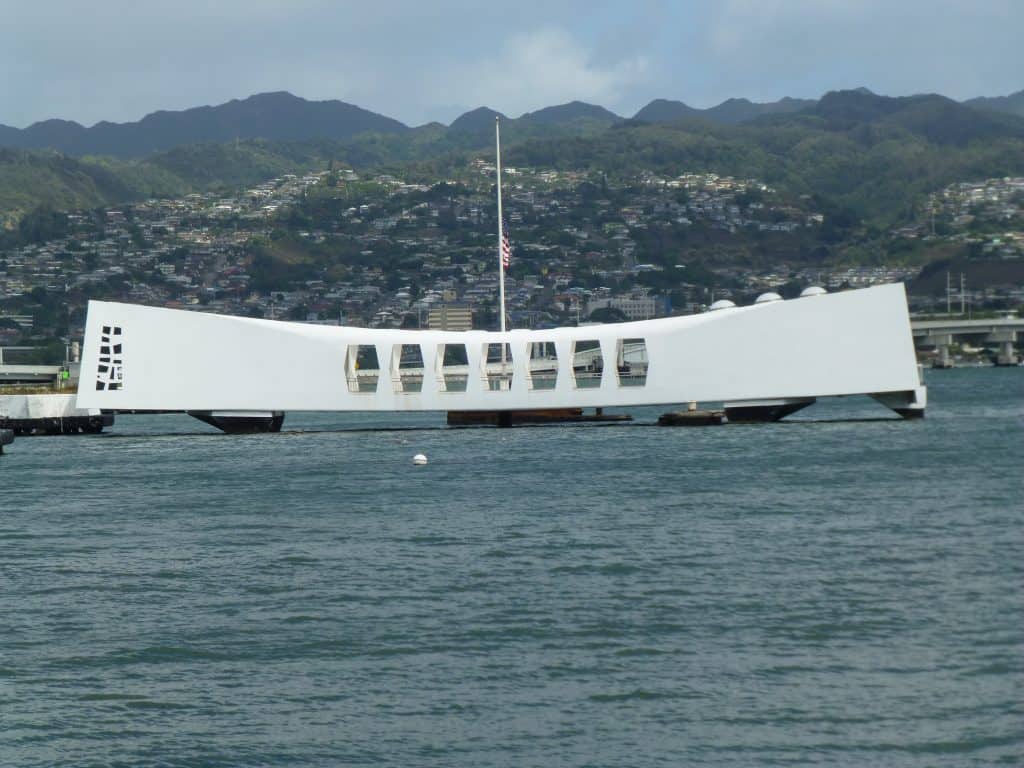
USS Arizona Memorial
The USS Arizona memorial is built over the remains of USS Arizona, sunk in the Japanese attack upon Pearl Harbor in WW2. It is currently unable to be boarded, as repairs are required to re-anchor the memorial to the floor of the harbor and the potential for un-exploded ordinance makes this a painstaking process. Boats run at regular intervals taking visitors out to the memorial and circling it instead, however, whether the boats will run is determined by the US Navy on a daily basis. The day I visited they did not run due to weather.
The Arizona memorial is incorporated in an audio tour narrated by Jamie-lee Curtis that is well worth doing.
USS Arizona Memorial
USS Bowfin
The USS Bowfin is a decommissioned US Navy Submarine active in both WW2 and the Korean War period, now permanently homed at Pearl Harbor. Visitors can board the Bowfin and walk through its interior. There is also an audio tour available.
Pearl Harbor Aviation Museum
A shuttle ride from the Arizona and Bowfin locations, the Aviation Museum is housed in two WW2 hangers and includes a number of WW2 era planes, flight simulators and a growing collection of other vintage aircraft.
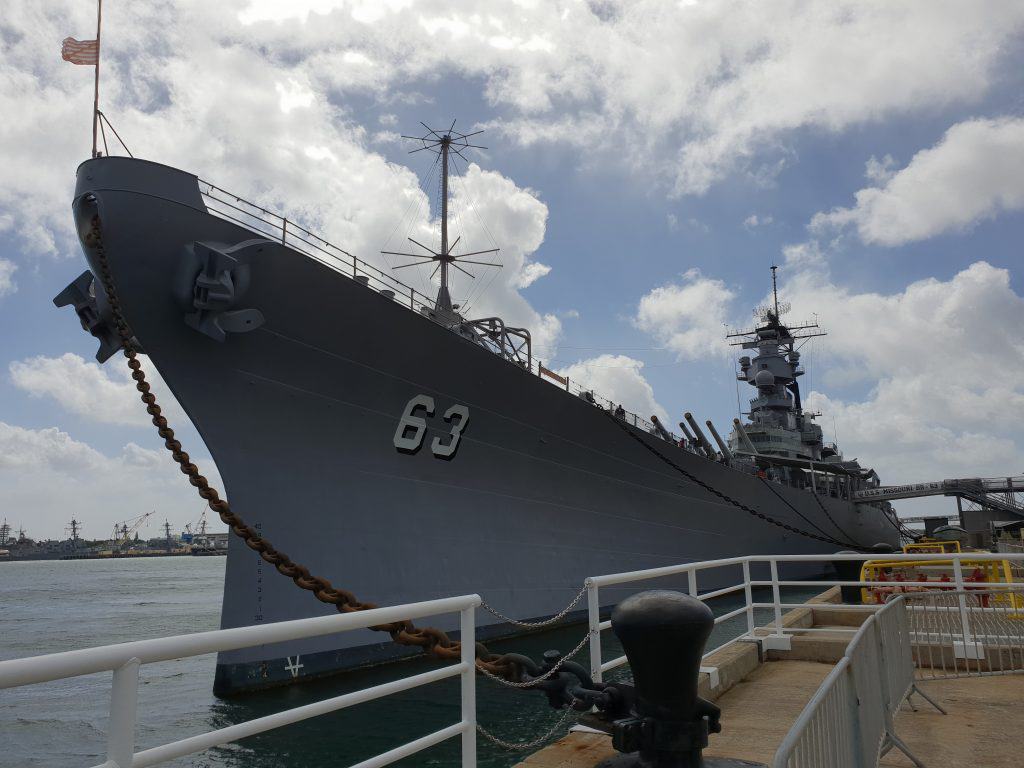
USS Missouri
Also a shuttle ride from the Arizona and Bowfin the USS Missouri was the last US battleship, and the one upon which the parties to WW2 signed the document of surrender which ended the war. Visitors can spend hours walking the decks and passages of the ship.
USS Missouri
So now that you know what’s there, what do you want to see?
My view is prioritise the whole Arizona section with the audio tour, and the USS Missouri. I spent the bulk of my day on these two, with a quick walk through the Bowfin. I unfortunately ran out of time to visit the Aviation museum.
Pearl Harbor Tickets
Entry to the USS Arizona Memorial is free, however if you haven’t reserved a ticket you will need to rock up early and get one of the 1,300 tickets that get issued for the Arizona Memorial on a first come first served basis. The Visitors Centre opens at 7am.
These tickets will not include admission to the other three locations.
Tickets become available online for purchase and reservation at 7am the day prior to entry . I recommend the USS Arizona Memorial + Passport Package for USD $89.99 per adult. This includes entry to all four locations, audio tour at the Arizona and shuttle between locations. You will need to arrive at the Pearl Harbor Visitors Centre to collect your tickets at least one hour prior to your scheduled boat run out to the Arizona.
Pro-tip #11: Wear clothing with pockets, or find a clear plastic carry bag – I saw one person using a clear toiletries bag. Anything which can conceal items is not permitted on the site.
Getting to Pearl Harbor
Don’t do what I did and just assume you’ll hop on a bus.
You absolutely can, but as Pearl Harbor is nearly 90 minutes by bus and only about 25 minutes by car it does seem to be a waste of time.
If you don’t have a car, the Waikiki trolley runs to and from Pearl Harbor at less than USD $65 per person, which will likely be cheaper than an Uber.
If there is a group of you, I understand you can also organise a private shuttle. I couldn’t find information about this online but your hotel should be able to assist. Uber would also be cost effective for more than one person.
Otherwise the push seems to be to get you on an organised tour.
The GoOahu card is worth a look, it offers discounted rates on many Oahu attractions, including Pearl Harbor.
Activity Level: Moderate. It’s not difficult but be prepared for a lot of walking.
Price: Passport package covering all four sites is USD $89.99 per adult
Duration: I arrived a little after 9am and ran out of time for the Aviation Museum, even staying til nearly 5pm.
For more detail on Pearl Harbor, including the most frequently asked questions, you can check out my post on Pearl Harbor here.
Day 6 – Scenic/Physical Activity
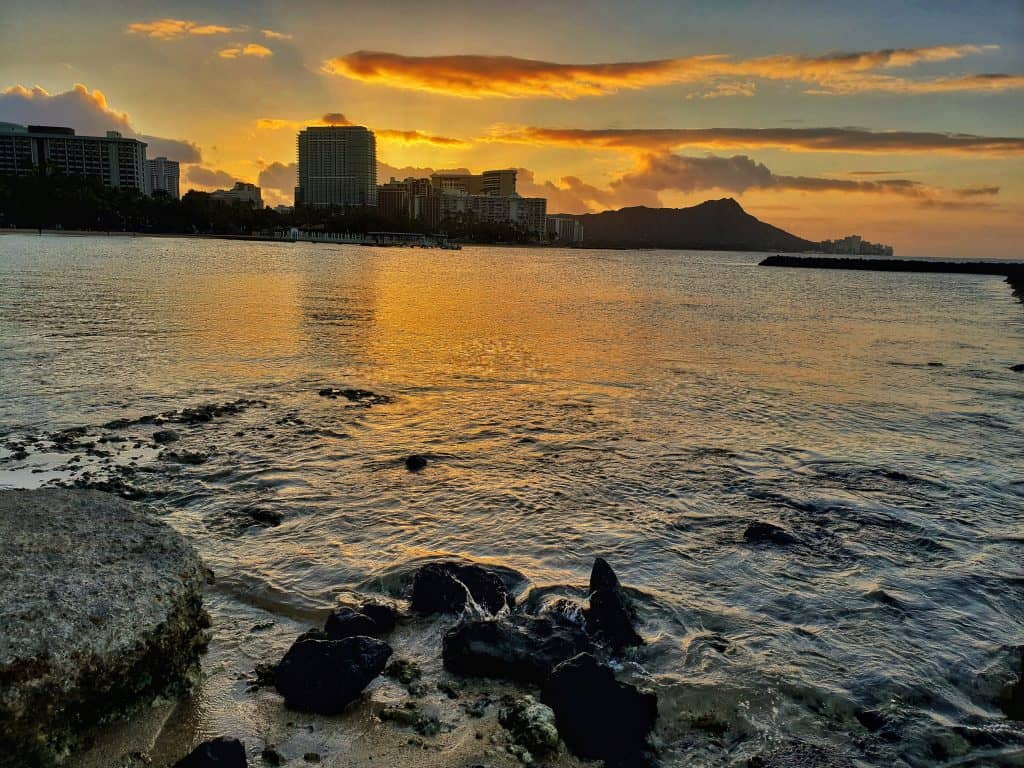
Sunrise Photography
An early one this morning as you head to one of the top spots for a Waikiki sunrise as recommended by the boys at Hawaii Photography Tours.
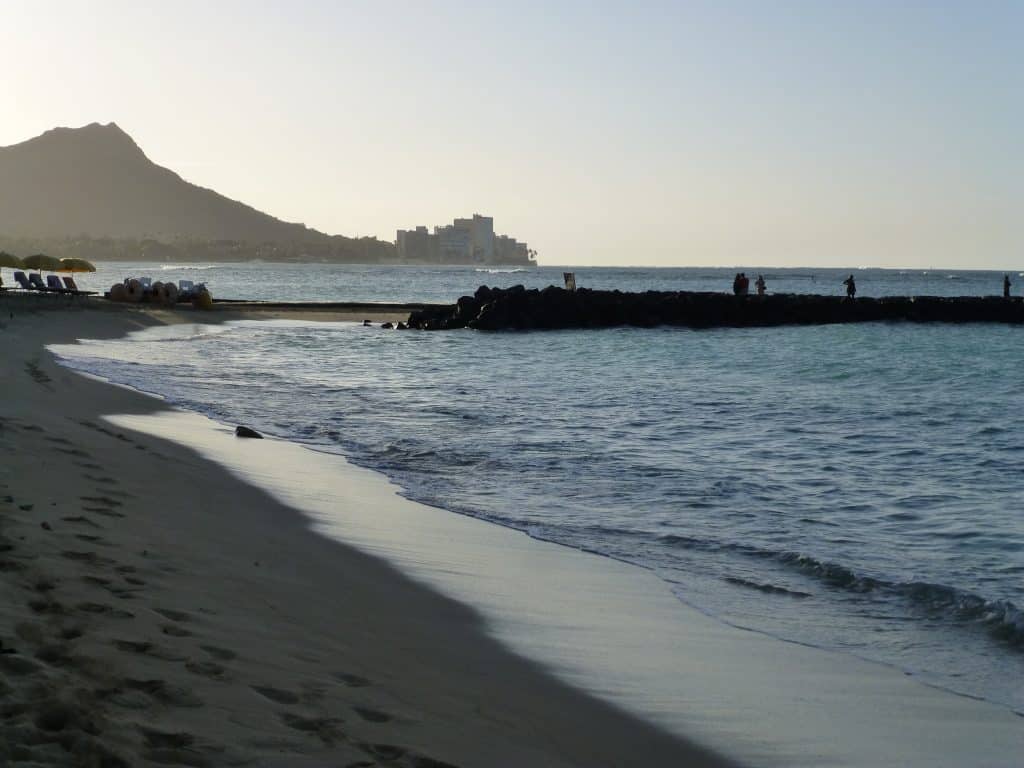
The length of your stroll will of course depend on where you are staying, but you are going to be heading for the Hilton Hawaii Village and then walking around behind it, where you will find a rock jetty that offers a great view of the sun rising over Waikiki. The morning I did this there were probably another fifteen people that showed up so the earlier you can secure a spot the better. It also means you can capture the great pre-sunrise light too.
Sunrise over Waikiki
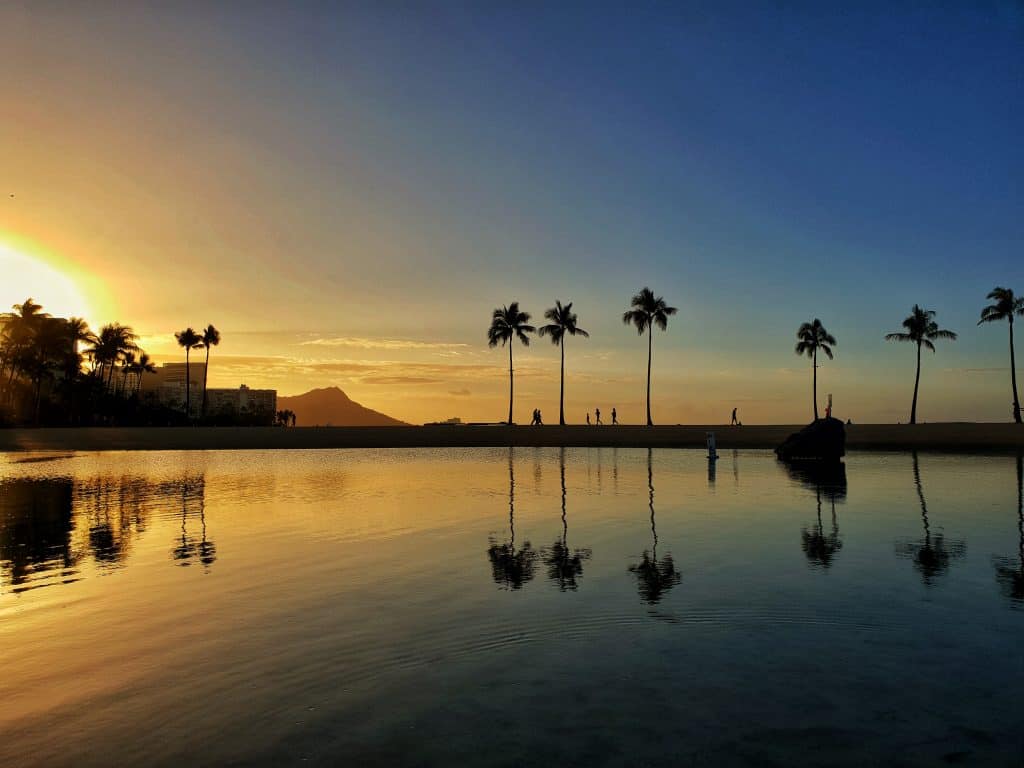
My favourite shot of the morning actually came from the lagoon nearby, walking around the far side to capture the reflections on the water.
Sunrise reflections
Pro-tip #12: Don’t forget your tripod!
After the sunrise take a stroll down along the beach for more photo opportunities before the beach gets crowded.
Treat yourself to a nice breakfast on the beach. Dukes does a great buffet.
Activity Level: Light. An easy stroll.
Price: Free
Duration: Approximately 2 hours
Hike Diamond Head
You can see Diamond Head looming from just about everywhere in Waikiki. The 760 foot summit of the extinct crater offers spectacular panoramic views and the chance to see more remnants of WW2, as it served as a lookout post for the US military.
Diamond Head is a really easy bus ride out of Waikiki on bus route #23. It does however mean a bit more of a walk than if you have a car, as the buses do not go right up into the crater where cars are able to park for a fee. If you want to extend your hike even further you can walk from Waikiki to Diamond Head in about an hour.
While not what I would call a challenging hike, it will definitely get your heart rate up as you climb. The path has been roughly cemented, so while you aren’t clambering over a lot of loose rocks you will still need good footwear. There is also a couple of sets of stairs and a tunnel through the rock which was pretty cool. There are plenty of spots on the way up to stop and catch your breath.
Tunnel through rock
The views from the top are pretty exceptional, it is easy to see why it was a military lookout point.
View from inside the lookout point
Waikiki and Honolulu from top of Diamond Head
If you are so inclined, I did read that it is a good vantage point for sunset from the top. Ensure you commence your hike prior to last entry at 4.30pm and park outside of the crater grounds to ensure you don’t get locked in.
Pro-tip #13: This is an activity for earlier in the morning or later in the afternoon. Avoid the heat of the middle of the day.
Activity Level: Potentially vigorous depending on your pace. It isn’t difficult but you are going up a 760 foot summit so it will lift your heart rate.
Price:USD $1 entry to the hike plus $5 if parking your vehicle. By bus $5.50 for a day pass.
Duration:Depends on your pace, and how long you spend at the top. Best to allow a few hours as the hike itself takes 1.5 – 2 hours.
Manoa Falls was also on my list to hike but I unfortunately ran out of time. If you’re after a waterfall hike it’s definitely worth a look!
If you’re after a hike on the other side of the island, take a look at Crouching Lion.
If a guided tour is your preference, some options are below.
Plan to spend your morning packing as there is a good chance that your flight is going to leave early tomorrow.
Pro-tip #14: Make sure you have your airport transfer organised!
My final day was an example of best laid plans going awry, so I’m going to include what I had planned to do, as well as what I actually did!
Option 1: Luau
A Luau is a traditional Hawaiian party or feast which usually includes some form of entertainment. There are countless options and they are quite expensive, but it is a traditional experience that most tourists like to enjoy at least once.
After a lot of research I had planned to attend the Polynesian Cultural Center, appealing due to incorporating other activities in addition to the dinner and shows, making it better value in my view. It is essentially a theme park within and is well reviewed by guests. It is on the other side of the island so about an hours trip from Waikiki, but transfers can be purchased in addition to your ticket. It is also an alcohol free venue.
Activity Level:Light
Price: Dependent on the package prices start at USD $119.95 and go up to $242.95 for adults. The mid-level package that includes entry to the park, dinner and show is $139.95
Duration: 9 hours commencing at 12noon
Some other Luau choices are included below.
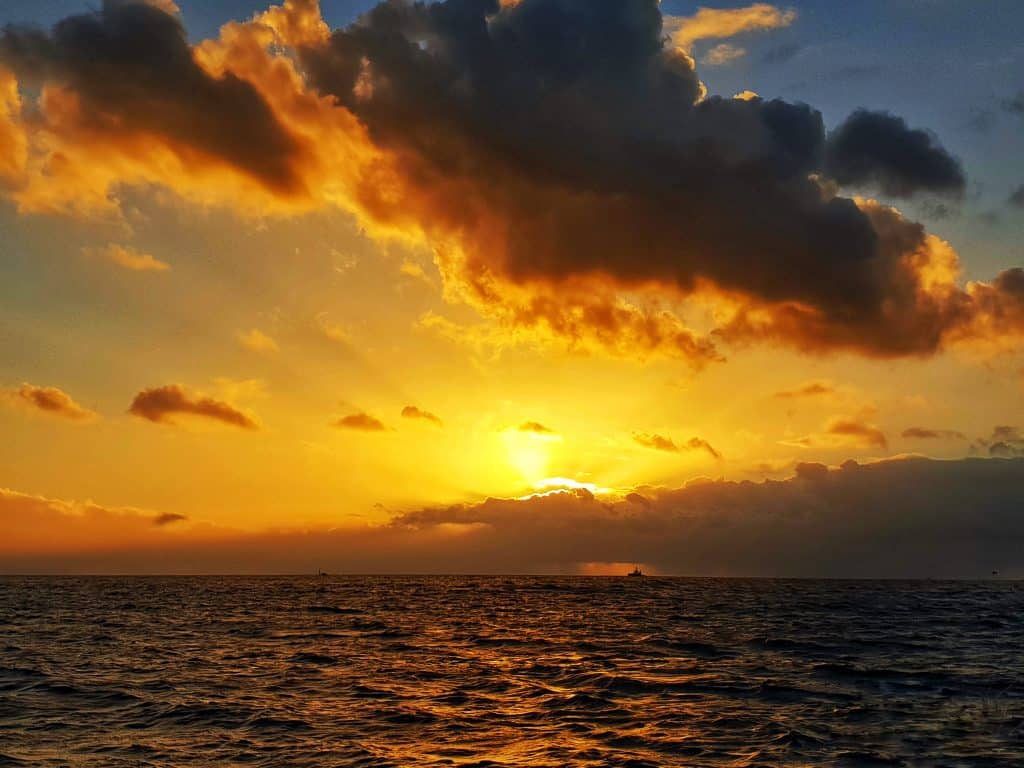
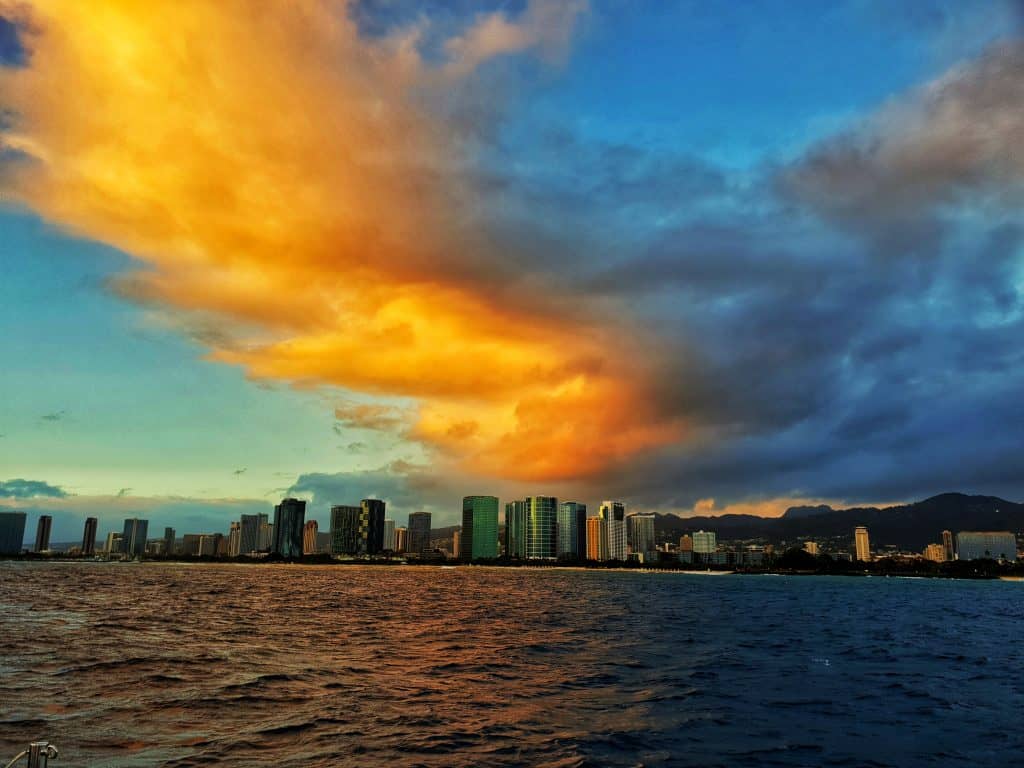
Option 2: Sunset Cruise
This option gives you the most part of your day to play with if there is any last minute activities or shopping you want to squeeze in. This is what I actually ended up doing on my final night in Waikiki and even got to witness a proposal and whales breaching in the distance!
My trip departed from the pier and traveled out into the open water, following the coastline. We had spectacular views of Diamond Head, the sun setting over the ocean and colourful skies over Honolulu.
My trip was privately organised, but some options are below.
Pro-tip #15: Remember a light jumper or jacket, it can get cool and sometimes wet!
Pro-tip #16: Take anti-nausea pills beforehand if you are prone to motion sickness.
Activity Level:Light
Price:From USD $78
Duration: 90 minutes – 2 hours
Day 8 – Goodbye!
Say your farewells to this amazing place as you leave for home!
If you’ve never been to Hawaii before, you’ll find when you start researching that there really is an astonishing amount to do that could fill far more than 7 days in Oahu. This itinerary does give you a taste however, and a little bit of everything!
It is worth at least taking a look at the Go Oahu card to see if you can save some money on local attractions. It includes discounts to numerous Oahu attractions and activities, including Pearl Harbor and the Polynesian Cultural Centre, and can prove good value if you want to do enough of the attractions covered
Planning a visit around the islands of Hawaii? Check out Hawaii Island Hopping, or if you are planning to head over to Maui here are things to do in Maui on a budget.
If you’re the kind of traveler who likes to have their guide at their fingertips, you can also purchase a digital guide to Oahu with kids.