For the Aussie traveler, dining in the USA can be a glorious adventure for the tastebuds, and Waikiki on the island of Oahu, Hawaii is no exception with so many amazing foods and places to try.
I’ve put together a list of the must-try Waikiki eats for Aussies abroad in Hawaii.
Best Coffee in Waikiki
As it was knowingly observed in my Guatemalan travels, we Australians are coffee snobs. We like our coffee and we are particular about it too. It is also one of the most commonly asked questions from Australians I see on the Hawaii travel forums.
Unfortunately, the coffee culture in the USA is somewhat lacking, and while the Americans seem to like their brewed liquid well enough, no one claims it is up to our standards.
But if you know where to go, you can still find great coffee in Waikiki. Be aware it will set you back a minimum of USD $5.
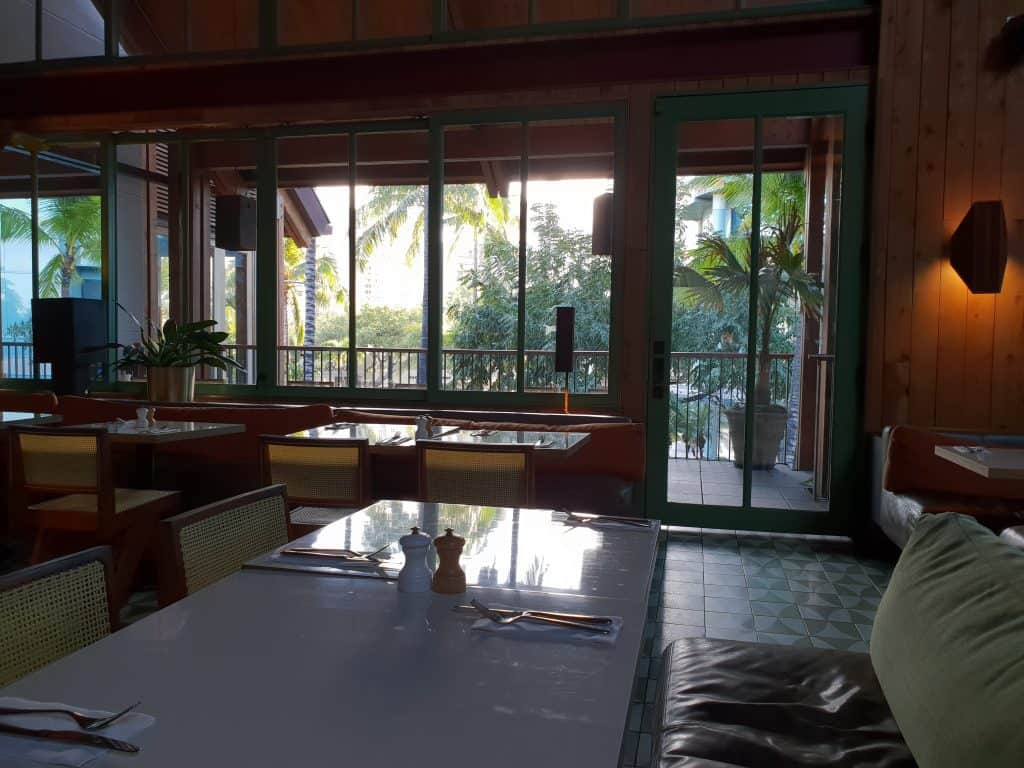
Bill’s Hawaii
Bill’s is a great Waikiki cafe which is strangely situated above a clothing store which you walk through to get go up the staircase at the back of the store. Don’t do what I did and just assume you can go on up though, the store attendants like to find out what you are after before you go up.
At the top of the stairs is a delightful open space with high ceilings filled with natural light and funky, upbeat tunes playing. Bills has a great breakfast menu, and the coffee was the best I had in Waikiki. It was just a shame I didn’t find it until my last day! They are an international franchise from Britain that is also found in Australia, which might be why their coffee is good. They serve Kaú coffee from the Big Island of Hawaii.
A glimpse inside the spacious Bills
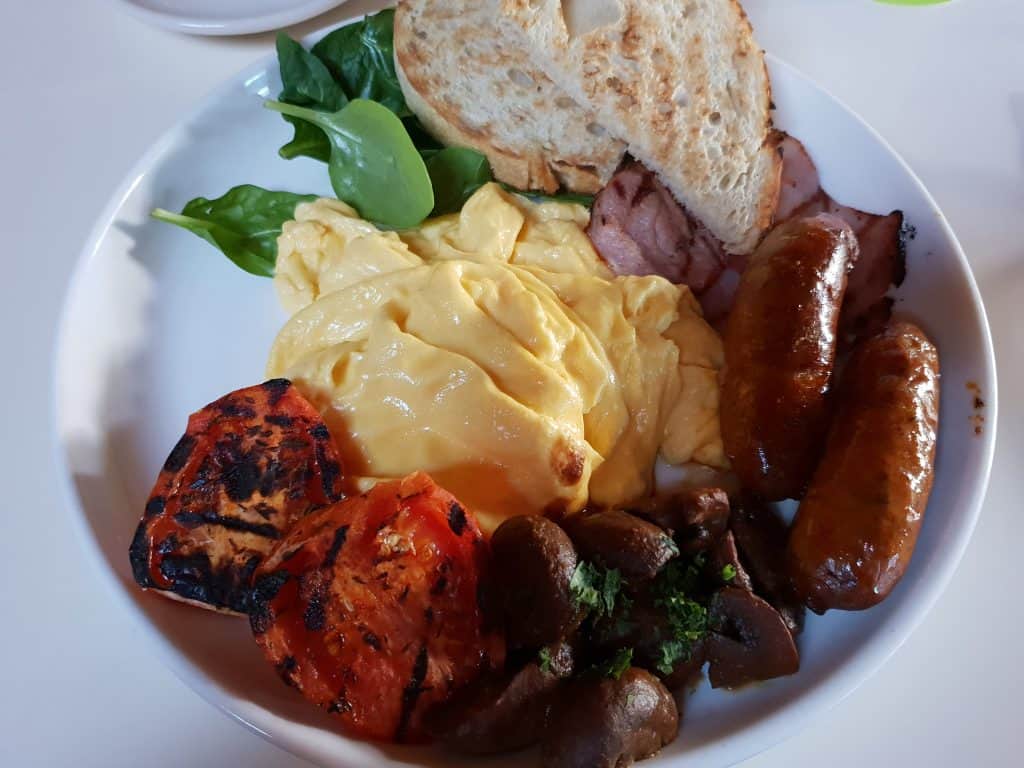
Breakfast was delicious also, but probably not the place to go for breakfast every morning. A big breakfast and two coffees set me back USD $40.
A tasty big breakfast from Bills Hawaii will set you back USD $24
Where to find Bills Hawaii: 280 Beachwalk Avenue, Honolulu
How to get there: From Waikiki it is a short walk from the main drag
Kai Coffee
Until I found Kai I had been supplementing my morning need for caffeine with the chilled Starbucks coffee drinks from the ABC store near my hotel. Not bad if you don’t mind the sugary sweetness.
Kai is rated as the top coffee on Trip Advisor by Australians, and you’ll find a long line in the mornings. They boast artisan roasted Hawaiian coffee.
Where to find Kai Coffee: Kalakaua Avenue, at the base of the Hyatt Regency.
How to get there: It is on the main road through Waikiki
Island Brew Coffeehouse
If you happen to spend a day at the Ala Moana shopping center, Island Brew Coffeehouse is the place to go for a good coffee. They also serve their takeaways in compostable cups made from corn, so you can feel good about the environment while you enjoy your caffeine fix.
Where to find Island Brew Coffeehouse: Level 3 of the Ewa Wing, Ala Moana Center. Near the Bloomingdales entrance.
How to get there: Bus routes 8, 19, 20, 23, 42 and E from Waikiki
Sweet Treats in Waikiki
Cinnabon
An American chain which will hopefully soon make it to Australia, the cinnamon buns are just to die for! Pastry scrolls filled with cinnamon and drizzled in a sweet glaze, these will delight any sweet tooth.
Where to find Cinnabon: Food court in the Ala Moana Center
How to get there: Bus routes 8, 19, 20, 23, 42 and E from Waikiki
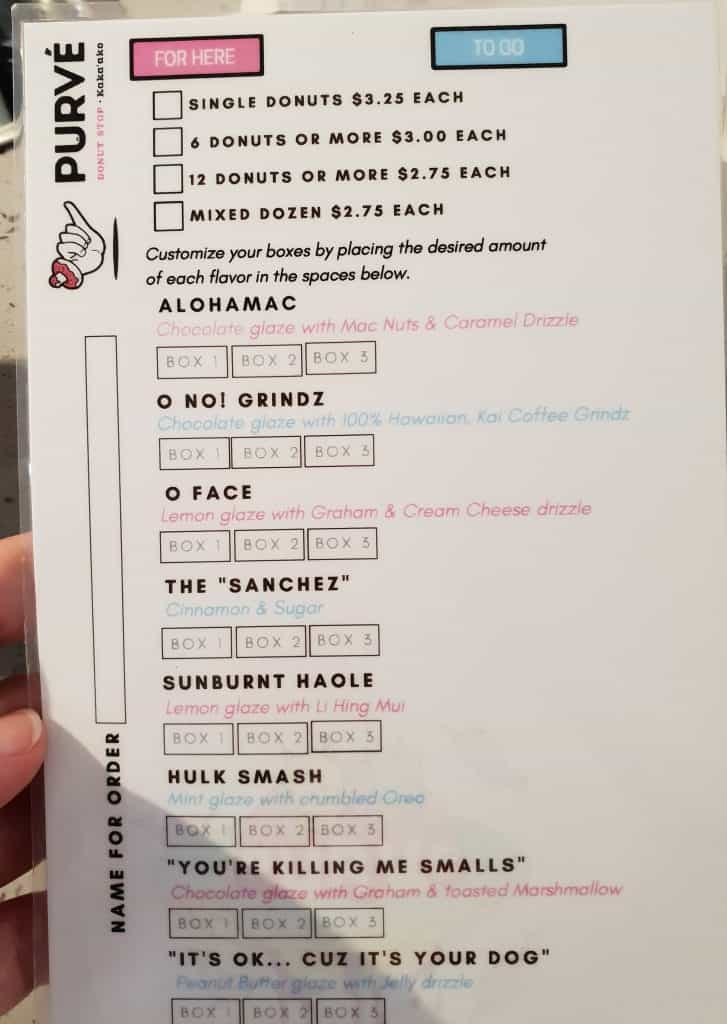
Purve Donut Stop
Colourful selections on display
This one I discovered because it was virtually beside the Ukelele factory I toured, and my new friend Lloyd urged me to try one as they were the best donuts in Honolulu. Their menu is colourful and creative, even down to the names! And they are oh so good!
Where to find Purve Donut Stop: 1234 Kona Street Honolulu (2nd floor of Iolani Center)
How to get there: Purve Donut Stop is an easy 5 minute walk from the Ala Moana Center.
Lloyd insisted on filming me trying the ‘You’re killing me smalls’ donut, while making fun of my accent! You can check out the video below for a giggle.
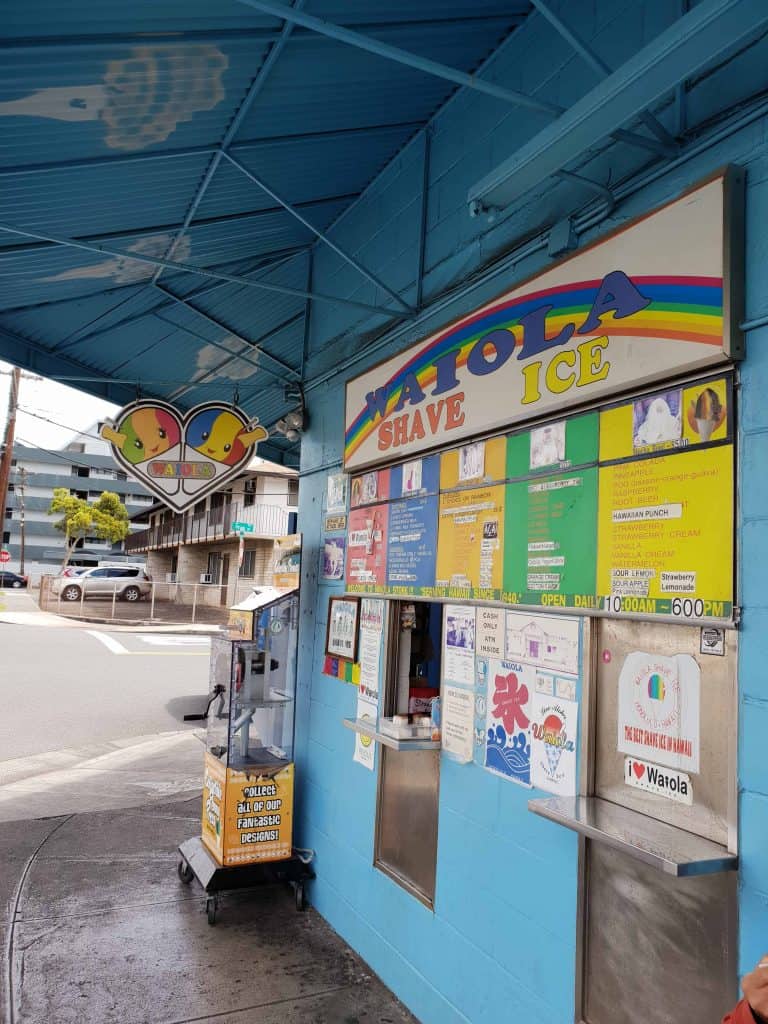
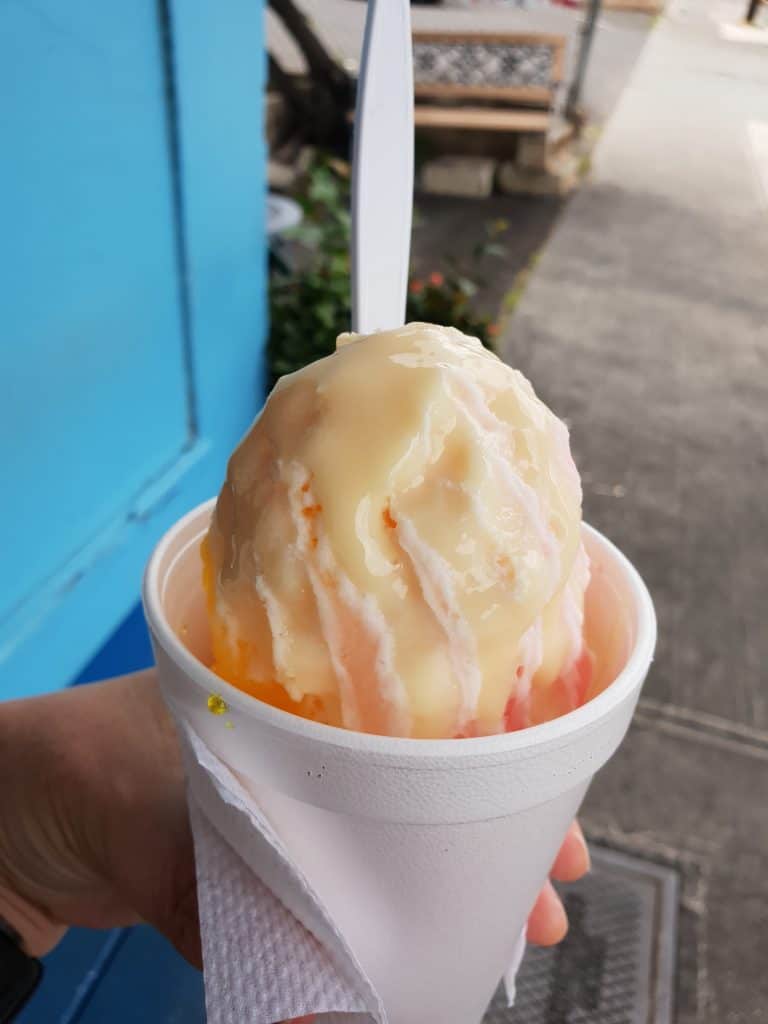
Waiola Shave Ice
Not something that we come across in Australia, nor did I see on my LA visit, but shaved ice is immensely popular in Hawaii. It is literally as it sounds, a giant block of ice is shaved down into small crystals, then various flavoured syrups are added to create what is effectively a delicious, soft iceblock in a cup. Now most Hawaii articles will tell you to go to a place called Matsumoto for the best shaved ice. I didn’t get there, but Waiola Shave Ice was another of Lloyd’s recommendations with the assurance that it was where all the locals go for the best shaved ice in Honolulu.
Waiola Shaved Ice is a small family business run out of a grocery store. On Lloyd’s recommendation I tried the Hawaii 5-0 drizzled with condensed milk, though I forgot to order the ice-cream base. It’s a must try in Waikiki!
Where to find Waiola Shave Ice: 2135 Waiola Street Honolulu
How to get there: A pleasant 20 minute stroll from Waikiki
Hawaii 5-0 flavour Shaved Ice
Lewers Lounge
This was a great tip from the Uber driver who picked me up from Pearl Harbor. Lewers Lounge is a funky little Jazz bar offering live music, cocktails and some fancy desserts! They’ll also keep putting plates of chocolate treats in front of you to nibble on while you sip on your cocktail.
Fancy profiteroles!
Where to find Lewers Lounge: I walked around the block a few times looking for this one, as you need to walk through the foyer of the Halekulani hotel to find it! It’s at 2199 Kalia Road Honolulu, at the top of Lewers street.
How to get there:A little over 5 minutes walk from Waikiki
The best food in Waikiki
Pro-tip: Restaurants in Waikiki tend to be pretty full so expect to wait potentially some time for a table if you haven’t made a reservation. However, most also offer full service at the bar so if you’re on your own skip the wait by taking a seat at the bar if there’s one free! Expect huge meal sizes and often a basket of bread before your meal arrives. They’ll also offer you a box if you are unable to finish.
I have a personal rule that when I’m by the water I’ll indulge on seafood, so all of these recommendations have a number of seafood options to choose from.
The Cheesecake Factory
Another American Icon not to be found in Australia, don’t be fooled by the name as The Cheesecake Factory offers an extensive menu as well as their amazing desserts.
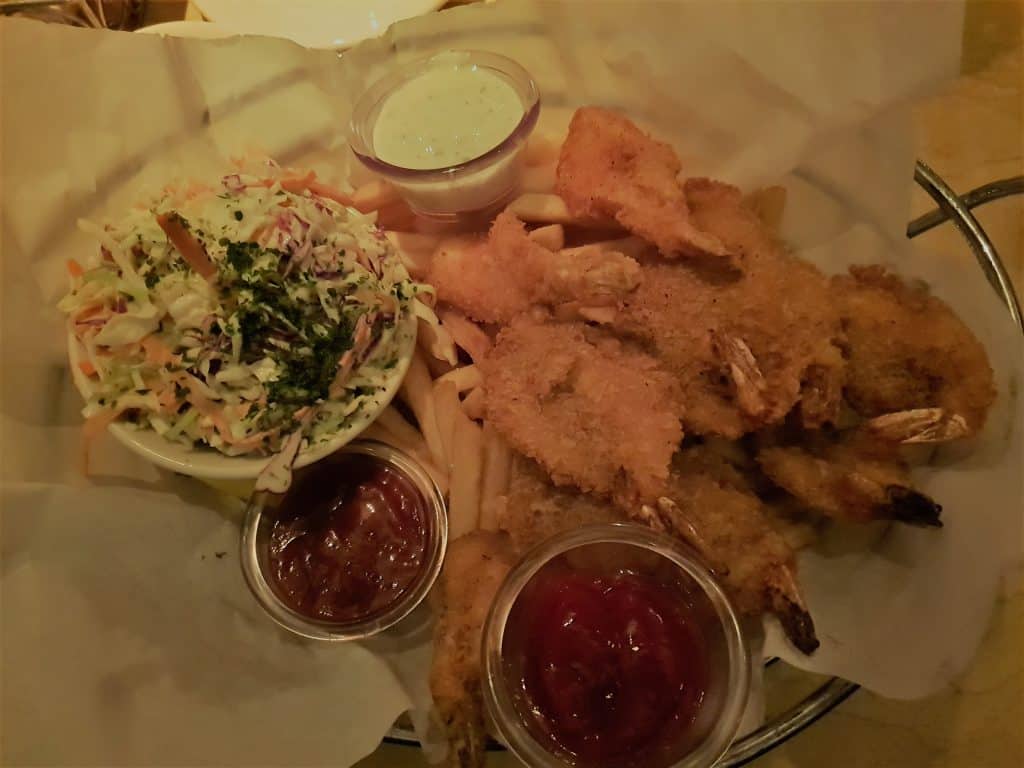
The lighting in The Cheesecake Factory is dim and it’s winding expanse is far bigger than it looks from the outside. At one end water spills down a textured wall. Though I had already ordered a considerable amount of food a basket of warm bread is placed in front of me within minutes and literally 10 minutes after taking my order my piping hot and delicious shrimp platter follows. There is a lot of food on this plate!
Though I am pretty full after not being able to finish the meal, I feel like I absolutely need to try a dessert! There are two full menu pages of choices that take a while for me to ponder. It all sounds divine but I eventually settle on the Chocolate Tower Truffle Cake, layers of fudge cake with chocolate truffle cream and chocolate mousse. I manage about six bites of the large, rich dessert before the waiter spots me put my spoon down and is at my shoulder asking if I would like him to box it for me. It lasted me another two nights!
Where to find The Cheesecake Factory: You can’t miss it on the main drag of Waikiki
How to get there: A short walk from your Waikiki accommodation
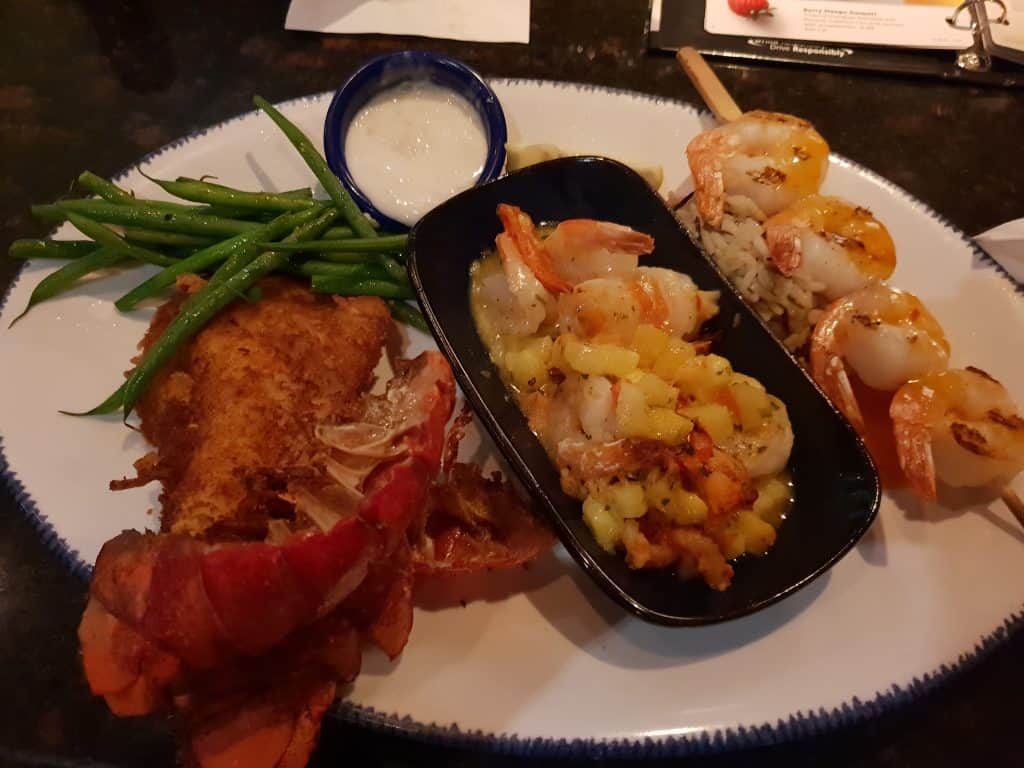
Red Lobster
Another American iconic restaurant chain viewers of The Big Bang Theory will have heard mentioned, Red Lobster has an extensive seafood menu to choose from largely featuring a great variety of one of my favourites; Lobster!
This is another restaurant that will put down a basket of bread pre-meal, as well as a salad. I had the lobster in paradise, crumbed lobster meat which also featured a skewer of prawns and a lobster and shrimp Caribbean pineapple beurre blanc. The beurre blanc was delicious!
Where to find Red Lobster: 1765 Ala Moana Boulevard
How to get there: An easy 15 minute walk from Waikiki or the bus route to the Ala Moana Center will go past the door
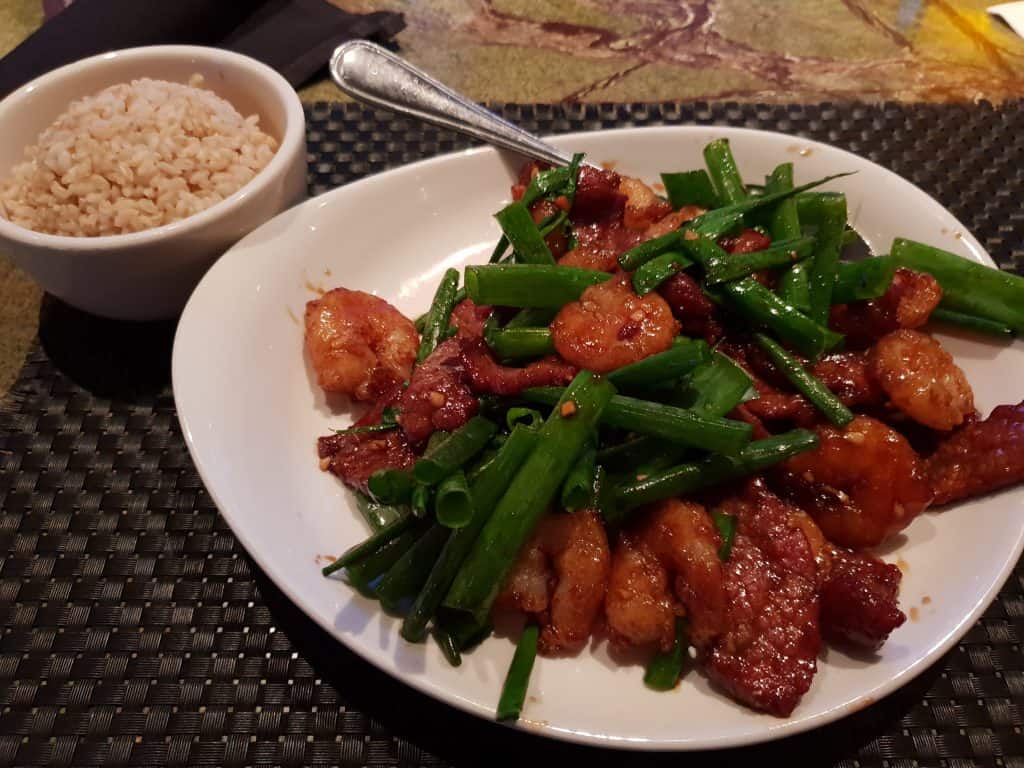
PF Changs
An another American restaurant chain, offering Asian and Chinese food. The serving sizes, while still large, are closer to what we expect in an Australian restaurant and the food was exceptionally good.
Surf and Turf
Where to find PF Changs: On the main drag of Waikiki, not far from The Cheesecake Factory
How to get there: A short walk from your Waikiki accommodation
Tony Roma’s Steakhouse
I was craving some good pasta, so went in search of some good Italian and stumbled upon Tony Roma’s Steakhouse. Tony Roma’s is well known for their ribs but the pasta meal I had was absolutely top-notch. As were the cocktails!
Where to find Tony Roma’s: 1972 Kalakua Avenue Honolulu
How to get there: 5 minute walk from Waikiki
Dukes
For oceanside views you can’t beat Dukes!
Dukes is a frontrunner for the best breakfast in Waikiki, offering a buffet breakfast for USD $18 with a great selection of food and omelettes made to order.
They also have a great dinner menu, and if its your birthday you can have a free slice of Hula Pie -a whopping great chunk of ice-cream cake that was big enough for four adults to share for dessert!
Where to find Dukes: The Outrigger Waikiki Resort, on the main drag of Waikiki
How to get there: A short walk from your Waikiki Accommodation
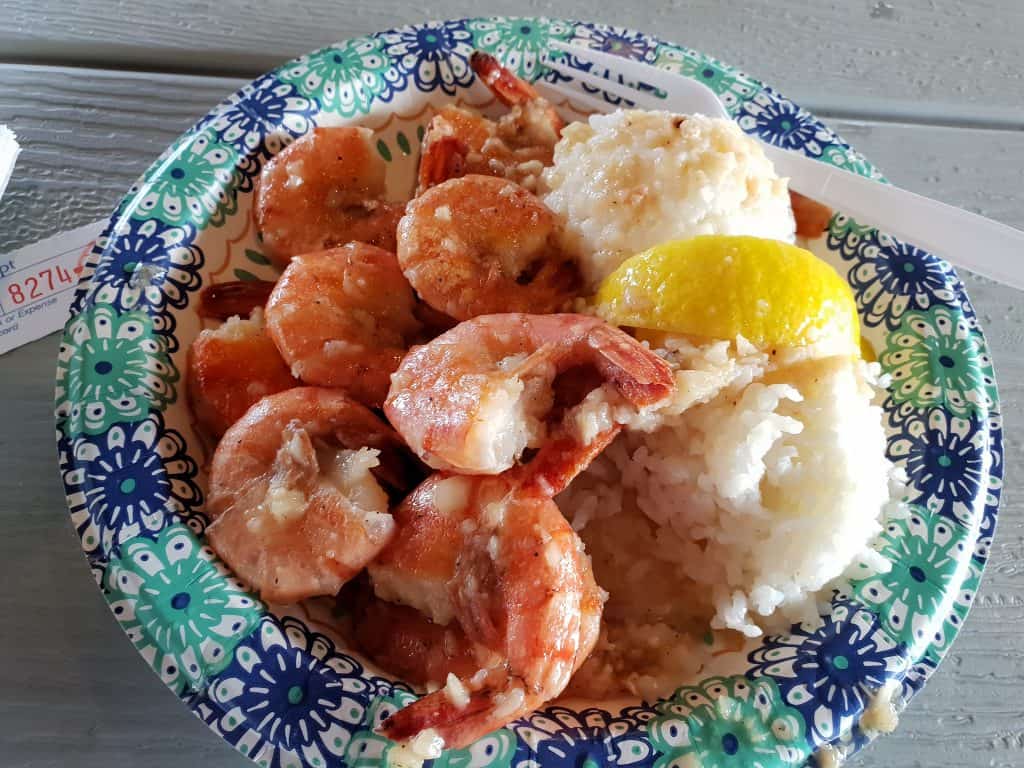
Giovanni’s Shrimp Truck
This one is on the North Shore of Oahu but I’m still giving it an honorable mention. The Scampi is messy but incredibly tasty!
Where to find Giovanni’s Shrimp Truck: 66-472 Kamehameha Hwy, Haleiwa
How to get there: You can probably expect this to be a pit-stop on most tours incorporating the North Shore of Oahu.
The things you should add to your packing list for Hawaii
So you’ve booked yourself a trip to the beautiful Hawaii and your departure date is looming. You might think that packing for Hawaii is just like any other beachside holiday, and while this is largely the case there are a few things that might not have occurred to you. So here’s a packing list for Hawaii from the perspective of an Aussie gal!
This list contains affiliate links. When you make a purchase through one of these links I earn a small commission at no additional cost to you. Making a purchase through these links is a great way to show your love to this site.
Due to product differences and availability in regions, a separate link is provided for Australian users. Wherever possible product recommendations have been matched.
Digital Luggage Scale
If you’re heading to Hawaii chances are you are fully aware of the fact that it’s a location pretty well-known for its shopping. If you are also a budget conscious traveler, there is also a fair chance you have some luggage limitations. I purchased a pair of the Fosman Digital luggage scales for my trip, ensuring I knew exactly how much weight I had in my case at both ends. They were pretty on the money when I got to the airport too!
Click here to see this product in the Australian store.
Reef Safe Sunscreen
Now normally I wouldn’t stick this on a packing list because it’s a pretty common sense item, however Hawaii passed legislation which will come into effect in 2020, banning the sale of sunscreen containing ingredients which have found to be harmful to reefs. Trouble is, they are the key ingredients in most sunscreen.
We Aussie’s like our SPF 50+, Thinksport is compliant with the new requirements and safe for kids. You can find it in the Australian store here.
Clear Plastic Toiletries bag
Now this one seems a little strange I admit, but there is logic behind it.
Pearl Harbor is on the list of most visitors to Hawaii. It is also an active naval base and as such is subject to some security restrictions. One of these is no bags, due to their ability to conceal. I loaded up my pockets, but saw someone walking around with a clear toiletries bag instead and thought it was a fabulous idea! And it will even carry your toiletries!
Click here to see this product in the Australian store.
Turkish Towel
I invested in this little gem a few years ago when I was looking for something big yet compact. I saw a review of these full size towels made of lightweight cotton and went straight out in search of one. I was hooked! They are perfect for travel, rolling up to a small size and incredibly quick drying, unlike heavier beach towels. If you’re staying in an Airbnb or somewhere they wont give you beach towels then a Turkish Towel is what you need. I never travel without mine now and it came in handy in Oahu.
Click here to see this product in the Australian store.
Waterproof Phone Pouch
Transform your phone into an underwater camera for capturing your adventures on and in the water in Hawaii. No need to go to the expense of purchasing an underwater camera given the quality of modern phone cameras – just pop it in a waterproof pouch and you’re good to go! While I took an underwater camera with me to Hawaii, I got some great footage on my phone in Belize with one of these.
Click here to see this product in the Australian store.
Travel Tripod
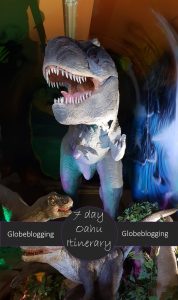
You are going to have some amazing photo opportunities in Hawaii, especially if you follow my 7 Day Oahu Itinerary. It is worth investing in a travel tripod to help you snap those great moments, especially when you’re waiting to capture those perfect sunrises and sunsets. This model will work for both phones and cameras and the flexible legs allow placement on uneven surfaces.
Click here to see this item in the Australian store.
I got this amazing shot on the North shore using my tripod and phone!
Sunset on the North Shore Oahu
Powerbank
I never travel anywhere without my Cygnett Powerbank. It will charge any device from USB and isn’t a lot of extra weight so is easy to pop in your pack or handbag for the security of knowing you can charge your phone when you’re out for a whole day using it heavily. This has also saved my bacon on a number of occasions at home so it isn’t just an investment for traveling.
Click here to see this item in the Australian store.
Multi-USB Charger
These days most devices charge off a USB cord, it takes up extra weight and space to take the plug for each one, and then an adapter plug for each on top of that. A multi-USB port travel adapter is the practical option that doesn’t just cover you for US travel.
Click here to see this product in the Australian store.
There seems to be a lot of questions about Pearl Harbor in Hawaii. I heard multiple conflicting things before going and online forums are full of future visitors trying to understand how they go about visiting.
I’m going to try and cover all the questions I’ve come across and give some tips for visiting Pearl Harbor. But lets start at the beginning.
Why you should visit Pearl Harbor
I’m going to make what I think is a fairly safe assumption that anyone reading this probably wasn’t alive in 1941 when the Japanese attacked Pearl Harbor. While I believe there are still some survivors, chances are most of us know from history studies or Hollywood blockbusters borrowing liberally from the facts.
For those who don’t know, a brief history lesson.
The treaties and reparations required of the aggressors of WW1 laid the groundwork for WW2, and it arrived on the doorsteps of the world in September 1939. War was great for the economy, and gave America’s a helpful boost coming out of the post 1920 depression era slump. In 1941 America had steadfastly continued to abstain from the fighting, though they had imposed economic penalty upon Japan for actions in China. America was a sleeping beast.
Japan calculated that if they could remove America from the equation in a surprise blitz attack, they would have free reign to continue their conquests in the Pacific without interference from the US Pacific fleet. They decided to attack the US Naval Base at Pearl Harbor on the island of Oahu, Hawaii, launching 353 Imperial planes from Aircraft Carriers that had managed to creep undetected across the Pacific. Hawaii’s remote location had made the base seem safe from air attack.
While it was an immensely successful mission, Japan’s attack did not cripple America as hoped, and the beast awoke and joined WW2 with fury.
Pearl Harbor was, at the time, an unprecedented attack on American soil and the worst military disaster in American History. Over 2,300 military personnel were killed, over 1,100 of them were on board the USS Arizona.
Even as a student of history there was so much that I hadn’t known.
Pearl Harbor is a powerful place.
Replica of the Japanese planes used in the attack on Pearl Harbor
Can you visit Pearl Harbor without a tour?
There seems to be a bit of pressure to get visitors to Pearl Harbor on organised tours but you can absolutely go on your own, it depends on the experience you want to have. A lot of the tours are only half day and include other things, but they also include pickup from Waikiki so if you don’t have transport and only want to spend a bit of time there perhaps seeing the Arizona Memorial, then an organised tour might be a good option for you.
You might hear that you should go on an organised tour to be guaranteed of getting a ticket, but it really isn’t that hard. We’ll go into that.
I’d recommend having a look at what there is to see at Pearl Harbor and decide what you want to visit, then decide if a tour is right for you. Some different combinations of options are below.
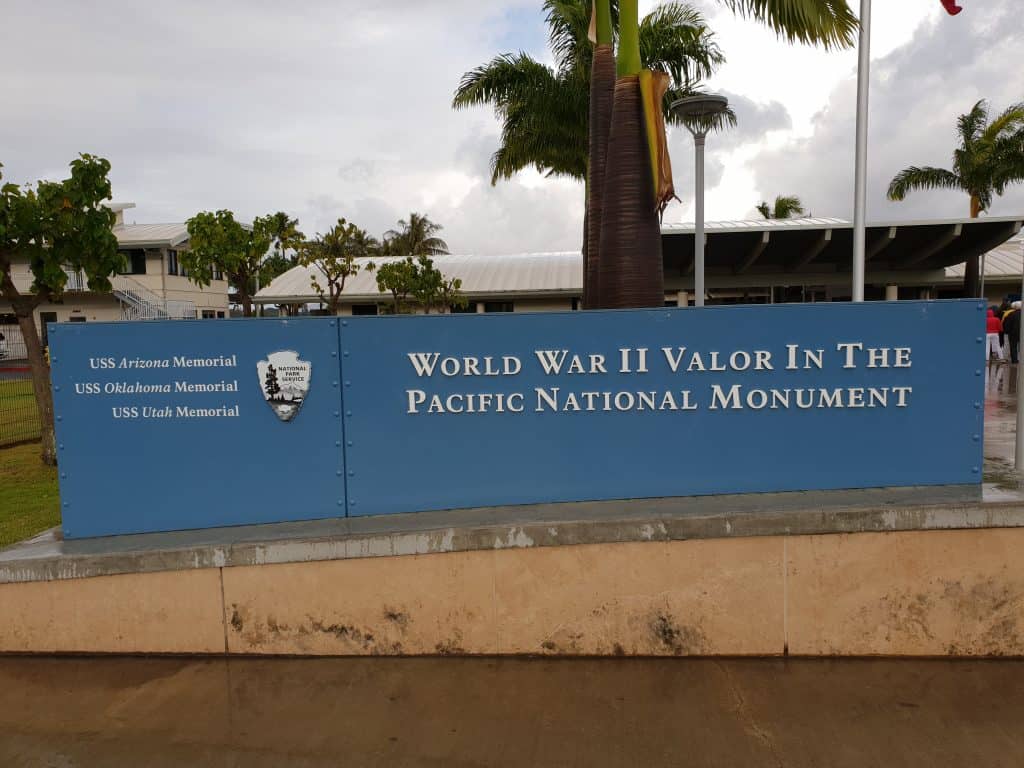
What is there to see at Pearl Harbor?
There are actually six sites in two locations that make up the Pearl Harbor historical site.
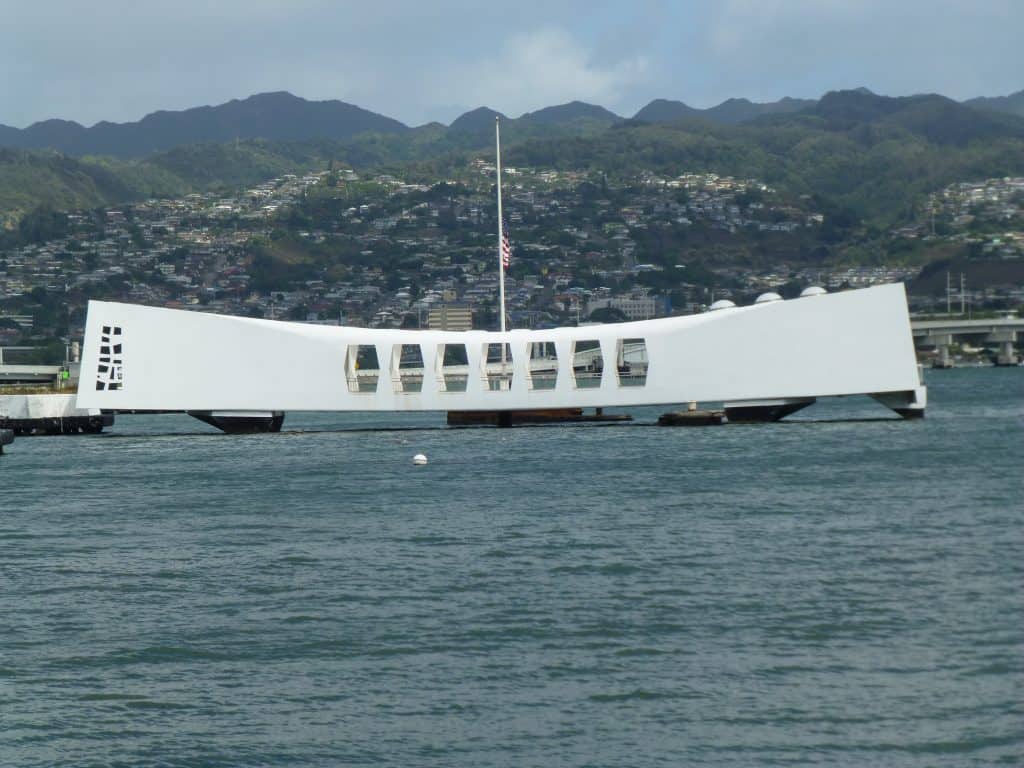
USS Arizona Memorial
This is the most well known of the Pearl Harbor sites, and often mistaken as the only thing to see there.
USS Arizona Memorial
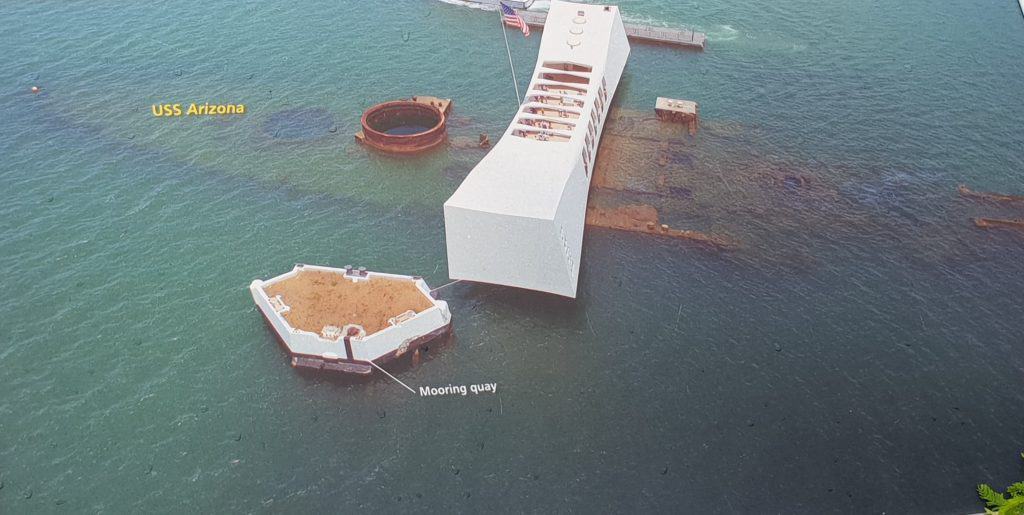
On December 7, 1941 all eight US Navy Battleships were moored in Pearl Harbor when the Japanese began dropping specially engineered torpedoes designed to be effective in the shallow waters of the harbor. All eight ships were damaged, and four sunk. The Arizona was hit by four armor piercing bombs dropped from above. The fourth to hit went through near the ammunition magazines, resulting in a massive explosion which marked the end for the Arizona. It was the only one of the battleships that was not raised.
It remains on the shallow floor of the Harbor, the watery grave of over 1000 men. Shiny bubbles can be seen raising to the surface from time to time, oil seeping slowly from the rusting metal below.
The Arizona memorial is built over the sunken battleship. Boats run throughout the day taking visitors to the memorial where they can look down upon the Arizona lying just below the surface. The Arizona Memorial visit runs for 75 minutes, including a 23 minute documentary in the cinema which runs before boarding the US Navy shuttle out to the memorial. As at February 2019 the Arizona Memorial is closed for repairs. It requires re-anchoring to the floor of the harbor, and the potential for unexploded ordinance makes this a painstaking process. The boats continue to run however, taking visitors out on the water and around the memorial. The US Navy determines daily whether conditions are safe for the shuttles to run. You will need to book for this part of the day.
The Arizona Memorial and the USS Arizona as pictured on a Pearl Harbor exhibit
You can see amazing footage inside the wreck of the Arizona below;
While the memorial is definitely the highlight, there is far more to see at the Pearl Harbor Visitors Center. The two exhibits are incredibly interesting and informative, and a walk around the harbor itself offers views of the Arizona Memorial and information exhibits along the path. It is worthwhile getting the audio tour to play as you walk around the site. If you have not purchased a package including this it is USD $7.50.
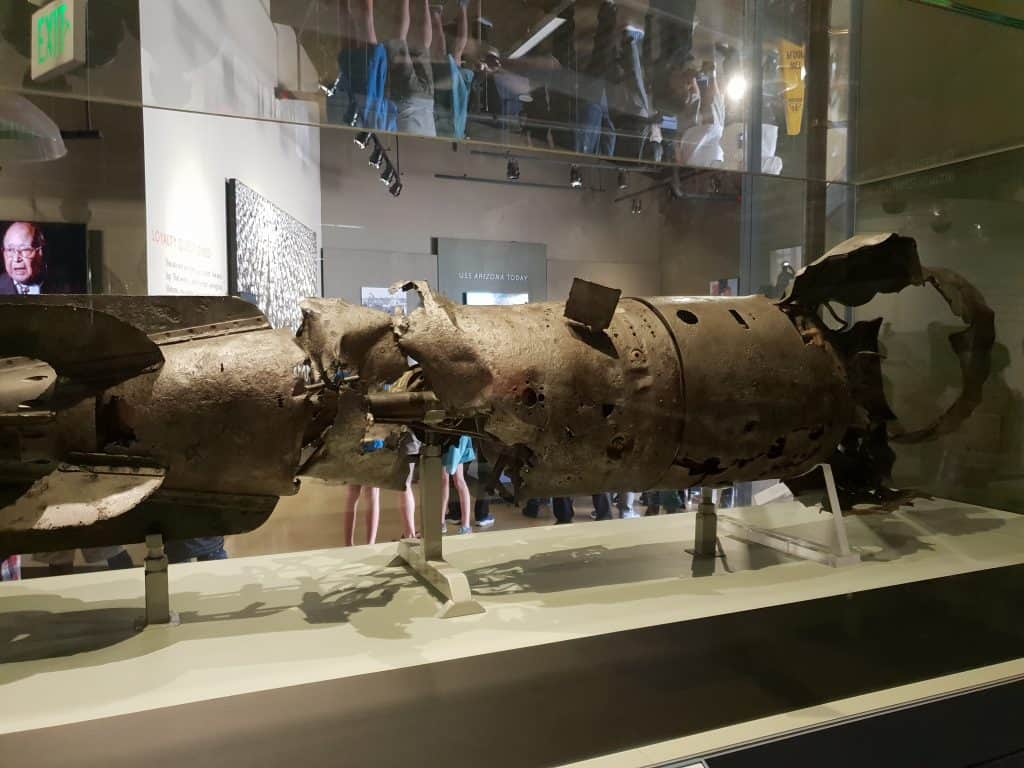
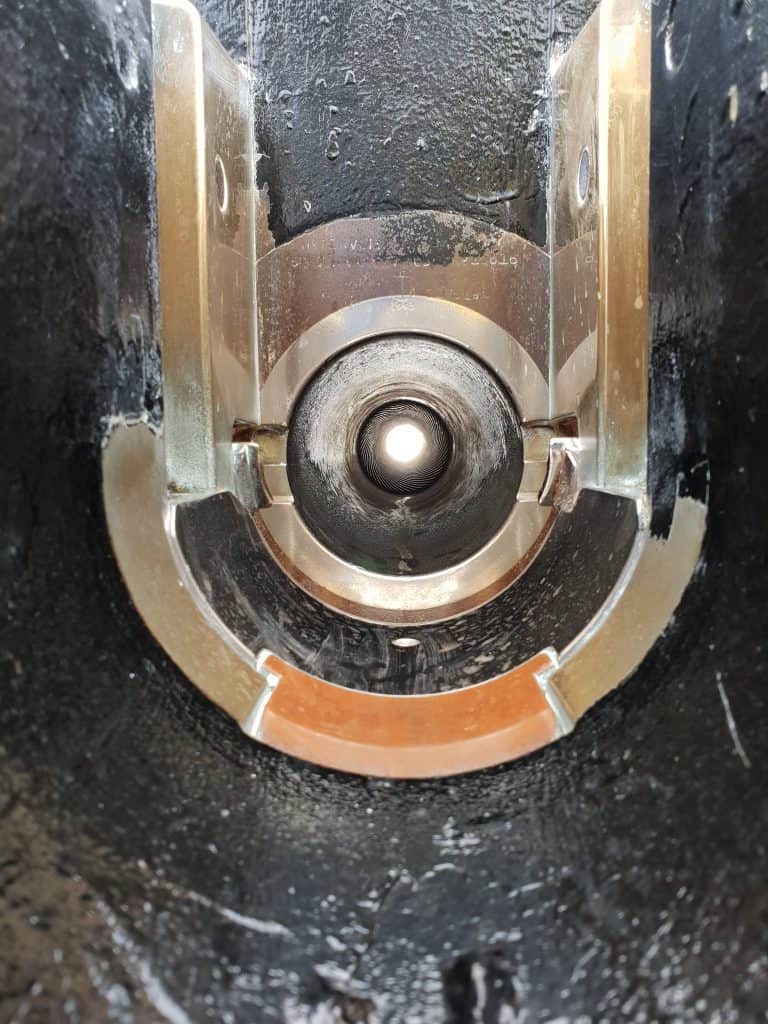
Rear section of a 20 foot Japanese aerial torpedo, on display in the Attack exhibit
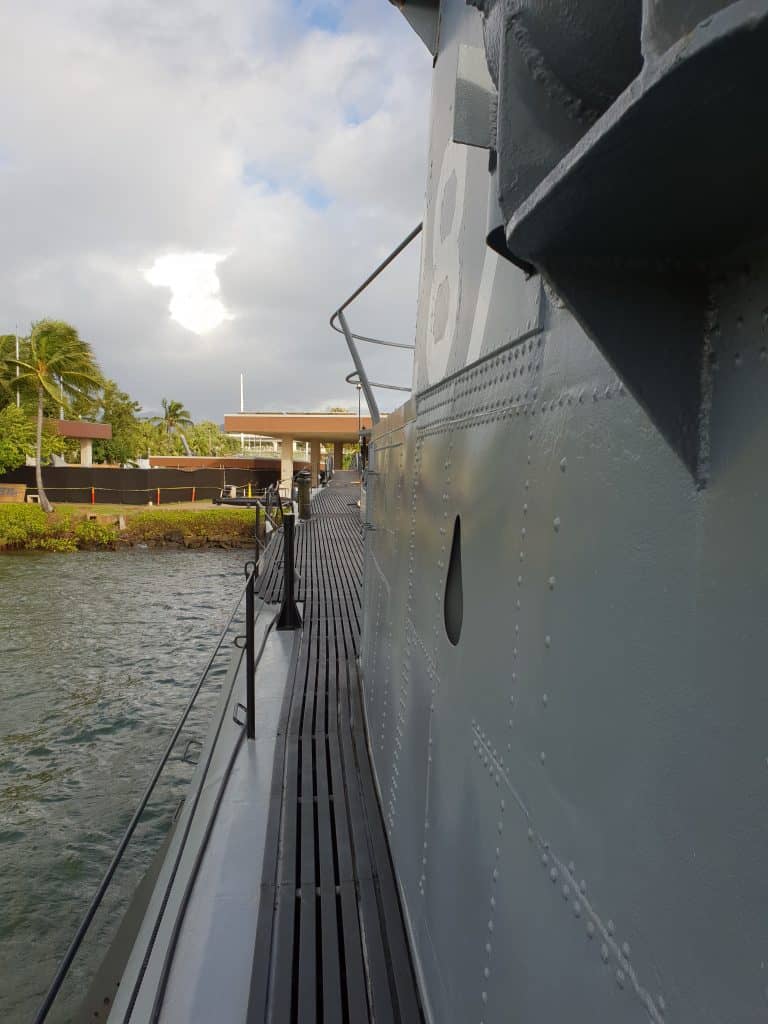
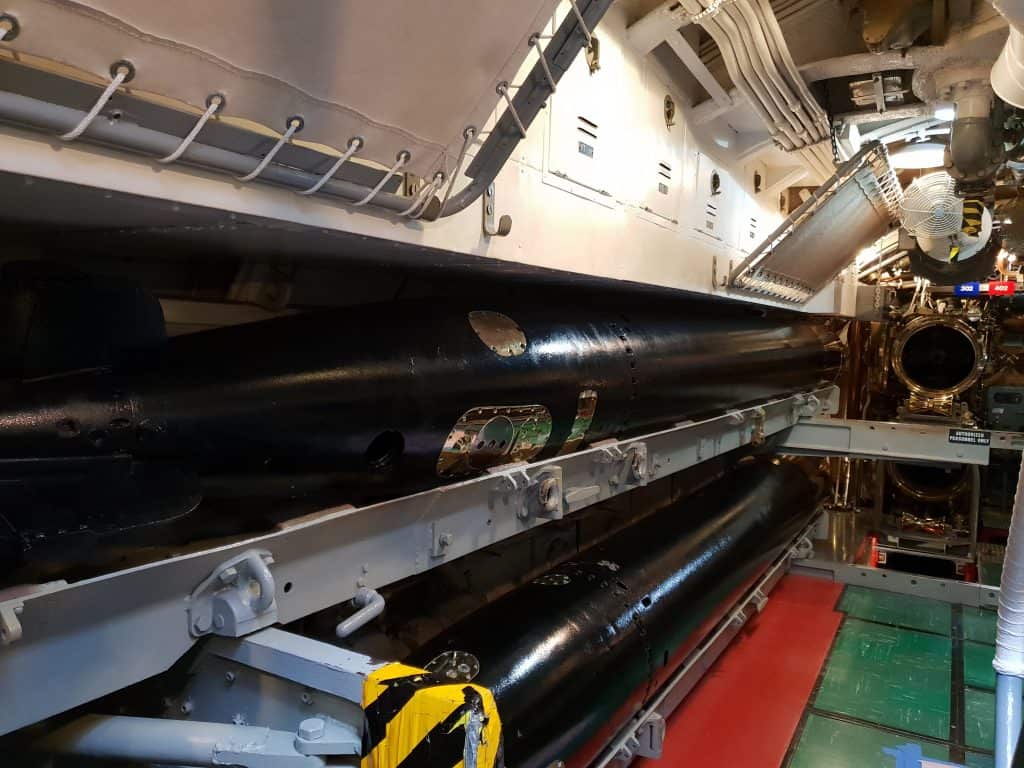
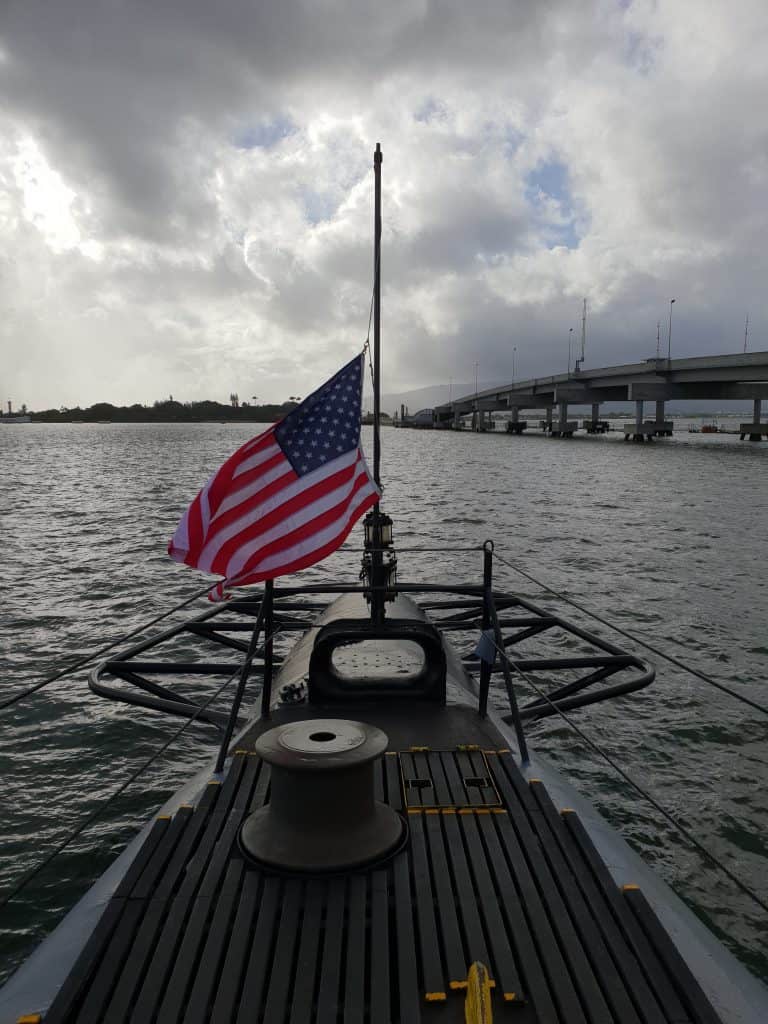
USS Bowfin
On board the USS Bowfin
Also located at the Pearl Harbor Visitors Center, the USS Bowfin is a decommissioned US submarine now open for tours and exploration by visitors to Pearl Harbor. The Bowfin had a number of successful patrols in the Pacific during WW2, claiming fifteen enemy vessels with her guns and torpedoes before being retired for a time and then serving in the Korean War. The nearby museum is filled with the history of submarines in US service and includes a number of weaponry.
Torpedoes and tubes inside the USS Bowfin
It’s a pretty cool experience being able to walk through the cramped quarters of a WW2 submarine and walk across the deck. There is also an audio tour for the Bowfin which wasn’t included in my package. It would have been interesting to have more context to the things I was looking at.
Take a stroll through the Bowfin with me;
If you have purchased a package it is time to depart the Pearl Harbor Visitor Center on a shuttle for Ford Island, in the middle of the Harbor. This is the location of the other four historic sites.
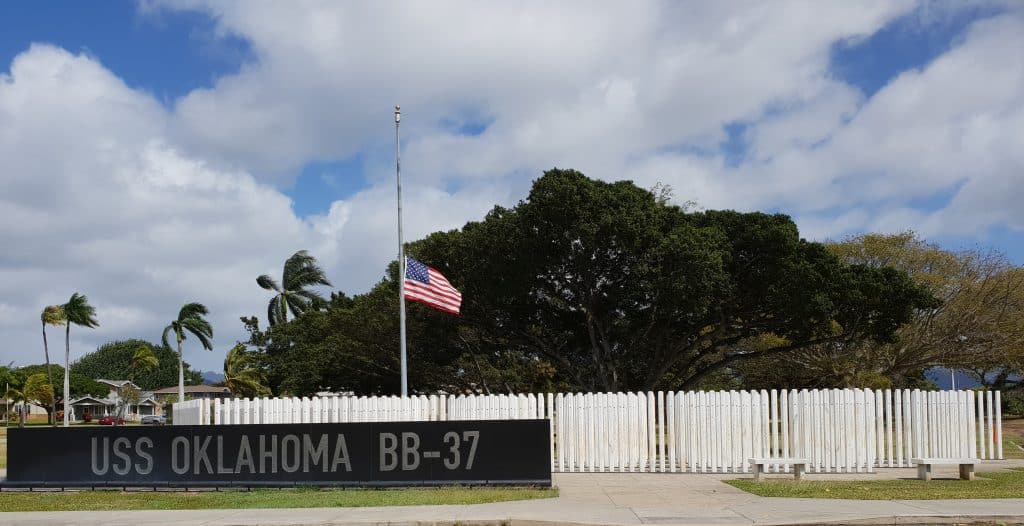
USS Oklahoma Memorial
The USS Oklahoma was hit by multiple torpedoes in the Japanese attack, the third causing the ship to capsize to the port side until halted by its mast hitting the Harbor floor. It remained there until July 1942 where the navigational hazard it posed in the harbor drove the decision to salvage the ship despite prohibitive costs involved. The USS Oklahoma was eventually stripped and sold, but in 1947 sunk in a storm while being towed to San Francisco for scrapping.
The USS Oklahoma Memorial was erected on Ford island in 2007 in remembrance of the 423 crew killed on board in the attack on Pearl Harbor.
USS Oklahoma Memorial
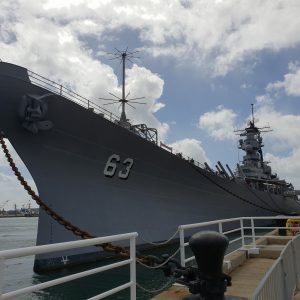
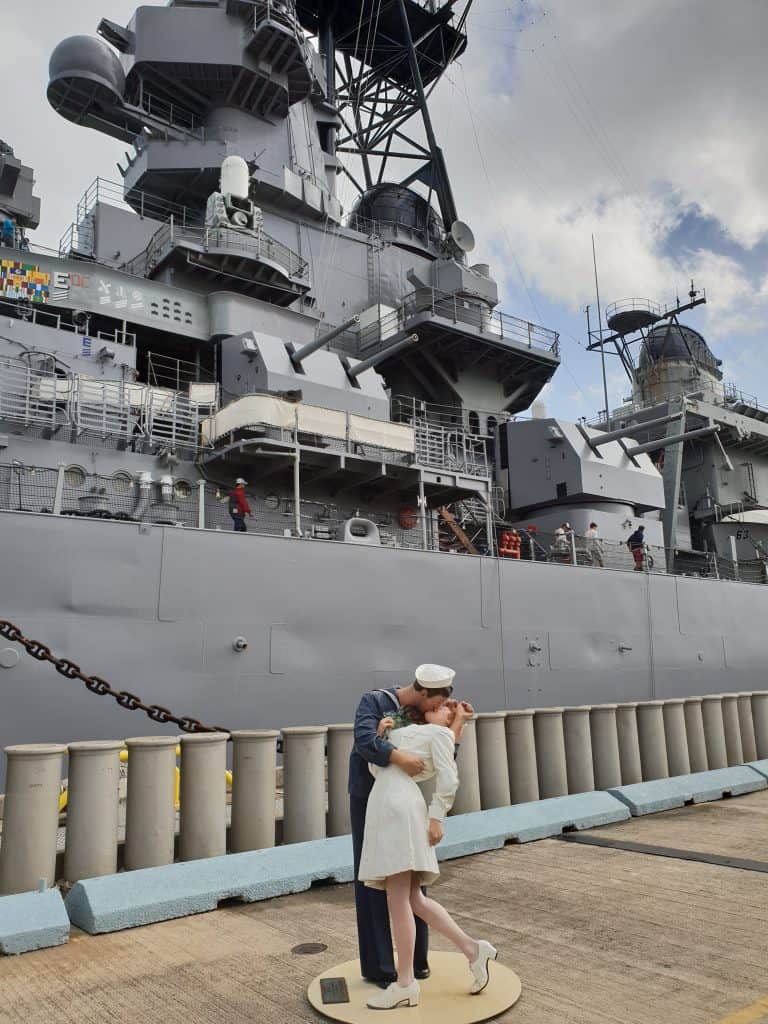
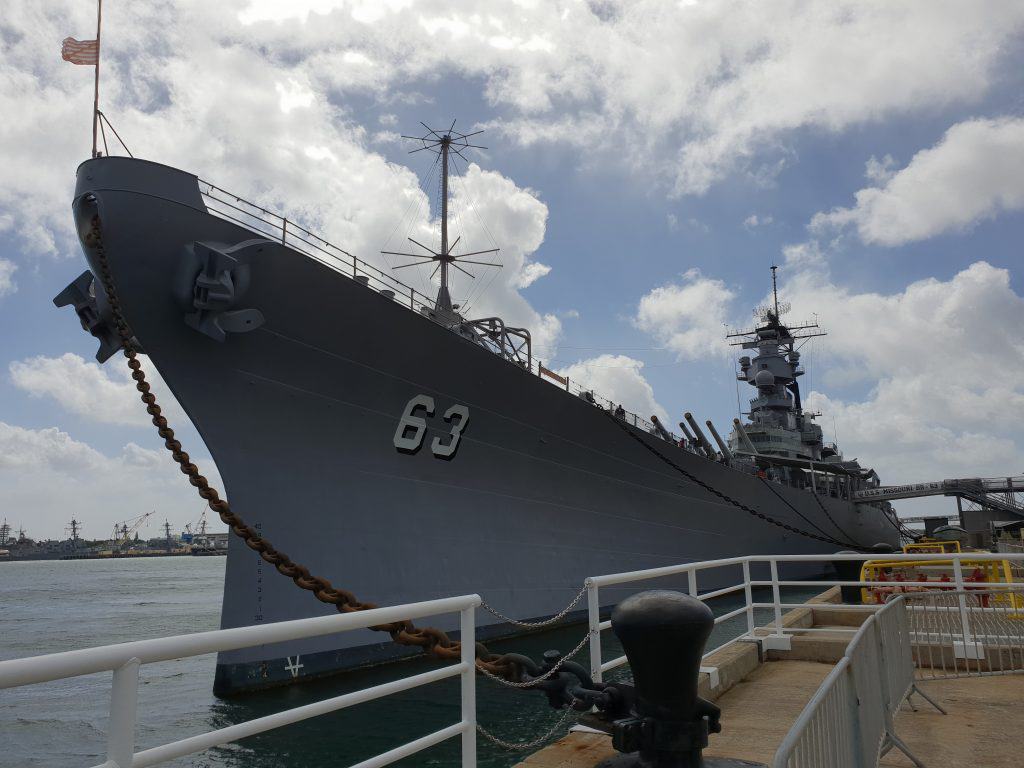
USS Missouri
Replicated from a famous photo marking the end of WW2, this sculpture stands on the dock before the USS Missouri
I think the USS Missouri was probably my favourite part of my trip to Pearl Harbor.
Moored a short distance away from the USS Oklahoma Memorial, the USS Missouri is the last US Battleship. Now decommissioned it stands as a memorial and museum, and a fascinating glimpse into WW2 and life at sea.
While she was built after the attack on Pearl Harbor, she was active in both the battles of Iwo Jima and Okinawa, and bears the scars which can still be seen of the attempt of a Kamikaze pilot on her starboard side. The plane hit just below the main deck level and while the Missouri suffered only superficial damage the plane broke apart, the cockpit containing the dead pilot landing on the deck. Missouri’s captain decided that the young pilot had served his country with honor and should receive a military burial at sea. Unfortunately there was no Japanese flag with which to wrap the young man. It is a little known story that a number of Missouri crew members spent that night sewing a Japanese flag for the pilots burial. It is a story you will hear if you take a guided tour of the Missouri. Part of the ships interior includes an area dedicated to the pilots story and identity.
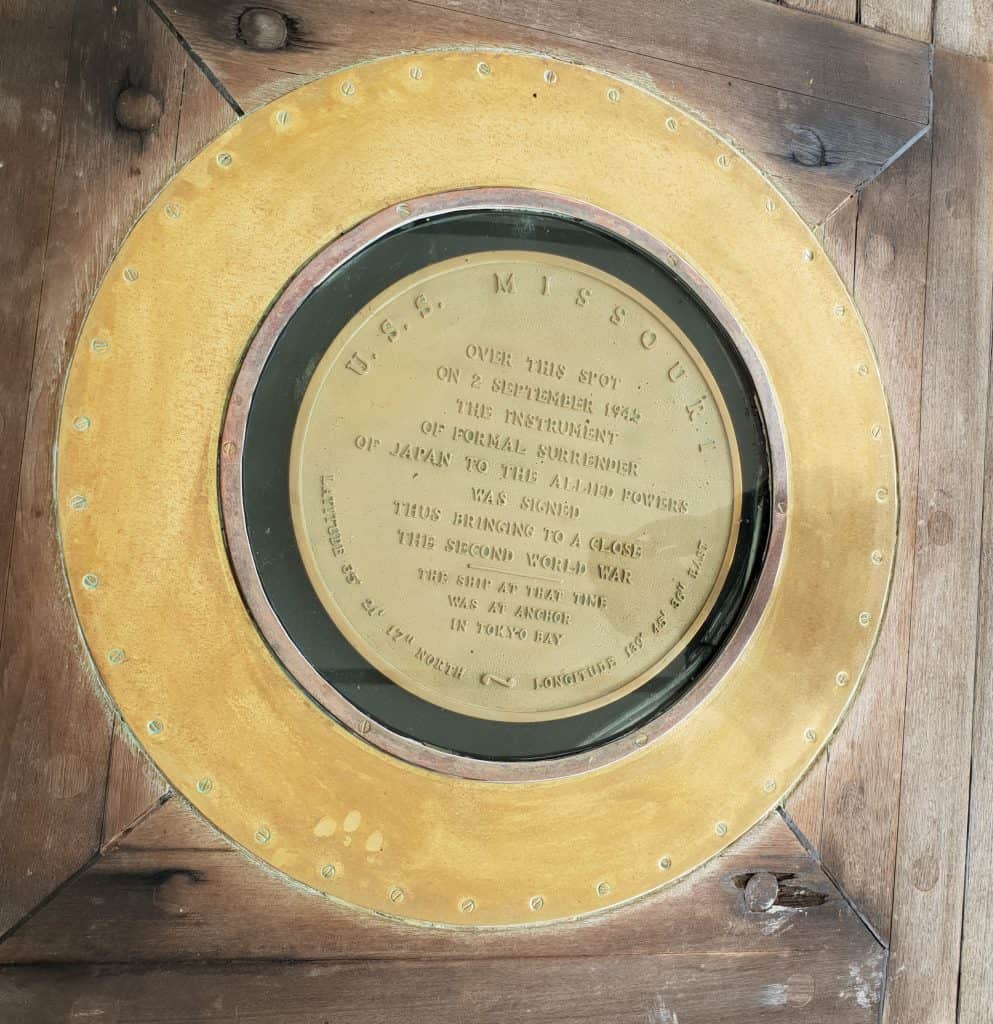
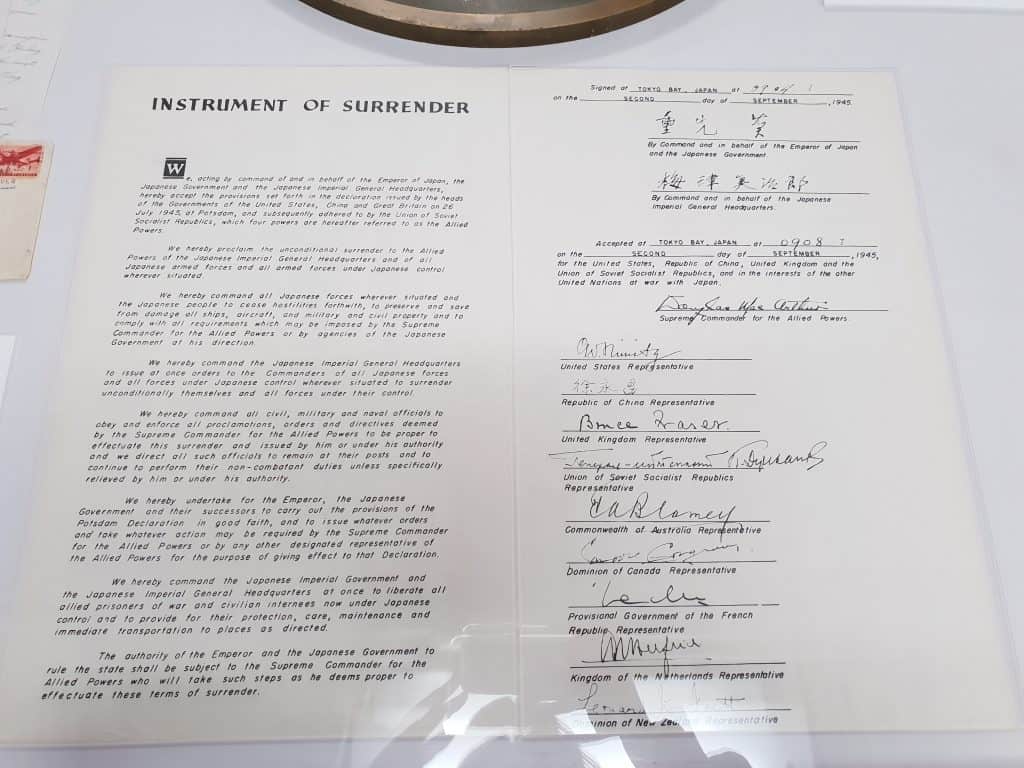
The Missouri was also the setting for the end of WW2, as the parties to the war all gathered on what is now known as the Surrender Deck to sign a document marking the end of the war. The moment is memorialised in the Missouri’s deck with a plaque that reads; “On this spot on 2 September 1945 the instrument of formal surrender of Japan to the Allied powers was signed thus bringing to a close the second world war. The ship at that time was in anchor in Tokyo Bay.”
The instrument of surrender on display on board the USS Missouri
It’s hard to get your head around the sheer size of the 900 ft long Missouri standing proudly at the dock. The Arizona memorial is a closer view from her deck than the Honolulu side of the Harbor.
USS Missouri
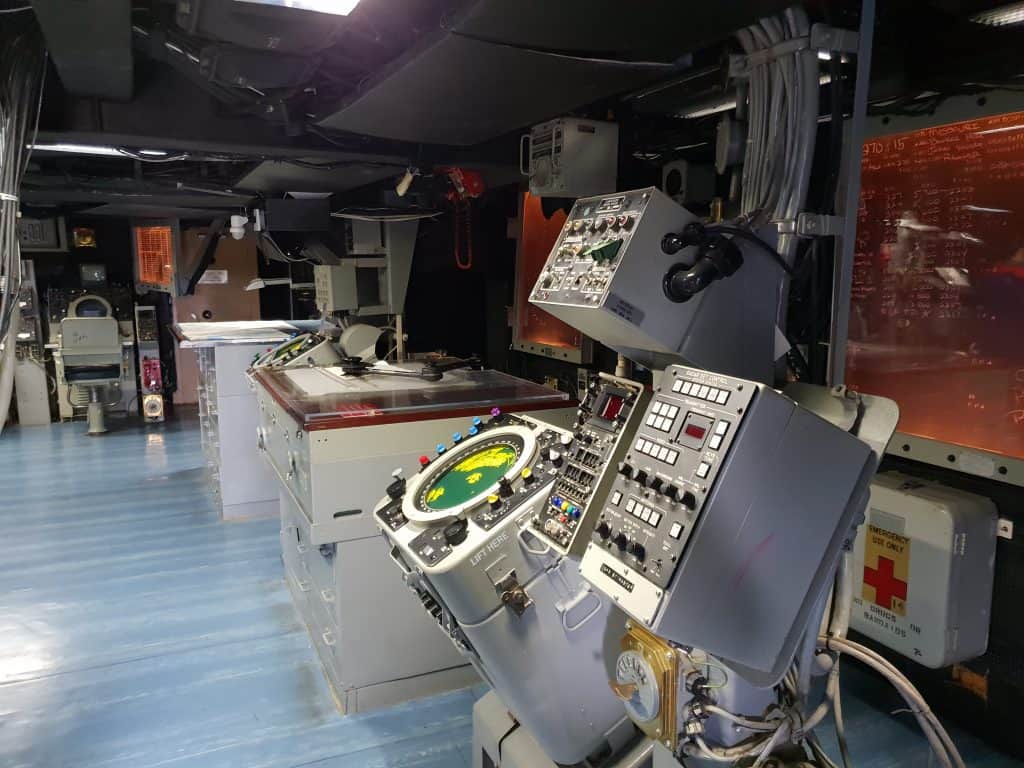
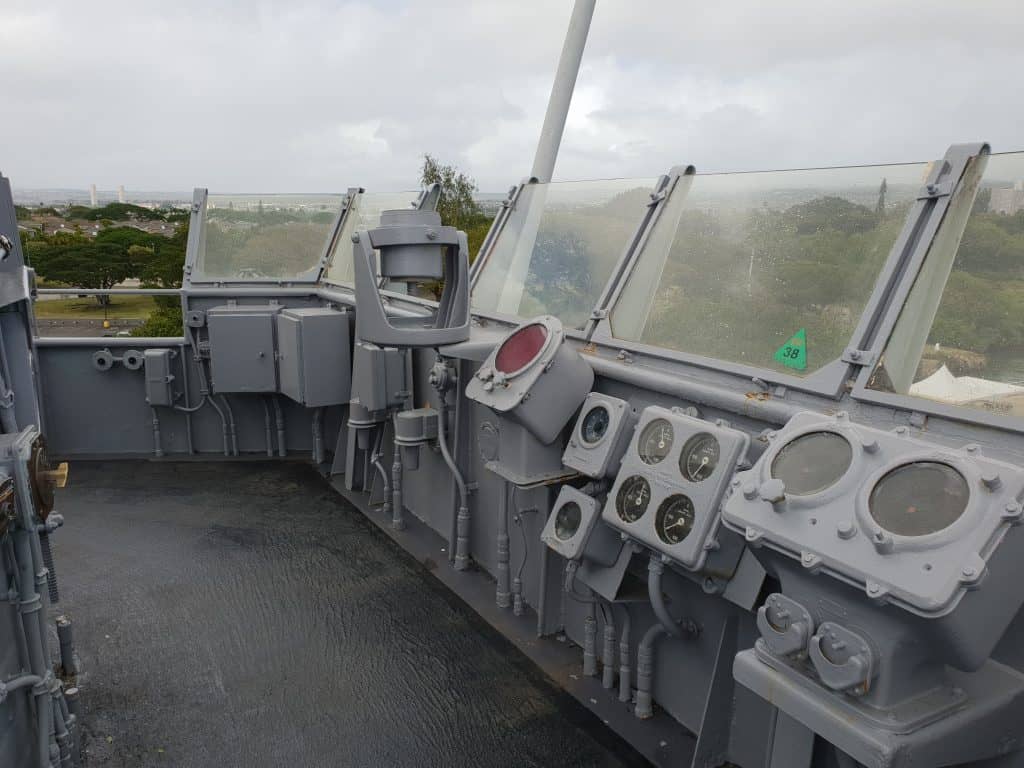
Guided tours run for about 20 minutes on a schedule that appears to line up with groups of people arriving on the shuttles rather than a set time. They will take you over the main deck and explain some of the ships layout and some historical points of interest, then send you free to wander the areas of the ship that are open to visitors. This includes most of the upper decks.
Mess hall on board USS Missouri
Operations Room
The Bridge (one of two)
You even get to have a real sense of life at sea by walking through both the crew and officer quarters. You can check out footage of them both below;
I spent hours exploring the twists and passages of the USS Missouri, and it and the Arizona Memorial would be my top recommendations to make sure you visit in Pearl Harbor.
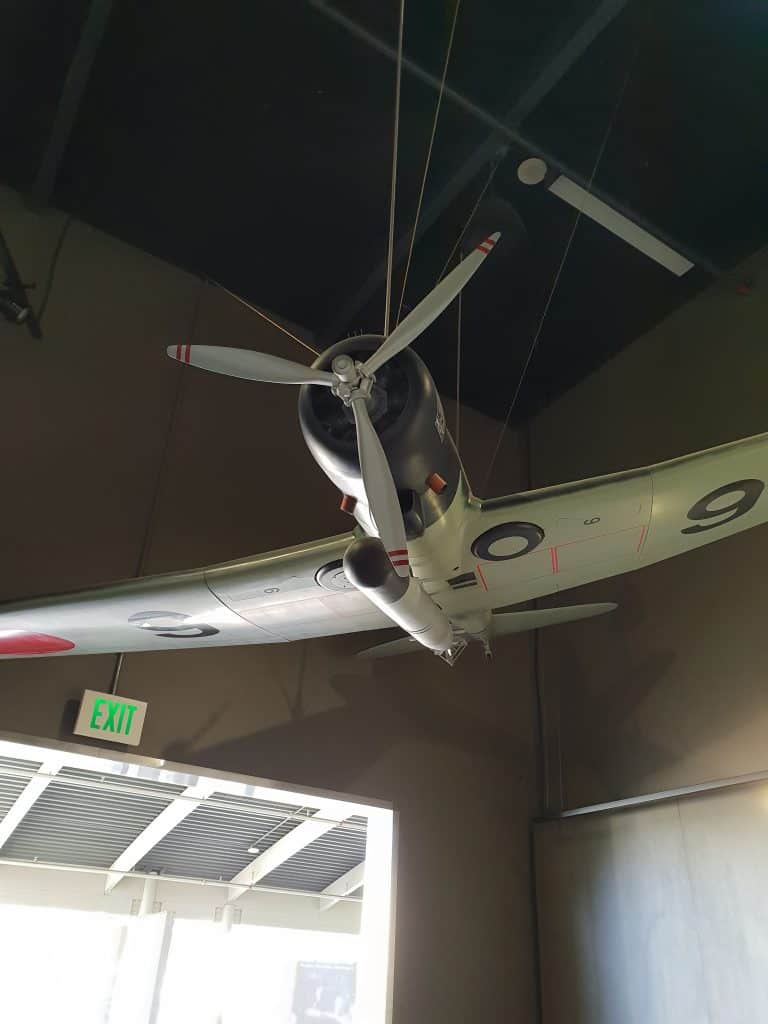
Pearl Harbor Aviation Museum
Also on Ford Island with the Oklahoma Memorial and USS Missouri, it is the next stop on the shuttle from USS Missouri.
Unfortunately the day I was there I ran out of time and chose to head back to go on the USS Bowfin rather than visit the Museum.
The airfield, along with other airfields on the island, were hit before the Japanese commenced bombing of the ships, in order to ensure that the planes could not return fire once the bombing of the ships commenced. They had a surprisingly easy task, the Lieutenant General with oversight of operations on Oahu had ordered all planes parked wingtip to wingtip in the open so they could be easily guarded. He believed given the large population of Japanese on Oahu that the primary threat came from sabotage. It made the planes sitting ducks to the Japanese imperial planes, and 188 US aircraft were destroyed.
The Aviation Museum is located in two aircraft hangers and contains several WW2 planes, flight simulators and a growing collection of vintage aircraft.
USS Utah Memorial
The USS Utah Memorial is on the other side of Ford Island to the Missouri, but is not open to general visitors. Only visitors with Military identification and driving themselves are able to visit this memorial.
Anchor retrieved from the USS Arizona
Is Pearl Harbor free?
Yes and no. The Arizona Memorial and the Pearl Harbor Visitors Center is free of charge, though it costs USD $7.50 for the narrated audio
tour. All other locations have an entry cost.
So yes it is possible to visit free, depending what you want to see.
Tree of Life at the Arizona Memorial
Are there free tickets for Pearl Harbor?
This was the biggest myth I heard about visiting Pearl Harbor. That you either had to rock up really early to get a free ticket, or take an organised tour to be guaranteed entry. Not the case.
There are a specified number of visitors that can visit the USS Arizona Memorial on any given day. The boats have a schedule of trips from the Visitor Center and there is a maximum amount of passengers in a boatload.
Every day, 1,300 tickets to the USS Arizona Memorial are reserved for walk-up visitors. These are for specified timeslots and available from 7am when the Visitor Center opens. These are the free tickets you hear referred to.
This is not the only way to get tickets. But you will need to book for a USD $1 reservation fee.
Just as there are timeslots reserved for walk-up visitors, there are timeslots and tickets reserved for online bookings. These become available at 7am the day before.
If you don’t care about going out to the USS Arizona Memorial, just rock up whenever you feel like it.
How to get tickets to Pearl Harbor
You can reserve your tickets for the USS Arizona Memorial online from 7am the day before. You will need to arrive at the Pearl Harbor Visitor Center to collect your tickets at least one hour prior to your scheduled timeslot.
Looking through the barrel of a submarines gun
How much is Pearl Harbor?
If you just want to see the USS Arizona Memorial and Pearl Harbor Visitor Centre then you can visit for free. The other sites will cost varying amounts.
For the convenience of just one ticket the USS Arizona Memorial + Passport Package costs USD $72 per adult. This includes the narrated audio tour of the Arizona and exhibitions, entry to the other locations and the shuttle between them.
A pass to the USS Missouri is USD $25 per adult which includes the same free guided tour included in the Passport package. A 90 minute special guided tour of the Missouri can also be purchased for USD $54 per adult but bookings must be made separately online.
Entry to the USS Bowfin is USD $15 per adult. This includes entry to the submarine museum and the audio tour.
Entry to the Pearl Harbor Aviation Museum is USD $20 for a self-guided tour if purchased online, and USD $30 for a guided tour.
You can save money by buying tickets online individually for the sites you want to see, or buying each of them online will save you an overall USD $1.50 from buying the Passport Package once transaction fees are added on.
If you don’t want the full package experience it is worth checking out the Go Oahu card, which includes discounts to the USS Bowfin, USS Missouri and the USS Arizona Memorial narrated tour, as well as many other popular Oahu attractions.
What can I take into Pearl Harbor?
Pearl Harbor continues to be an active naval base, and you are not permitted to bring in bags which can be used for concealment.
I was allowed in with the small carry pouch my camera is in, but anything larger can be checked at a cloakroom at the entrance for a USD $5 fee. I put everything I needed in my pockets, but a zip-lock bag will be permitted, and I did see someone using a clear plastic toiletries bag as a carry bag too.
Prams are permitted in the Visitor Center but not in the theater or shuttle to the USS Arizona Memorial.
Flag at half mast on board USS Bowfin
How to get to Pearl Harbor
The cheapest alternative if you don’t have a car is to get the bus, at a cost of USD $5.50 per adult. However given as it is close to 90 minutes by bus and 25 minutes by car, it’s not exactly the most convenient.
The Waikiki Trolley runs to and from Pearl Harbor for less than USD $50 per person. It covers multiple tourist attractions and can be purchased as a multi-day pass.
Your hotel may also be able to organise a private shuttle for you.
If you are splitting costs with others then an Uber may work out more cost effective for you.
How long should I spend at Pearl Harbor?
This is entirely down to the individual, I easily could have spent longer than the over 7 hours I spent there in order to do everything, but I was on my own and had no one else to consider. With children factored in I’m sure it’s a very different matter!
The Visitor Center is open from 7am and the USS Arizona boats run until 3pm. The Missouri closes at 4pm while the Aviation Museum and USS Bowfin close at 5pm.
Can I get food at Pearl Harbor?
Yes. There are sandwiches and snack food available at the Visitor Center, and more options that include hot food at the USS Bowfin and USS Missouri.
Can I take photos at Pearl Harbor?
Yes. I didn’t come across anything that said no photos were allowed.
Where to Stay near Pearl Harbor
I stayed in Waikiki but if you want to stay closer to Pearl Harbor you can find some options below;
As is probably pretty clear from this post I had a great day at Pearl Harbor and I’d recommend it to any visitors to Oahu. I’ve tried to answer the most commonly asked questions, but if yours isn’t covered feel free to let me know in the comments below and I’ll be sure to add it in for you.
You can also check out my 7 day Oahu Itinerary for more Oahu ideas for your trip!
My perfect holiday will usually include a mix of tourist and cultural activities, as well as time to relax and unwind. But let’s face it, if you have a week to spend somewhere chances are you aren’t going to be building in too much time to sit around not doing much. So this isn’t the itinerary for 7 days in Oahu that’s going to be building in days laying on the beach not doing much of anything. If however, you are interested in a well-rounded Oahu itinerary that gives you a good taste of the Hawaiian experience on Oahu, including the main tourist items as well as some more unique experiences, then this is the Oahu 7 day itinerary you need.
This is based on staying in Waikiki, the main tourist hub of Oahu. If you don’t want to stay put in Waikiki, check out what not to do in Hawaii.
Hawaii’s beautiful climate also makes it the perfect Winter getaway!
Where to Stay in Waikiki
If you haven’t realised already, Waikiki is tourist central and the prices are reflective of that. As such I chose to stay somewhere off the main drag, but still a short walk away, and found the prices were much more reasonable.
I stayed at the Coconut Waikiki Hotel, located alongside the canal. It was super comfortable with excellent staff and included breakfast in the morning. Less than ten minutes walk from the main hub of Waikiki it was still really easy to get to all the big restaurants, but it was somewhat quieter. It’s also close by the bus stop for easy access to the rest of the island. If you’re looking at accommodation options I wouldn’t hesitate to recommend it but you can check out some other alternatives below.
Day 1 – Scenic
Arriving in Waikiki
Day 1 is of course always going to be dependent on your flight plans, but if you are arriving from Australia then there’s a good chance that you’ll be arriving on an early morning flight. This is great if you can sleep on a plane and arrive refreshed to make the most of the day, but if you’re like me you could do with a little help staying awake to get on the right time.
Once you have passed through customs and exited the airport you can follow the signs for the Waikiki shuttle run by Roberts Hawaii. A one-way ticket starts at USD $21 per person for drop off at your hotel in Waikiki.
Pro-tip #1: You can also book your return shuttle at the time of purchasing your fare to Waikiki so this is one less thing to worry about. Alternatively you can book your return shuttle online.
If you are traveling in a small group a taxi may be more cost effective. My flight home was too early for the shuttle pickup and it cost me just under USD $40, not including a tip.
Pro-tip #2: If you are on an early morning flight it is well worth it to look at hotels that offer an early check-in option. Mine cost me USD $50 additional for a 10am check-in, however they let me straight into my room at 8.45am when I arrived and the ability to have a shower and a lie down made it the best $50 I spent!
Oahu Photography Tour
Now you may think I’m bonkas for recommending a tour on the day you arrive but there is logic to my madness.
Your stay will be a whole lot easier if you can get straight onto US time, and a little help staying awake to do that isn’t a bad thing! Some tours also pick you up from your hotel after Midday, so you have plenty of time for a nap and freshening up, or margin for error on delayed flights.
I was looking for things that were a different experience and being an avid photographer the idea of a photography tour instantly appealed to me.
Hawaii Photography Tours aim to show you the parts of Oahu that you probably wont see on other tours and excursions, at the same time showing you the best places for photographing Oahu. The guides are not only incredibly personable and knowledgeable about their island, they are also professional photographers in Waikiki and no matter what you’re using, even a little camera the size of a credit card like one lady on my tour had, they will have tips for you.
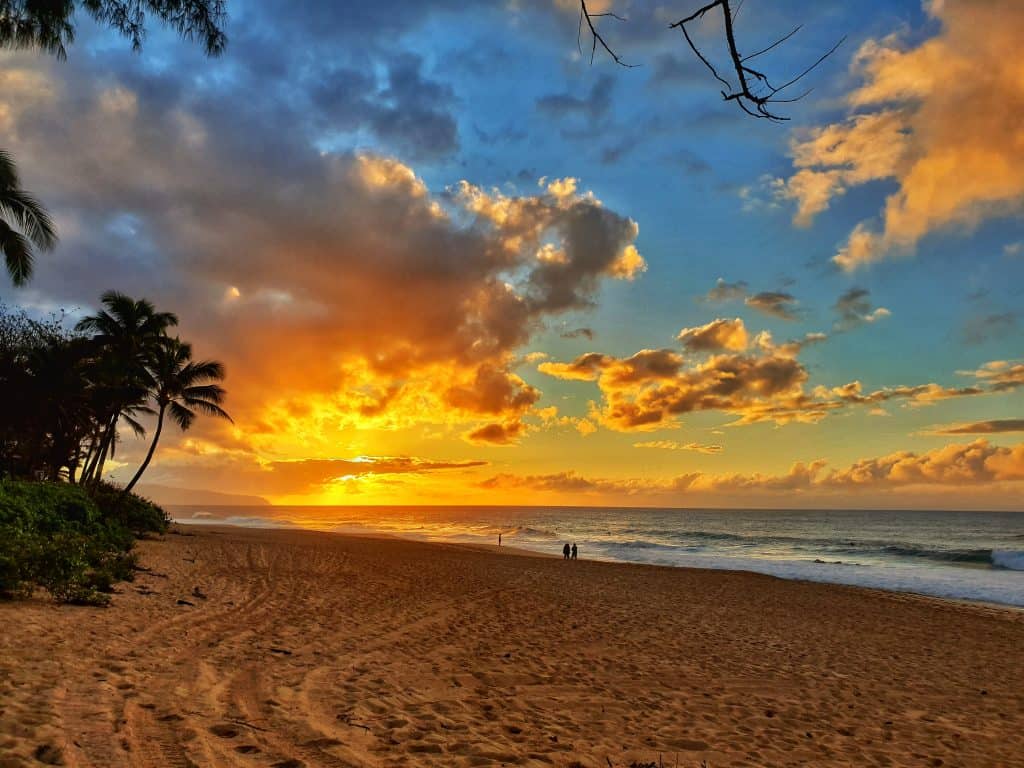
There are a range of tours on offer of various duration but the Country Sunset appealed to me for the amount of the island it covered that I wouldn’t have otherwise seen, and because I love sunsets. We finished with sunset on Pipeline beach, known for its famous waves. Surfing is naturally one of the popular things to do on North Shore Oahu. I also got to visit the famous North Shore food trucks for a late lunch/early dinner, which tided me over until breakfast the next day.
Different tours run on different days of the week. So check out the options for what might suit you. The crew at Hawaii Photography Tours regularly change the lineup of the tours available and the one I took has changed, although the Oahu Sunset Tour features some of the same locations. You can check out some of their other tours below.
This is definitely one of the best things to do in Waikiki!
Activity Level: Light. Transport is provided as part of the tour and there is some light walking between destinations.
Price: From USD $126 per person
Duration: Varies according to tour, ranges from 5 – 10 hours.
Pro-tip #3: I found these guys on Groupon, and while there were no specials on this tour on Groupon at the time it is worth a look to see whether there is a deal on the tour you want to do.
Sunset on the North Shore Oahu
Day 2 – Scenic/Adventure
A Day at Kualoa Ranch
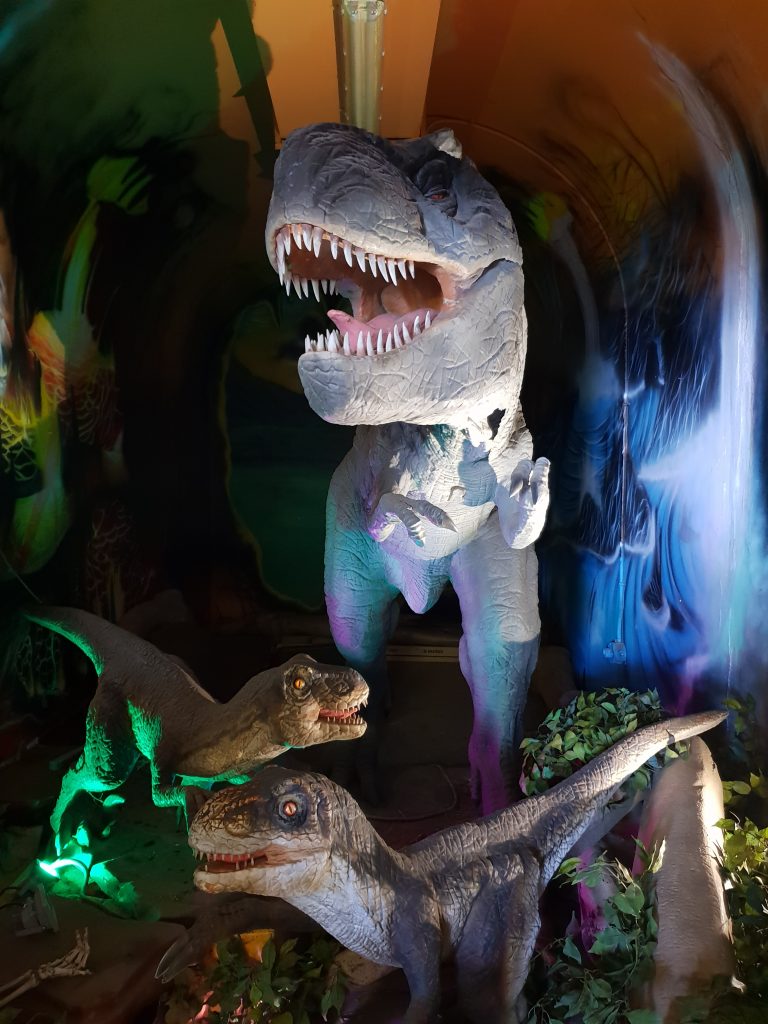
When I was planning my Hawaii trip, Kualoa Ranch was the number one recommendation from people who had been. If you’ve heard about Jurassic Park Hawaii, you’ve heard about Kualoa Ranch.
Superimpose some dinos and you have Sam Neill and the children running across the plain in Jurassic Park!
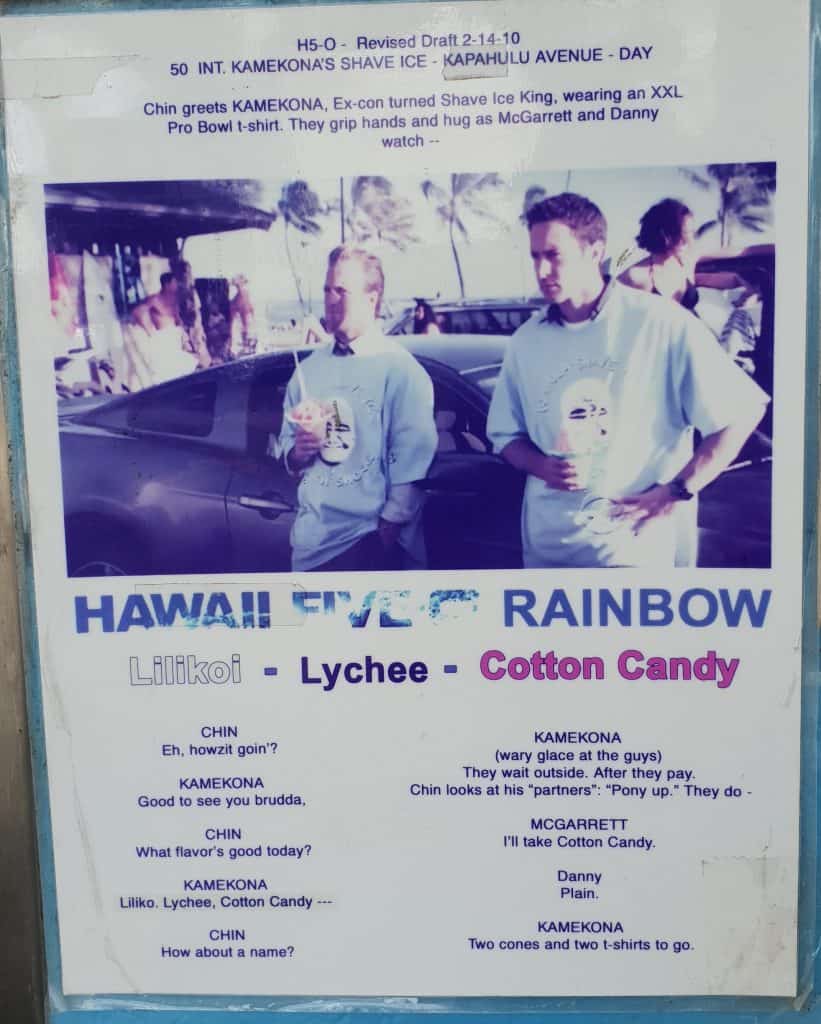
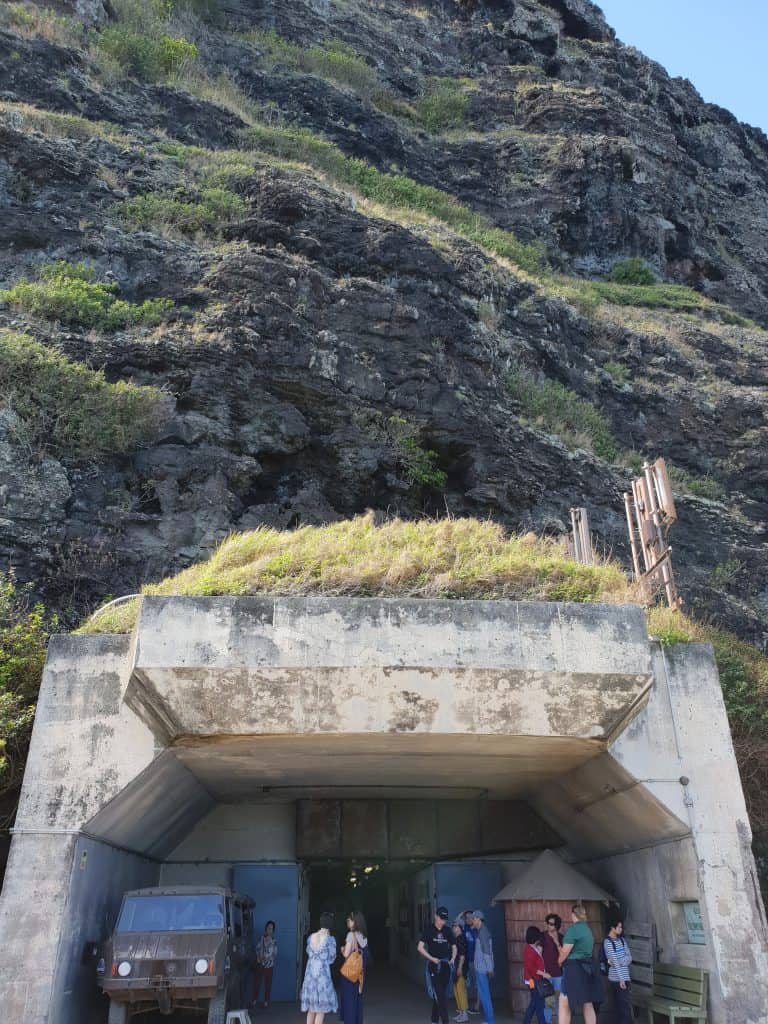
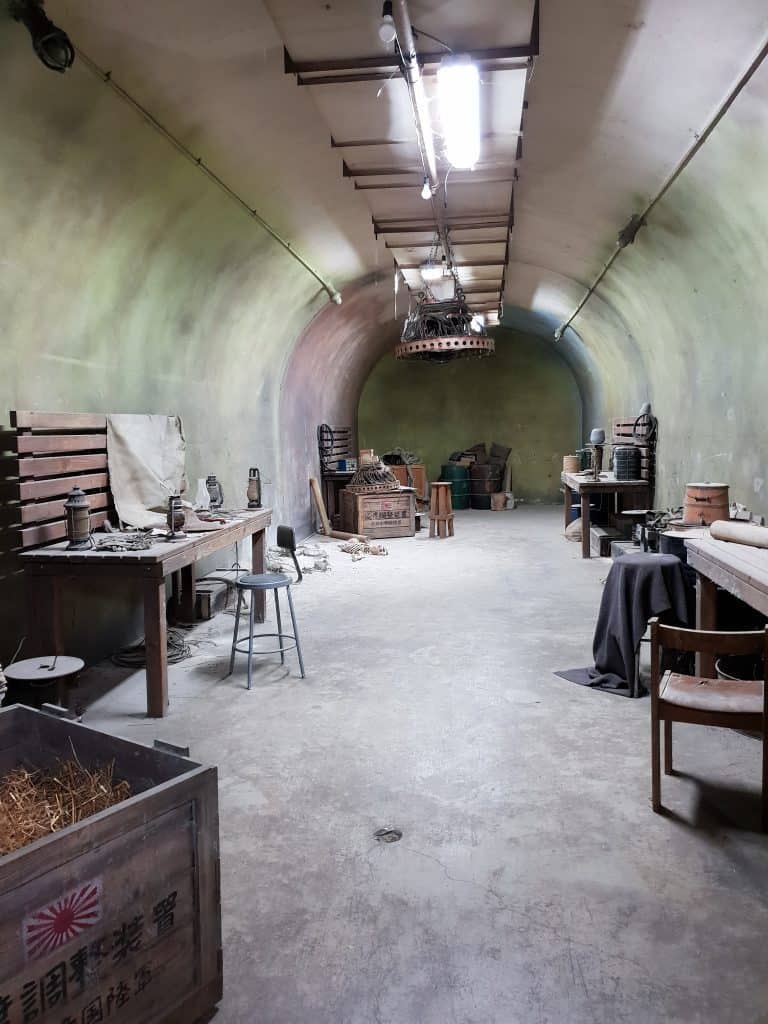
Otherwise known as Hollywood’s Hawaii set, if there was a movie filmed on Oahu then the 4000 acre Kualoa Ranch undoubtedly features. It has been the filming location for Hollywood blockbusters including Jurassic Park, Jurassic World, King Kong, Godzilla, 50 first dates and Jumanji 2. Along with the sprawling hills with imposing mountain ranges keeping watch, Kualoa Ranch was also a military outpost in WW2, and has a number of bunkers located on the property. The largest of these bunkers, Battery Cooper, winds deep under a mountain and has featured in movies and Television episodes. It is now partially a working set and partially a museum of movie memorabilia from films shot there.
Entrance to Battery Cooper
A Hawaii 5-0 set in the WW2 bunker Battery Cooper
Jurassic Park display inside Battery Cooper
Kualoa Ranch is on the other side of the island, and close to an hours drive from Waikiki. For some tours you can add a shuttle transport to your booking if you aren’t hiring a car. A round trip on the shuttle is USD$30 per person plus tax.
Given there is so many options with regards to tours and activities, and you’re going to the effort of getting there, it’s worthwhile planning to spend the day. You can select your tours individually, or select a package which bundles a number of tours together and includes lunch on the sustainable ranch. Each tour will show you a different aspect of the property.
Depending on your package the shuttle will drop you back in Waikiki early/late afternoon. If you haven’t already, take the opportunity for a stroll on the beach and scope out the tourist drag.
Activity Level: This will depend on your chosen activities. Many of the Kualoa Ranch tours you’ll be sitting in a bus with some light walking around, but there are also more physical tour options available.
Price: Entirely dependent on the activities you want to do. The tours range from USD $49.95 to $174.95 for Adults, or you can get three tours packaged together for a better price starting at $149.95. The packages also include a buffet lunch.
Duration: Tours start at 1 hour and range up to 2.5 hours for the Zipline Tour.
Pro-tip #4: Some tours book out weeks in advance so book this one early!
Day 3 – Water
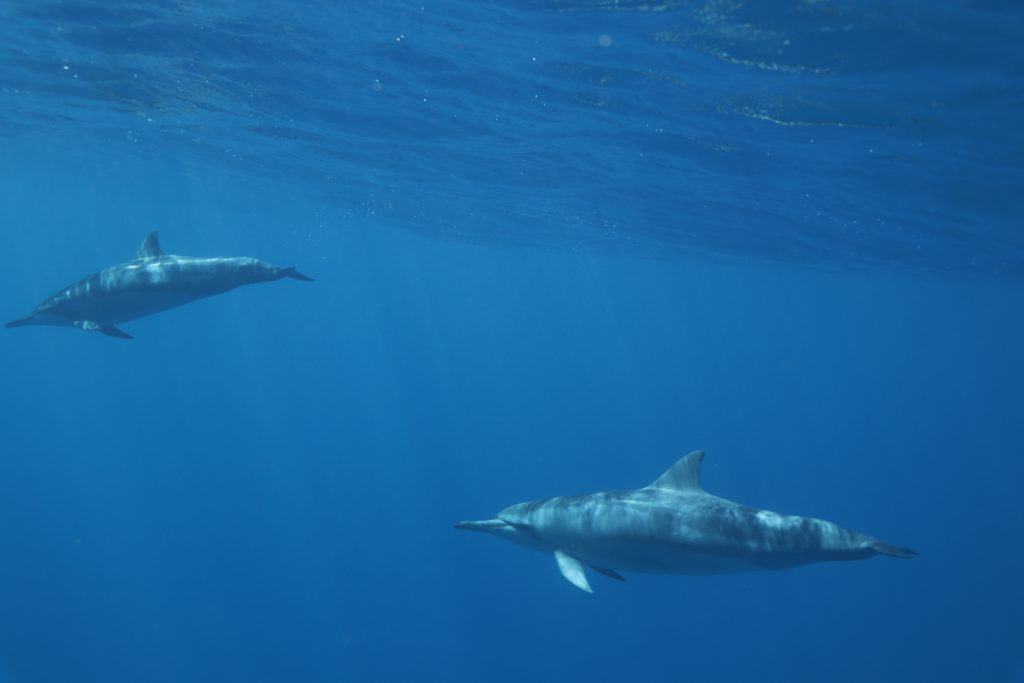
Swimming with wild Dolphins
It has been a bucket list item of mine to swim with dolphins for a very long time. I had attempted this twice before, the first time in New Zealand where the weather was too bad for the dolphins to be located, and once in Australia, which was cancelled due to lacking numbers. On both occasions I was offered an alternative date, which was a lesson I applied when planning this trip.
Pro-tip #5: Schedule this activity early in the itinerary. Dolphins are wild animals and providers can’t give any guarantees about success on a given day, but most will offer a discounted rate to schedule another day. If you’ve tried this at the end of your trip you’ll have no room for a second attempt.
There are a number of tour operators that are rated well and offer this activity. However they will all depart from a bay on the other side of the island so the availability of a car will influence your choice. It was the inclusion of transport from Waikiki that led me to choose Dolphins and You Oahu.
Pro-tip #6: I saved money on this tour by purchasing through Groupon. The price for the basic tour was no different but there was a good discount on the photo package addon. Check the fine print, the Groupon voucher can only be used for the second tour. Enjoy your sleep-in. For non-US residents you won’t be able to purchase on your credit card as they require a card registered to a US address. Paypal however will work just fine.
Pro-tip #7: Get the photo package. The dolphins aren’t going to come right up to you and even with an underwater camera I wasn’t lucky enough to snap some good photos but with the photo package you’ll receive a USB with the images from your tour taken on a professional camera. Unless its something you do regularly, its probably something you’ll want to remember! You’ll also receive a selection of some of their best images. There was no video with mine and the water isn’t great visibility beyond a certain distance so its probably not worth paying the extra for that.
Photo reproduced with permission of Dolphins and You
The shuttle will collect you from a central location in Waikiki and transport you to Waianae Harbor, on the east side of the island, where you will board the boat for your trip. You will then be given your snorkel gear and wetsuit if you have hired one. Once the captain spots dolphins the call goes out to gear up and one by one everyone jumps in the water with one of the guides serving as the marker for everyone to gather around. We were lucky enough to have a large pod of Hawaiian Spinner dolphins resting beneath us, a few of which swam around or surfed the waves on the surface.
After the dolphin snorkel the boat will move to another location and guests have the opportunity for another snorkel, and the chance to see some more of the local marine life. Turtles are a frequent sight, as are the brightly colored fish. The crew will put out a selection of water toys, including a large slide off the top deck into the water.
Lunch is served while the crew puts on a hula show, before returning to the harbor and the shuttle back to Waikiki.
Activity Level: Moderate. While you’ll be equipped with buoyancy vests for safety this is an activity in the open ocean and you’ll need some level of swimming ability.
Price: USD $156 per adult and $100 additional for a video and photo package. I got it for $189 through Groupon. Wetsuits can be hired for an additional $10 per person and snorkeling gear is included.
Duration: For the second tour my pickup in Waikiki was just before 10am and I arrived back a little before 5pm.
Snorkeling at Hanauma Bay Nature Preserve
If swimming with dolphins isn’t your thing but you are still keen to fit in a water day then a snorkel at Hanauma Bay might be for you. I didn’t make it there unfortunately, but it was highly recommended to me by other travelers. Famous for an abundance of Sea Turtles and marine life within the reef, it is one of the most popular destinations on Oahu. Expect it to be busy, they will grant entry to only 3,000 visitors per day so get there early.
You can organise transportation and gear in advance, which also includes the USD$25 entrance fee.
It’s also important to note that Hawaii has passed legislation banning the sale of sunscreens containing chemicals which can be harmful to the reef. The one below is one of the few SPF 50+ in this category. It’s also useful to have your own towel and a waterproof pouch for your phone if you would like to attempt your own photos.
Hawaii is renowned for its shopping, and the shoppers of you are probably wondering when I’m going to give you time to indulge. Today is the day for you!
But first, a recommendation a little outside of the usual tourist stuff.
Before you head off for your day, you’ll have something to do at 7am for your day tomorrow so make sure to be in wifi range!
Hawaiian Ukelele Factory Tour
This was hugely appealing to me as an avid music lover and amateur musician, but the ukelele is so integral to the Hawaiian culture that I would encourage everyone to consider adding this to their trip.
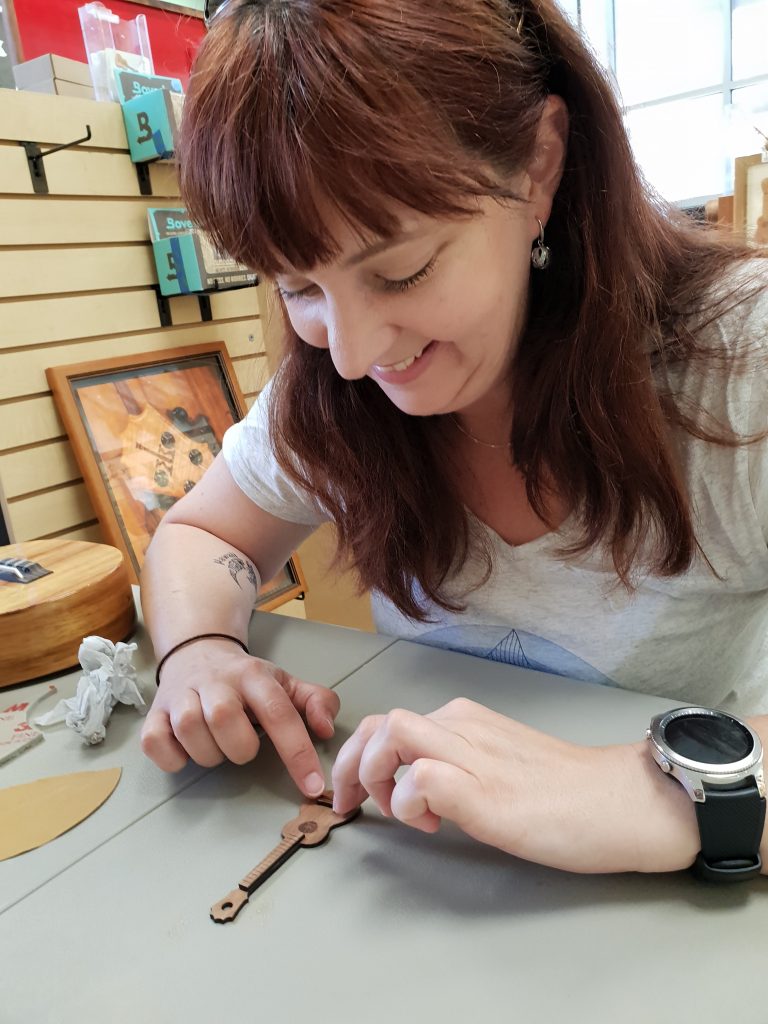
KoAloha Ukelele is a family owned and operated company that has been making premier quality instruments for over 20 years. The tour will commence in the showroom at 9am, with examination of the various ukelele’s on sale and constructing a miniature ukelele keyring to understand how the instruments are put together.
While the glue on your keyring instrument dries, your host will escort you into the factory itself and proceed to show you every step in the process of making the instruments, from the obtaining and cutting of the Koa wood, to the bending of the wood, construction and polishing. You will see what makes their instruments unique and innovative, and so highly regarded. Lloyd took me through the factory, and proudly showed me the wood that he had put aside to make the marital ukelele for his son. Due to the rare waves in the Koa wood, already an incredibly expensive material, the completed instrument will be incredibly valuable.
This is a really fun and interesting experience and I’m really glad I made time in my trip for it. Lloyd also passed on some great tips for the rest of my trip.
KoAloha Ukelele Factory is located on Kona Street in Honolulu. From Waikiki take the #13 bus and ask the driver to let you know when to get off. An all day pass for the bus will cost you USD $5.50, for as many rides as you want.
Pro-tip #8:The bus is one of the easiest ways to get around outside of Waikiki. On your phone bookmark the site moovitapp.com or download the Moovit app for up to date information on all routes and times.
Pro-tip #9: Carry the right change for your bus ticket. The drivers don’t carry change and the ticket machine will not dispense it either.
Activity Level: Light. The factory is small and there is minimal walking required.
Price: Free! Tours kick off at the KoAloha Factory at 1pm Monday to Friday.
Duration: 90 minutes
Shaping Ukeleles
Shopping at Ala Moana
I have paired a trip to the huge Ala Moana shopping centre with the Ukelele Factory as it is a 5 minute walk between them. There is a large food court and plenty of bargains to be found.
Pro-tip #10: The buses do have signs indicating that anything taking up a large amount of space that would prevent someone having a seat is not permitted. I took my small backpack and only had one additional carry bag, but if you shop up a storm you may need to look at an Uber back to your hotel.
If the Ukelele Factory is not your style and you’d prefer to spend the whole day shopping you may wish to think about a trip to the Waikele outlets instead. About 30 minutes from Waikiki, there are over 50 outlet stores at Waikele. You can book the Waikele shuttle to transport between the outlet and Waikiki hotels.
Pearl Harbor was without a doubt one of my favourite experiences in Oahu, and definitely one that is not to be missed by visitors. However there are some misconceptions about visiting that can be confusing. It is easy to think you need to go on an organised tour in order to be guaranteed entry, but this is not the case. While an organised tour might be exactly what you want to do, it’s important to understand what they do and don’t include when choosing your tour, and realise that they will often be quite time limited at the site and include other activities before or after that might not interest you.
I went solo to Pearl Harbor, and I spent the entire day and still ran out of time to see everything.
So lets start with the basics to help inform your decisions.
There are four locations as part of the Pearl Harbor historic site;
USS Arizona Memorial
USS Bowfin
Pearl Harbor Aviation Museum
USS Missouri
USS Arizona Memorial
The USS Arizona memorial is built over the remains of USS Arizona, sunk in the Japanese attack upon Pearl Harbor in WW2. It is currently unable to be boarded, as repairs are required to re-anchor the memorial to the floor of the harbor and the potential for un-exploded ordinance makes this a painstaking process. Boats run at regular intervals taking visitors out to the memorial and circling it instead, however, whether the boats will run is determined by the US Navy on a daily basis. The day I visited they did not run due to weather.
The Arizona memorial is incorporated in an audio tour narrated by Jamie-lee Curtis that is well worth doing.
USS Arizona Memorial
USS Bowfin
The USS Bowfin is a decommissioned US Navy Submarine active in both WW2 and the Korean War period, now permanently homed at Pearl Harbor. Visitors can board the Bowfin and walk through its interior. There is also an audio tour available.
Pearl Harbor Aviation Museum
A shuttle ride from the Arizona and Bowfin locations, the Aviation Museum is housed in two WW2 hangers and includes a number of WW2 era planes, flight simulators and a growing collection of other vintage aircraft.
USS Missouri
Also a shuttle ride from the Arizona and Bowfin the USS Missouri was the last US battleship, and the one upon which the parties to WW2 signed the document of surrender which ended the war. Visitors can spend hours walking the decks and passages of the ship.
USS Missouri
So now that you know what’s there, what do you want to see?
My view is prioritise the whole Arizona section with the audio tour, and the USS Missouri. I spent the bulk of my day on these two, with a quick walk through the Bowfin. I unfortunately ran out of time to visit the Aviation museum.
Pearl Harbor Tickets
Entry to the USS Arizona Memorial is free, however if you haven’t reserved a ticket you will need to rock up early and get one of the 1,300 tickets that get issued for the Arizona Memorial on a first come first served basis. The Visitors Centre opens at 7am.
These tickets will not include admission to the other three locations.
Tickets become available online for purchase and reservation at 7am the day prior to entry . I recommend the USS Arizona Memorial + Passport Package for USD $89.99 per adult. This includes entry to all four locations, audio tour at the Arizona and shuttle between locations. You will need to arrive at the Pearl Harbor Visitors Centre to collect your tickets at least one hour prior to your scheduled boat run out to the Arizona.
Pro-tip #11: Wear clothing with pockets, or find a clear plastic carry bag – I saw one person using a clear toiletries bag. Anything which can conceal items is not permitted on the site.
Getting to Pearl Harbor
Don’t do what I did and just assume you’ll hop on a bus.
You absolutely can, but as Pearl Harbor is nearly 90 minutes by bus and only about 25 minutes by car it does seem to be a waste of time.
If you don’t have a car, the Waikiki trolley runs to and from Pearl Harbor at less than USD $65 per person, which will likely be cheaper than an Uber.
If there is a group of you, I understand you can also organise a private shuttle. I couldn’t find information about this online but your hotel should be able to assist. Uber would also be cost effective for more than one person.
Otherwise the push seems to be to get you on an organised tour.
The GoOahu card is worth a look, it offers discounted rates on many Oahu attractions, including Pearl Harbor.
Activity Level: Moderate. It’s not difficult but be prepared for a lot of walking.
Price: Passport package covering all four sites is USD $89.99 per adult
Duration: I arrived a little after 9am and ran out of time for the Aviation Museum, even staying til nearly 5pm.
For more detail on Pearl Harbor, including the most frequently asked questions, you can check out my post on Pearl Harbor here.
Day 6 – Scenic/Physical Activity
Sunrise Photography
An early one this morning as you head to one of the top spots for a Waikiki sunrise as recommended by the boys at Hawaii Photography Tours.
The length of your stroll will of course depend on where you are staying, but you are going to be heading for the Hilton Hawaii Village and then walking around behind it, where you will find a rock jetty that offers a great view of the sun rising over Waikiki. The morning I did this there were probably another fifteen people that showed up so the earlier you can secure a spot the better. It also means you can capture the great pre-sunrise light too.
Sunrise over Waikiki
My favourite shot of the morning actually came from the lagoon nearby, walking around the far side to capture the reflections on the water.
Sunrise reflections
Pro-tip #12: Don’t forget your tripod!
After the sunrise take a stroll down along the beach for more photo opportunities before the beach gets crowded.
Treat yourself to a nice breakfast on the beach. Dukes does a great buffet.
Activity Level: Light. An easy stroll.
Price: Free
Duration: Approximately 2 hours
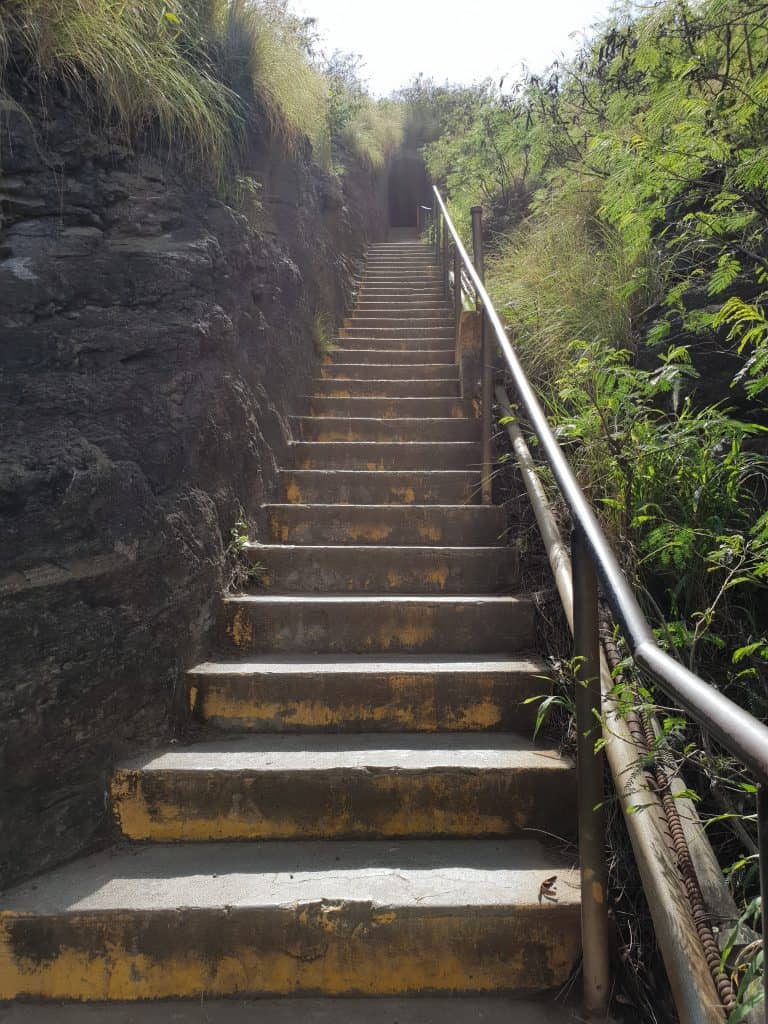
Hike Diamond Head
You can see Diamond Head looming from just about everywhere in Waikiki. The 760 foot summit of the extinct crater offers spectacular panoramic views and the chance to see more remnants of WW2, as it served as a lookout post for the US military.
Diamond Head is a really easy bus ride out of Waikiki on bus route #23. It does however mean a bit more of a walk than if you have a car, as the buses do not go right up into the crater where cars are able to park for a fee. If you want to extend your hike even further you can walk from Waikiki to Diamond Head in about an hour.
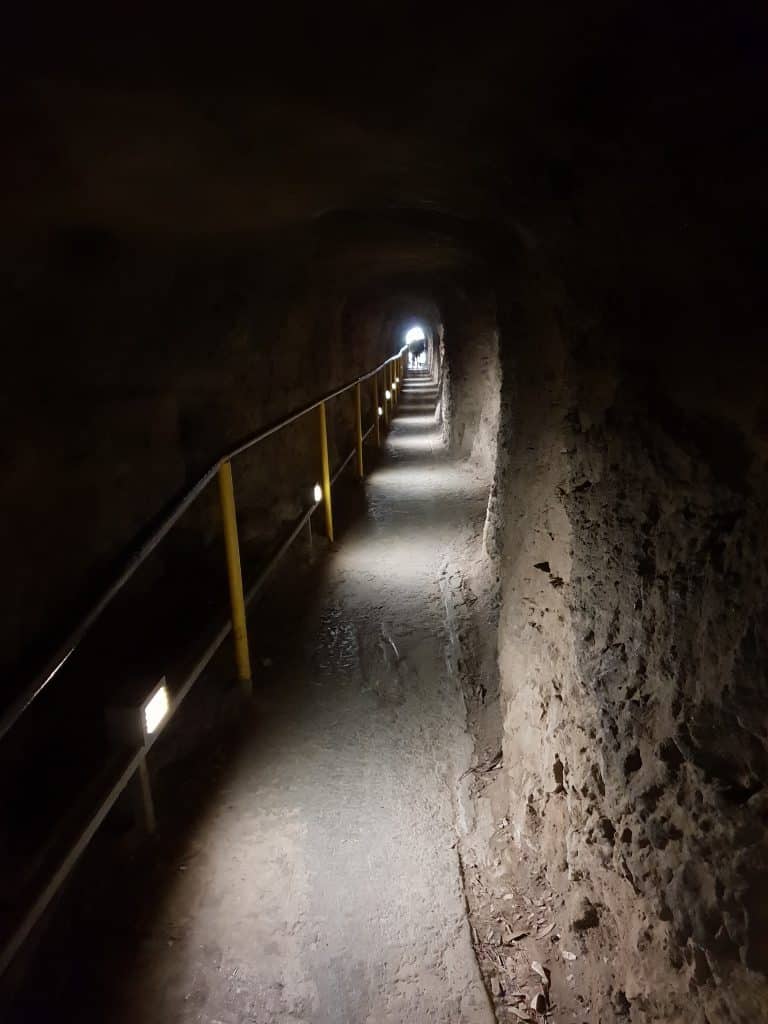
While not what I would call a challenging hike, it will definitely get your heart rate up as you climb. The path has been roughly cemented, so while you aren’t clambering over a lot of loose rocks you will still need good footwear. There is also a couple of sets of stairs and a tunnel through the rock which was pretty cool. There are plenty of spots on the way up to stop and catch your breath.
Tunnel through rock
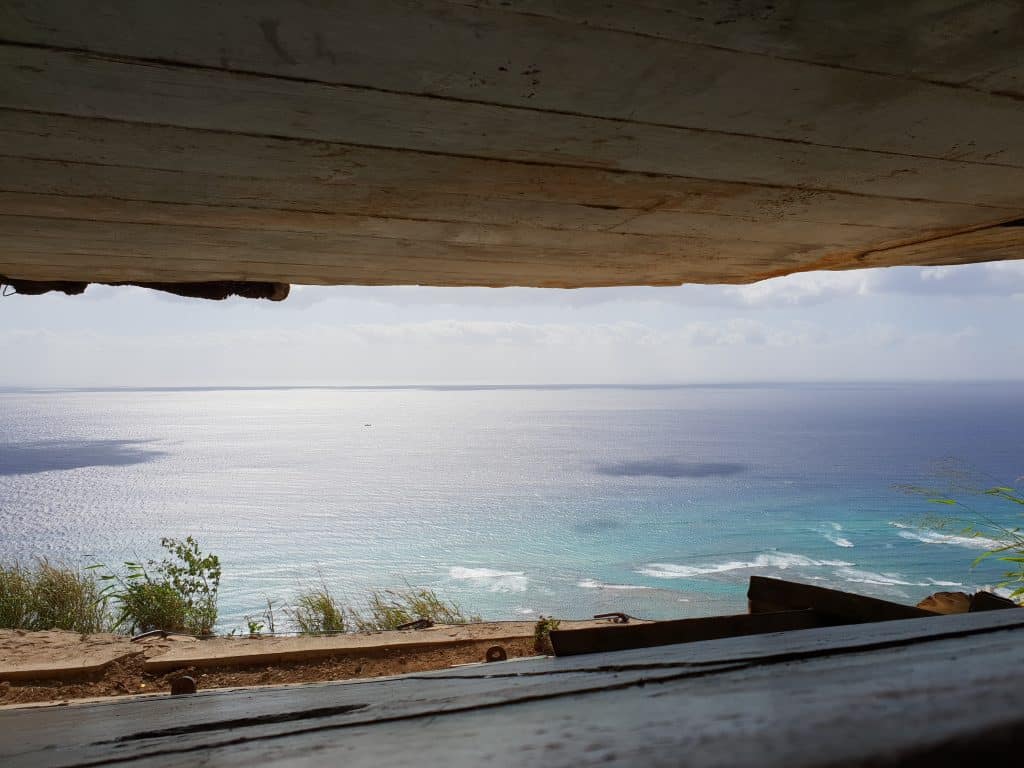
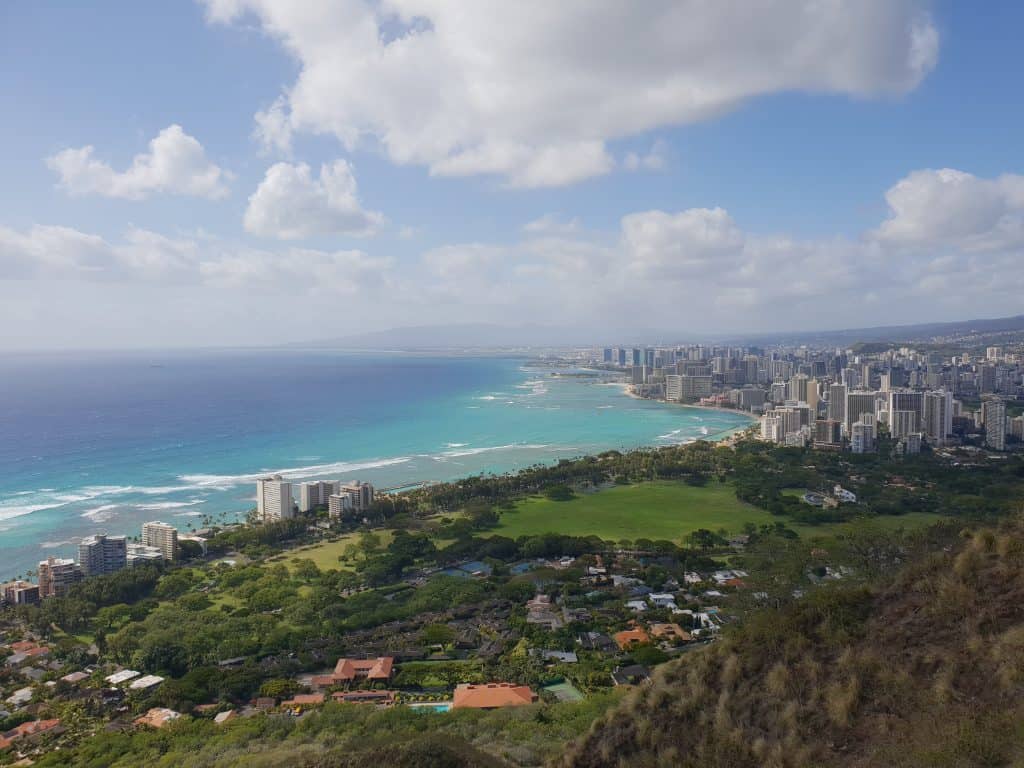
The views from the top are pretty exceptional, it is easy to see why it was a military lookout point.
View from inside the lookout point
Waikiki and Honolulu from top of Diamond Head
If you are so inclined, I did read that it is a good vantage point for sunset from the top. Ensure you commence your hike prior to last entry at 4.30pm and park outside of the crater grounds to ensure you don’t get locked in.
Pro-tip #13: This is an activity for earlier in the morning or later in the afternoon. Avoid the heat of the middle of the day.
Activity Level: Potentially vigorous depending on your pace. It isn’t difficult but you are going up a 760 foot summit so it will lift your heart rate.
Price:USD $1 entry to the hike plus $5 if parking your vehicle. By bus $5.50 for a day pass.
Duration:Depends on your pace, and how long you spend at the top. Best to allow a few hours as the hike itself takes 1.5 – 2 hours.
Manoa Falls was also on my list to hike but I unfortunately ran out of time. If you’re after a waterfall hike it’s definitely worth a look!
If you’re after a hike on the other side of the island, take a look at Crouching Lion.
If a guided tour is your preference, some options are below.
Plan to spend your morning packing as there is a good chance that your flight is going to leave early tomorrow.
Pro-tip #14: Make sure you have your airport transfer organised!
My final day was an example of best laid plans going awry, so I’m going to include what I had planned to do, as well as what I actually did!
Option 1: Luau
A Luau is a traditional Hawaiian party or feast which usually includes some form of entertainment. There are countless options and they are quite expensive, but it is a traditional experience that most tourists like to enjoy at least once.
After a lot of research I had planned to attend the Polynesian Cultural Center, appealing due to incorporating other activities in addition to the dinner and shows, making it better value in my view. It is essentially a theme park within and is well reviewed by guests. It is on the other side of the island so about an hours trip from Waikiki, but transfers can be purchased in addition to your ticket. It is also an alcohol free venue.
Activity Level:Light
Price: Dependent on the package prices start at USD $119.95 and go up to $242.95 for adults. The mid-level package that includes entry to the park, dinner and show is $139.95
Duration: 9 hours commencing at 12noon
Some other Luau choices are included below.
Option 2: Sunset Cruise
This option gives you the most part of your day to play with if there is any last minute activities or shopping you want to squeeze in. This is what I actually ended up doing on my final night in Waikiki and even got to witness a proposal and whales breaching in the distance!
My trip departed from the pier and traveled out into the open water, following the coastline. We had spectacular views of Diamond Head, the sun setting over the ocean and colourful skies over Honolulu.
My trip was privately organised, but some options are below.
Pro-tip #15: Remember a light jumper or jacket, it can get cool and sometimes wet!
Pro-tip #16: Take anti-nausea pills beforehand if you are prone to motion sickness.
Activity Level:Light
Price:From USD $78
Duration: 90 minutes – 2 hours
Day 8 – Goodbye!
Say your farewells to this amazing place as you leave for home!
If you’ve never been to Hawaii before, you’ll find when you start researching that there really is an astonishing amount to do that could fill far more than 7 days in Oahu. This itinerary does give you a taste however, and a little bit of everything!
It is worth at least taking a look at the Go Oahu card to see if you can save some money on local attractions. It includes discounts to numerous Oahu attractions and activities, including Pearl Harbor and the Polynesian Cultural Centre, and can prove good value if you want to do enough of the attractions covered
Planning a visit around the islands of Hawaii? Check out Hawaii Island Hopping, or if you are planning to head over to Maui here are things to do in Maui on a budget.
If you’re the kind of traveler who likes to have their guide at their fingertips, you can also purchase a digital guide to Oahu with kids.
I was lucky enough to spend a little over five weeks traveling in five countries in January 2018. Yet there was one that prompted more questions than any of the others I went.
Cuba.
It’s understandable. Cuba is a very different society to most others in the world, and unlike other countries with similar systems it is somewhat insulated being an island. It is alluring and mysterious, a gem tucked away in the Caribbean seemingly frozen in time. If you’re planning to travel there, there are a few facts about Cuba you need to know.
For my part, there were so many questions before I went, and I spent months researching. Many answers were conflicting when they were even able to be found.
While I’ll be detailing my adventures in Cuba in good time, I thought I would answer some of those essential questions and provide the facts about Cuba in the meantime for those planning their travel.
This post contains affiliate links. Making a booking or purchase through these links comes at no additional cost to you and is a great way to show your support for this site.
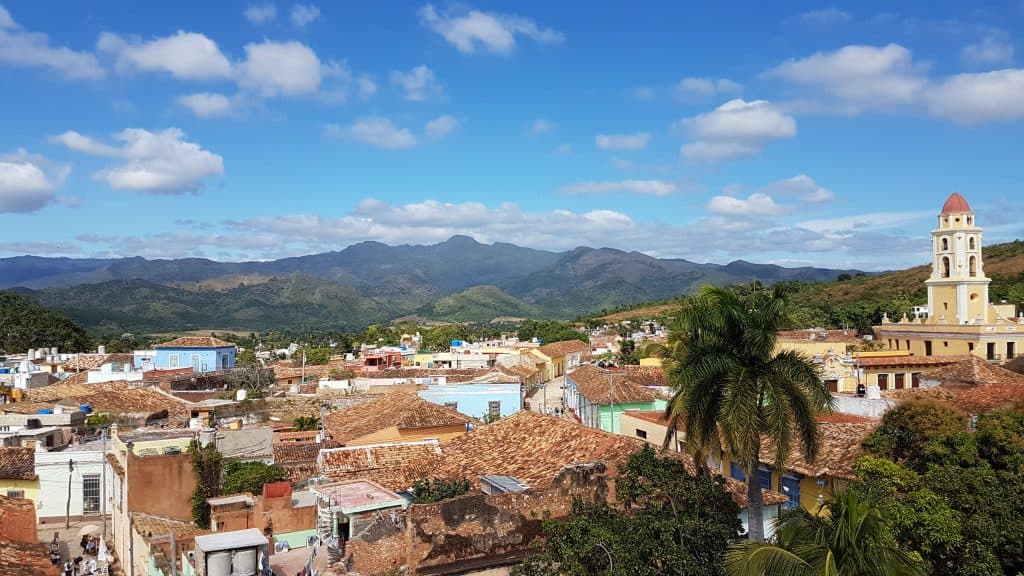
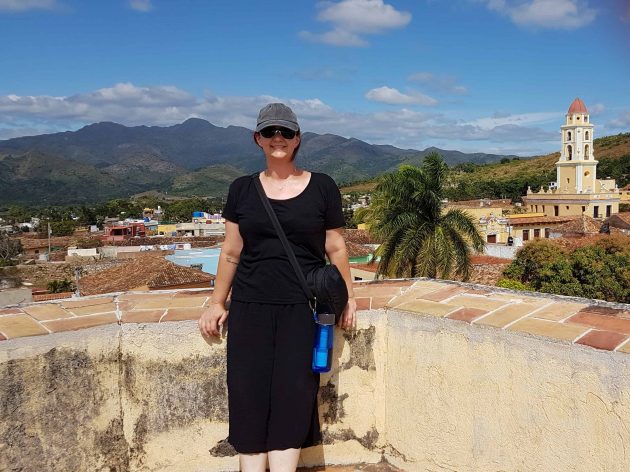
Trinidad from the top of the Museum of the Revolution
Money in Cuba
There are two currencies in Cuba, both called Pesos. As a tourist you are only likely to come into contact with the Cuban Convertible Peso, which is worth seven times the local Cuban peso. It’s important to realise the difference so you don’t get ripped off. The local one is being used less and less, so in the future we may see a move to the one currency.
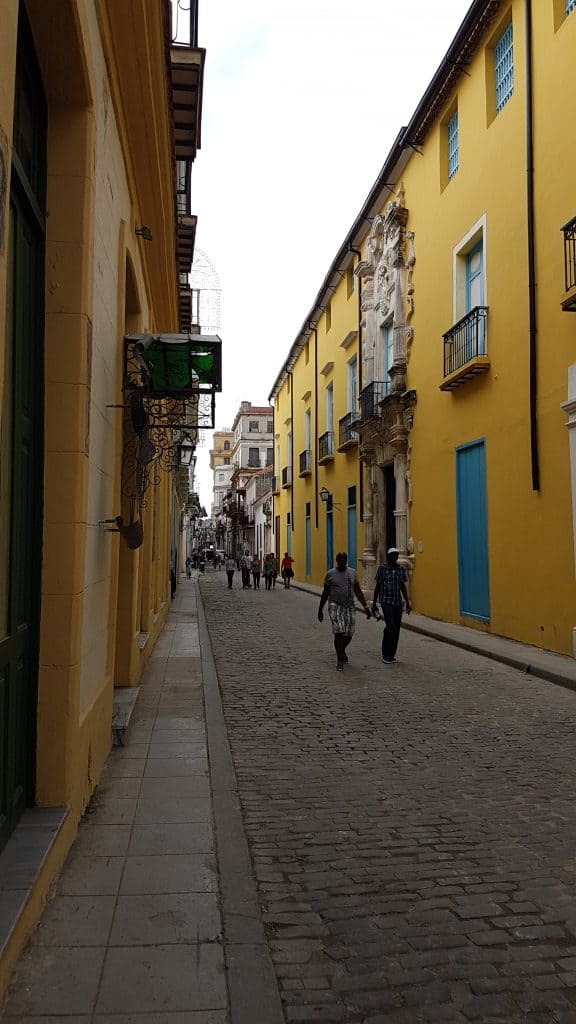
Havana street
Cash is king. ATM’s are available but they aren’t on every street corner like you expect in a western country. Essentially where there is a bank you will find an ATM. You are very unlikely to find EFTPOS or credit facilities in stores or restaurants, unless you happen to be in a big hotel.
Cuban Convertible Pesos are not available outside of Cuba, so don’t expect to be able to obtain currency before your Cuba vacation. You will be able to complete a Cuban currency exchange immediately when you walk out of the airport doors. The best currency to take to Cuba is Euro, Canadian and the English Pound. I took a bunch of Mexican Pesos since I flew into Cuba from there and these were changed with no issue, but check exchange rates before you decide what currency to take to Cuba to see what will give you the best rate. They will exchange American dollars, which on face value give you the best rate as the Cuban Convertible Peso is matched against them, but a 10% penalty is applied to exchanges of US dollars, so it will ultimately leave you worse off than the other currencies.
As with any country you travel to it is a good idea to have multiple sources of funds, and it is the same with Cuba. However, it’s also pretty hard to get a clear answer on what will work in Cuba and it was a source of considerable stress to me. I ended up taking enough cash for the trip in both Euro and Mexican Pesos, because I was unable to get straight answers on what would work. According to the forums anything affiliated with the US is out, as is anything Mastercard. For the Aussies they say Westpac doesn’t work, and nor will anything branded as a travel card. I did see that some people had success with a card from the Bank of Melbourne.
When I arrived at my Casa in Havana the desk attendant told me to try my card anyway, saying with a shrug “This is Cuba, who knows.” I didn’t try my St George Visa debit but I did successfully withdraw from my Qantas Frequent Flyer card in both Havana and Trinidad – which contradicts what I had read about both Mastercards and travel cards.
In a nutshell; take cash to Cuba.
I was told you cannot remove the currency from Cuba but I didn’t see this being enforced when I flew out. But I tried to spend up what I had anyway.
In regards to costs, I found Cuba pretty cheap. My accommodation and transport had been paid beforehand, food wasn’t expensive and alcohol is definitely cheap, especially rum. If you budget $100 CUC a day you’ll come home with plenty of change.
Visa for Cuba
The hotel in Havana where Hemingway famously wrote. His room was on the top floor.
You will need a Visa to visit Cuba, but there is no need to organise this prior to your trip as they are readily available at the airport. I forgot all about it and they sold me one while I was in the line waiting to check in to my flight.
If you are a non-US resident and are flying to the US out of Cuba, have your ESTA paperwork handy. They wouldn’t check me into my flight to Miami without showing it.
Language in Cuba
Do yourself a favour and learn some basic Spanish before you travel to Cuba. You will get by on English in the main tourist areas but I couldn’t even find someone who spoke English in the airport and struggled to get through even with some basic Spanish.
While we are at it, you cant bring a radio into Cuba. Expect some scrutiny at the x-rays if there is anything in your bag that resembles one, like a powerpack.
Sanitary products in Cuba
Ladies, this one goes out to you. Not because it doesn’t effect men, we just have more specific needs in this department.
Everything you need, you bring with you on your Cuba vacation. Don’t expect to be able to replace anything you run out of. Supermarkets, when you even find them (I saw one) have no guaranteed stock of anything. No one knows when deliveries will arrive and what they’ll contain.
This goes for toiletries, sanitary products and any medications.
While we’re at it, let’s talk about the bathrooms in Cuba. It’s a good idea to pop a few purse packs of tissues in your luggage, toilet paper is a luxury you won’t find everywhere. Like most of Central America you can’t flush it and in Cuba you’ll be lucky if there’s a toilet seat. And if you manage to close the cubicle door with your knees inside. At 5’7″ there were times I struggled to.
And keep your eyes forward. Trust me on this. Cuban’s are not a tall people.
Accommodation in Cuba
Home sweet home, our Vinales Casa
Tourism in Cuba has traditionally been the province of the Cuban government, and as such you will find most of the hotels are government owned.
Though there are still stringent requirements tourism has been opened up to the locals and casa particular’s provide a cheaper and often equally good alternative to the government hotels.
Provided they comply with the strict regulations local homeowners can apply to open their homes and rent out their spare rooms to tourists. A different classification of casa is available to other Cubans.
They are clean and comfortable, and the people are incredibly generous and eager to look after you. You won’t manage to eat all of the breakfast that gets put in front of you! When you are looking for your accommodation in Cuba you will find casa’s listed on AirBnB. I stayed at La Gargola in Havana.
Outside of the cities your hosts probably wont speak English. And you should absolutely get out of the city. Vinales is beautiful and charming. See the real Cuba and check out how to spend four days in Vinales.
Our room and rooftop at our casa in Vinales
Cuban locals
The Cuban people are warm and friendly and will make you feel very welcome. They will however, take any opportunity to make money off tourists in order to support themselves. Don’t expect to take a photo of any performers without handing over some Pesos, and if you stop for a moment or make eye contact with a musician you’ll be asked for a tip. I was asked for one from performers at a cafe I had literally just sat down at. I watched one man with his dogs dressed up trying to explain to a group of Japanese tourists that they had to pay him for the photos they had just taken.
One woman in a museum in Havana made great show of concealing me from watching security cameras while encouraging me to take photos of exhibits which were not allowed to be photographed. Before I knew what was happening she had my phone out of my hand telling me she would take photos of me. I had to pay to get it back, and she didn’t hand it over until she was satisfied I had placed enough Peso’s in her hand, then trotted back to her post with a smile. Her photography skills were terrible.
Funny story, photos not so much!
Everyone has something on the side. The drivers of my horse-drawn carriage took me to one of their mates who attempted to charge me a ridiculous amount for cigars. Which I ended up paying just to remove myself from the situation. I figured it wasn’t a huge amount of money for me, but it was a lot to them.
See Havana from a horse-drawn carriage – but bargain on the price!
Safety in Cuba
As a woman traveling alone I’m always hyper-conscious when it comes to my own personal safety, but there was not a moment when I felt unsafe in Cuba, not even walking the streets of Havana alone in the middle of the night.
If you are a woman alone though, expect to be propositioned by virtually every man that goes past, asking if you are looking for a husband. It’s annoying, but it isn’t threatening, I just had ‘no gracias’ on repeat and there was no one that didn’t take my polite no for an answer. I was told most crimes in Cuba are crimes of passion.
Food of Cuba
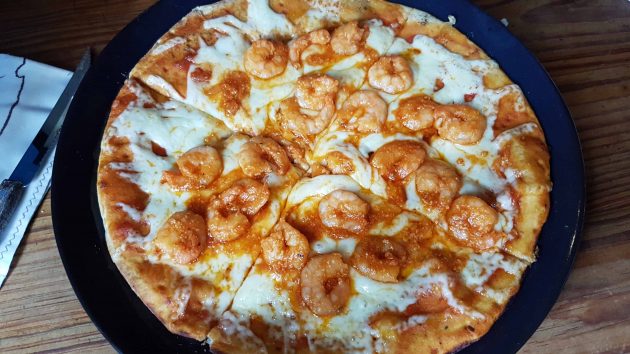
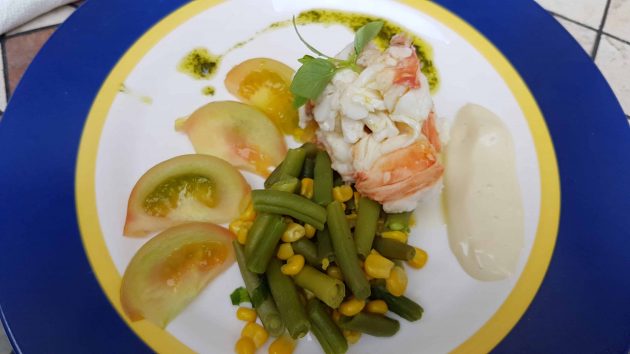
I had read that food in Cuba was quite bland, but that was not my experience at all. There was heaps of variety and it was all quite delicious. Expect to see a lot of Seafood being an island. I had some really delicious lobster a couple of times in Trinidad as well as an amazing prawn pizza, chicken schnitzel in Cienfuegos and local dishes straight from the harvest on a farm in Vinales. Breakfast always included eggs, a plethora of fresh fruit and often cakes and pastries. The Coconut Pie I was served in Havana was simply to die for!
From farm to table in VinalesPrawn pizza in TrinidadI had this lobster salad in a little cafe on the corner of one of the main plaza’s in Havana. They also had the best coffee I found!
The coffee wasn’t to my taste, though several people I traveled with enjoyed it. I preferred the Guatemalan coffee.
Don’t expect to find any version of western fast food. The closest you’ll get is a pizza shop selling by the slice from their window. It’s refreshing.
Access to the internet in Cuba is a mission. In order to utilise Wi Fi in Cuba, when it is even available, you will need to purchase a card from the Telecommunications supplier. They aren’t particularly expensive at roughly 1 CUC for an hour, but they are in demand. I waited in line for over 90minutes in Havana just to get one. You can often find locals on-selling them at a higher rate.
Once you have a card, you’ll need to find Wi Fi. There are a few designated spots in Havana, if you see a bunch of people standing around with their phones its a good bet you’ve found one. Don’t expect small hotels and restaurants to have Wi Fi on offer like elsewhere in your travels, but even if they do you’ll still need the card. I found Wi Fi was easier to find outside of Havana in the smaller towns but its not something that every household has like in the western world. There was talk of internet access being extended though so this may improve.
Many of the people I traveled Cuba with largely gave up on internet due to how difficult it was. In my eight days there I didn’t even go through the five hours credit I bought, and a chunk of that was killing time at the airport waiting for my Miami flight.
Havana international airport
Take food. Once I was through the checkpoints there was nothing to purchase to either eat or drink.
Using a mobile phone in Cuba
Mobile phones will work, but sporadically. I took my mobile with a global SIM, I did find out it wasn’t connecting to the network settings properly once I got to LA, but some of the messages I sent were received while others weren’t, and I didn’t receive many of the messages sent to me. Best let people know not to worry if they don’t hear much from you for a while.
Don’t take photos of the military
Unless you feel like spending a few hours in a room without windows being questioned.
The culture of Cuba
The Cubans are a really happy people. They don’t have much, but they don’t know any better. You have to wonder if the increasing access to the rest of the world with the internet will change this.
The streets are filled with music and you don’t have to look too hard if you want to find somewhere to dance. The Cuban’s learn to Salsa at school so they are almost born with rhythm in their bones. I danced in both Vinales and Trinidad.
They also love their rum. Expect any cocktail on a menu to have this key ingredient.
It should be noted that animal welfare is not of the same importance as elsewhere in the world. My companions and I were distressed by the treatment we saw some subjected to.
Expect Cubans to be curious. Most of them are restricted from traveling outside of the country so they’ll be interested in hearing your experiences.
Statue of Benny More in Cienfuegos, regarded as the greatest Cuban singer of all time
Drinking water in Cuba
Like Central America, Cuba water is not safe to drink from the tap. If you don’t want to buy bottled water you can buy water purification tablets or invest in a water bottle with an inbuilt filter, like the Lifestraw.
Me in Trinidad with my trusty Lifestraw water bottle
Medical in Cuba
Apparently tourists have easier access to Doctors than locals in Cuba. But as with everything else in Cuba medical supplies are not guaranteed to be available. You are best prepared with your own travel medical kit before you travel to Cuba. I got the worst bout of Gastro of my life and my kit was a lifesaver!
It is also a requirement to have medical insurance when entering Cuba. Check when purchasing your Travel Insurance that it meets the requirements set out by the Cuban Government. It may be checked by airport officials when you arrive and if they are not satisfied you will be asked to purchase coverage on the spot.
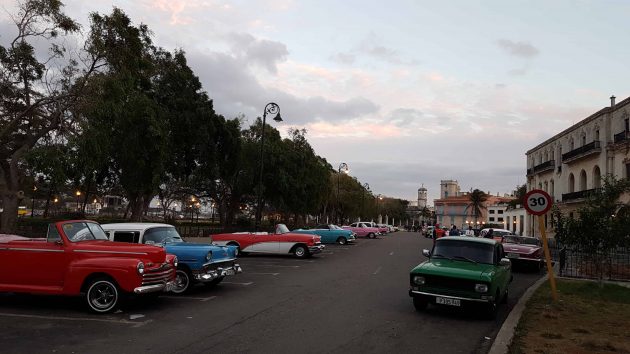
Step back in time
Many people who visit Cuba expect to see nothing but cars from the 50’s, and I was much the same. So I was surprised to see plenty of newer cars on the roads, among the 50’s cars and even horse-drawn carts. Many of the farmers can’t afford a car so horse and cart is still a common form of transport.
You will see more old-era cars in one place than anywhere else though!
Cars lined up in Havana
Giving gifts in Cuba
You won’t notice it so much if you stay in Havana, but if you venture out into the smaller towns you’ll notice a lot of people that don’t have a lot, and appreciate many of the things we take for granted. Cuba was my second last stop and I pilfered hotel toiletries the whole trip leading up to it. I also took the opportunity to lighten my bag of anything I didn’t need for the last few days of my trip, including some clothes. If you’re on an organised tour your group leader will make sure these items get to where they’re needed.
Cigars in Cuba
Everyone’s heard of Cuban cigars! If you want to take some cigars home from your travel to Cuba make sure you check the restrictions for getting them back into your country. Australia has lowered the duty free weight allowed and will hit you with duties on the full amount if you go over. Buy direct from the farmers or government run stores to ensure you are getting the real deal.
Cuban Dance
The Cubans are born with rhythm in their veins, and they all learn how to Salsa at school. If you want to dance it’s not too hard to find somewhere and someone to dance with. I danced in both Vinales and Trinidad, I didn’t get the time in Havana but I heard of several clubs where you could go. If you are a woman that dances LA style salsa, you might find the lead a little softer than you are used to.
Be prepared that Cuba is a very different country. Their system is based on an equal distribution of wealth which was established after the revolution, but if you venture outside of Havana you will see that disparity has crept back in. Many people still live in poverty and everything is government regulated. You are unlikely to find anything made outside of Cuba. Che Guevara is a national hero and you will see reminders of this fact everywhere. You may see soldiers working beside the road as part of their compulsory government service, if they wish to continue their education they will complete an additional year. It wouldn’t surprise me if the internet is closely monitored through the use of the cards issued from their Telecommunications authority. It is a country with considerable history, culture and beauty and well worth experiencing.
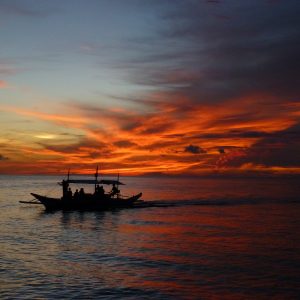
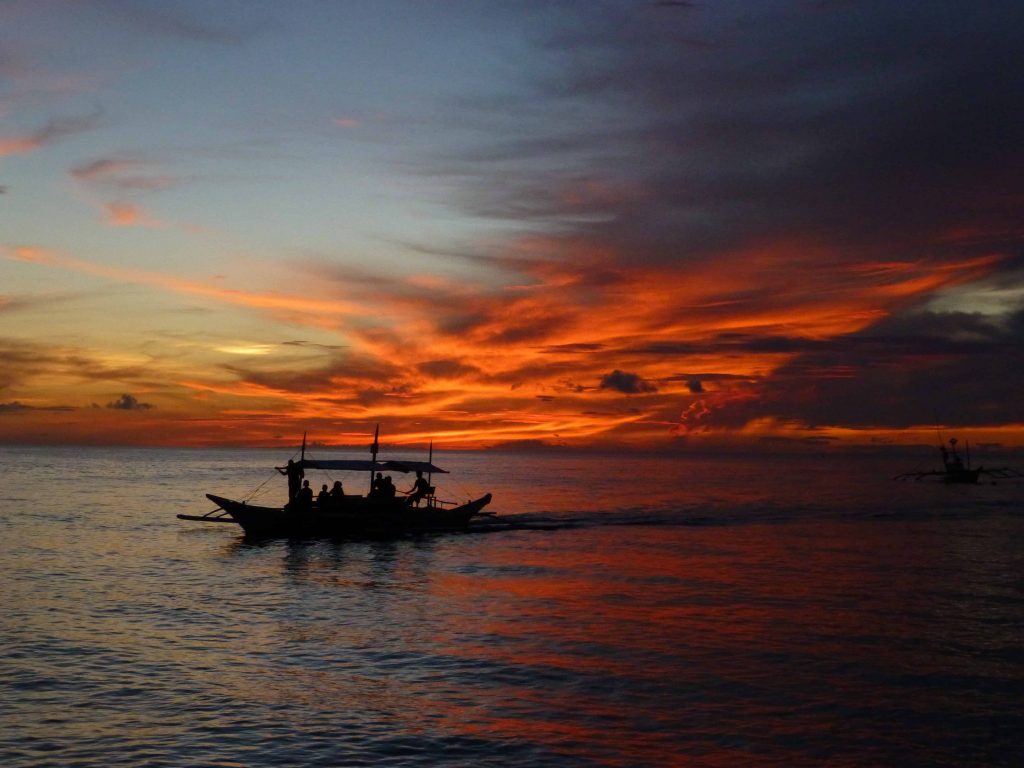
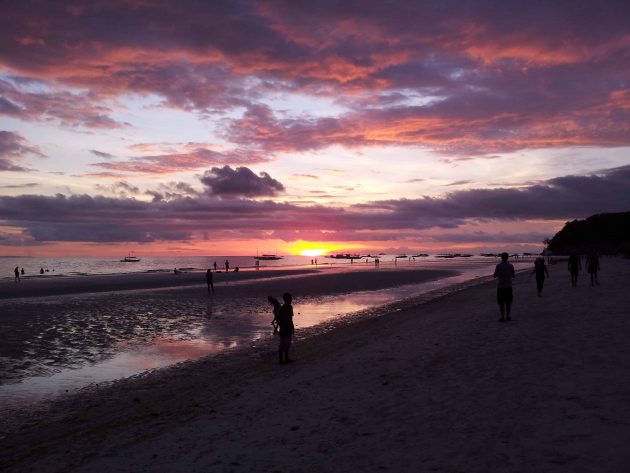
I’d never considered the 7000 plus islands of the Philippines as a holiday destination, and possibly wouldn’t have if not for the fact I was invited to attend an event there. But if you’re looking for an alternative to Thailand or Bali within a budget, then Boracay is definitely worth a look!
Boracay was ranked number one island in the world in 2012, and with good reason; undulating white sands, crystal clear aqua waters teeming with fish, sunny days, amazing food, local culture and a nightlife to rival the big cities.
And the Boracay sunset is truly a sight to behold!
This post contains affiliate links. Making a booking or purchase through these links comes at no additional cost to you and is a great way to show your support for this site.
Getting to Boracay
Boracay is a small island serviced by the airport on nearby Caticlan, a short boat ride away. Air Asia fly to Caticlan from Kuala Lumpur but otherwise the easiest way to get to Boracay is to fly to Manila and hop on local carriers Cebu Pacific or Philippine Airlines. I found Philippine Air had a good range of flight choices and were friendly and efficient. Beware they will charge on excess baggage though!
If you’re looking for adventure or maybe save some dollars you can take an overnight ferry from Batangas to Caticlan, which will set you back $10 – $60 depending on what kind of accommodation you want. The catch is you need to make it from Manila to Batangas to get on the ferry, while there is a bus things work a little differently in South-East Asia and it won’t leave until it’s full, potentially a problem if you’re on a schedule. You can hire a driver for around 4000 pesos, roughly $100.
Getting a boat taxi from Caticlan to Boracay, and a taxi to your motel from there is easy enough, but it’s worth getting a quote on your hotel arranging transfer for you. I made my own way over but had the hotel arrange the transfer back and the 400 pesos (about $10) they charged was well worth the convenience of being transferred door to airport. Plenty of porters are available to help with luggage but keep coins handy as they will ask for a tip. Around 40 pesos is standard.
Where to stay in Boracay
Where to stay in Boracay depends on the kind of holiday you’re looking for.
Boracay is a long island with stretches of beach on each side. On one side is Bulabog Beach, famous for kitesurfing due to the winds channeled by the island’s hills, which also make it slightly cooler. I only went to this side during the night so I can’t say what it was like at day, but at night it was quiet.
The other side is White Beach, a 4km stretch of white sand that is the tourist centre of the island and always bustling with activity! There are plenty of reasonably priced resorts lining the beach to choose from, or houses you can hire as a group.
Make sure your accommodation is air-conditioned. It will make your stay a whole lot more comfortable. Regardless of which side you stay it is only about a 15minute walk to cross from one side to the other.
We stayed at Casa Pilar Beach Resort. It wasn’t anything fancy, but it was clean and comfortable and breakfast was included. It was also centrally located and on the beach.
When to go to Boracay
The low season runs May – October. There are less tourists however higher rainfall and cooler temperatures.
During high season, October – May, White Beach is protected from the winds on the other side, but it is also peak season for tourists. Temperatures range from 28-38 degrees and humidity can be high depending on the direction of the winds. Expect tropical temperatures and don’t pack much in the way of clothing, it doesn’t cool down significantly at night and you’ll mostly wear swimmers, t-shirts and shorts. Most hotels will offer you an overnight laundry service for cheap rates.
Best restaurant in Boracay
The food is amazing and there is plenty of variety! I can only recall having one average meal and that was because I didn’t like the flavour of the particular fish, not through any lack of quality in the dish. There’s also a beachside McDonalds, which had to be tested though it looked out of place! It had more menu options than Australia and was the best McDonalds I’ve had in my life!
If you love your seafood, you NEED to visit the fish market (D’Talipapa) located in the centre of a square. Buy your seafood directly from the fisherman who caught it that morning, some of it still alive! Whatever they quote you, halve it and give that as your first offer. Once you’ve purchased your seafood pick one of the cooking services surrounding the square, choose from the menu how to have it cooked, pay your money and take a seat. I can recommend Plato D’Boracay Resto – the food was amazing and even a local told us it was the best! We had a 1.2kg Lobster cooked in red coconut curry and 2kg of Prawns cooked in chilli, for about $70 between three of us. Don’t expect the same prices on meat though, it’s imported and $30-$40 for a steak.
The fish market in the centre of a square of the D’Talipapa1.2kg Lobster cooked in red coconut curry
Things to do in Boracay
There’s plenty of things to do in Boracay but in my opinion if you aren’t looking for a holiday where you lounge around not doing much then it has a lifespan of about a week before it all starts to feel a bit the same.
During the day White Beach is a bustling strip of restaurants, shopping and locals selling their services. I found one of the hardest things to adjust to was the value of money. Being a 3rd world country what is so little to us equates to so much there, and you will be quoted ‘foreigner price’, which isn’t alot of money but is still overpaying. Feel free to bargain at the street stalls and with street sellers, it feels a little mean but it’s the done thing. However in the proper stores and restaurants you pay what is asked. As a general rule, if you have to ask them what the price is you can negotiate.
White Beach by Day
At night White Beach transforms into another world! Restaurants and bars materialise on the beach serviced by the permanent establishments there during the day. Performers earn their living on the strip with fire dancing, music, acrobatics, beach sculptures and whatever talents they can. Save coins up during the day for strolling the strip at night as there are some exceptionally worthy performers. Alcohol is amazingly cheap, during happy hour you can expect to pay around 150 pesos for two cocktails, that’s about $3.75, and there are plenty of bars and clubs to party.
The transformation of White Beach at night
Alcohol is so cheap!
Don’t miss the chance to have a massage! At about $12.50 for an hour full body massage you could try a different place every day! I recommend the Paradise Gardens resort, which happened to be near my hotel. They have a closed in canvas tent set up on the beach which is cooled, you have complete privacy, an amazing masseuse and the soft lapping of the ocean to lull you.
From White Beach you can organise Helmet Diving, Scuba Diving, Glass Bottom boat, Island hopping, Parasailing, jet boating, island tours, snorkeling and a range of other activities. While these will be offered by spruikers all along the strip I’d recommend finding the actual stores selling them. A sunset cruise is worth it with a group, and I really enjoyed the afternoon on a glass bottom boat.
A sunset cruise is worth it for these views!
Boracay has some of the most spectacular sunsets I’ve ever seen, definitely take a stroll on White Beach at sunset. Purchase a waterproof pouch for about 100 pesos, which comfortably fits your phone and money and enables you to strip off and run into the warm waters whenever you please. Any valuables you can’t keep on you should be left locked in your room. You will need cash, but the strip has plenty of places offering competitive exchange rates, and a number of ATM’s. I recommend changing some cash before you go and taking currency with you to change there and save on ATM fees.
Taking a sunset stroll on White Beach
You need a Typhoid shot before you go, and it’s a good idea to carry a travel medical kit with you. The biggest battle we had was staying hydrated so packing hydration tablets is wise. The tap water isn’t safe to drink, and we were cautious to not have ice in drinks until we found out that it’s produced from filtered water on the island.
If you’re new to this part of the world be prepared to see a lower standard of living outside of the tourist hub. Beggars, particularly children, are common in the tourist parts. Which is why you can’t leave any valuables lying around.
I spent eight nights in Boracay and four in Manila. Flights, accommodation, all food, alcohol, activities and spending money set me back less than $2500. It’s a beautiful part of the world and I couldn’t help but look around and wonder how long it would be before we destroyed it. Boracay in fact shut down for six months in 2018 to correct a number of problems, read about Boracay after its 2018 closure.
Like my photos? These were taken on an older model point and shoot Panasonic Lumix with a Leica lens. The latest model features an amazing 60x zoom!